 One Community
Duplicable City Center Lighting
This page is about the development of the lighting plan for the Duplicable City Center. It is purposed to share the important developments and considerations made in relationship to the interaction of light, energy conservation, and aesthetics in this structure. This page includes the following sections:
- What is an Eco-Lighting Plan
- Why Open Source an Eco-Lighting Plan
- Ways to Contribute
- Eco-lighting Design Details
- LEED Lighting Points Explained
- Implementation Guidance for LEED Lighting
- Applying LEED in the Duplicable City Center (Case Study)
- Resources
- Summary
- FAQ
- Consultants for this component of One Community
NOTE: THIS PAGE IS NOT CONSIDERED BY US TO BE A COMPLETE AND USABLE TUTORIAL UNTIL
WE FINISH CONSTRUCTION OF THE DUPLICABLE CITY CENTER AND ADD ALL THE VIDEOS AND
EXPERIENCE FROM THAT BUILD TO THIS PAGE – IN THE MEANTIME,
WE WELCOME YOUR INPUT AND FEEDBACK
RELATED PAGES


")

")
")
")
")
WHAT IS AN ECO-LIGHTING PLAN
 Designing an eco-lighting plan means creating a maximally energy efficient and functional plan to meet all of a structure’s lighting needs. It saves energy and reduces up-front energy infrastructure costs in off-grid village construction. As a component of achieving LEED Platinum certification, lighting is also a big part of 25 possible points of 80 needed (out of a total of 110) for LEED Platinum qualification.

Duplicable City Lighting Zone Plan – Click to enlarge
WHY OPEN SOURCE AN ECO-LIGHTING PLAN
 One Community’s goal in open sourcing the Duplicable City Center eco-lighting plan is to help people interested in more sustainable lighting approaches, saving money through reduced energy usage, and/or curious about the process of maximizing lighting-related points for LEED Platinum certification. These goals are also part of our Highest Good Energy plan for do-it-yourself and replicable teacher/demonstration communities, villages, and cities.
WAYS TO CONTRIBUTE TO EVOLVING THIS SUSTAINABILITY COMPONENT WITH US
SUGGESTIONS ● CONSULTING ● MEMBERSHIP ● OTHER OPTIONS
CLICK THESE ICONS TO JOIN US THROUGH SOCIAL MEDIA
![]()
![]()
![]()
![]()
![]()
![]()
![]()
![]()
![]()
![]()
ECO-LIGHTING DESIGN DETAILS
Eco-lighting can be designed using several different approaches. We’ve used the Leadership in Energy and Environmental Design (LEEDv4) guidelines as our foundation. We discuss here the specifics of LEED, how you can apply these eco-lighting standards to your own projects, and our LEED Platinum design process for the Duplicable City Center. We do this with the following sections:
- Understanding LEEDv4 Lighting
- LEED Lighting Points Explained
- Implementation Guidance for LEED Lighting
- Applying LEED in the Duplicable City Center (Case Study)

The One Community City Center Social Dome | Visualization of Lighting under Loft-overhang
UNDERSTANDING LEED (version 4) LIGHTING
LEED is a third-party certification program and the nationally accepted benchmark for design, construction, and operation of high-performing sustainable buildings. LEED gives the owners the performance metrics needed for improving the holistic aspects of energy efficiency in their buildings. LEED also promotes a whole-building approach to sustainability. It does this through six key areas: sustainable site development, water savings, energy efficiency, materials selection, indoor environmental quality, and locating buildings close to transit and amenities.
The lighting aspects of LEED are emphasized in the energy efficiency and the indoor environmental quality sections. LEED Version 4 (the most current as of this writing) promotes more energy efficient lighting and lighting design with the following credited areas:
- Energy and Atmosphere Minimum Energy Performance Prerequisites
- Energy and Atmosphere Credit – Optimized Energy Performance
- Environmental Quality Credit – Interior Lighting
- Environmental Quality Credit – Daylighting
- Environmental Quality Credit – Views
- Lighting Pollution Reduction Credit
LEED LIGHTING POINTS EXPLAINED
Here we discuss each of the areas where LEED points can be awarded in association with lighting. As previously mentioned, 25 points are possible with sustainable energy management and 80 points are needed (out of a total of 110) if LEED Platinum status it to be achieved. Lighting is a significant part of these 25 points. We discuss here the details of the various areas where points are awarded in a way we hope will help anyone interested in improving the sustainability of a structure. Regardless of whether or not you are interested in actual LEED certification, applying the strategies below will make your building more energy efficient and sustainable.
Note: Visit the Maximizing LEED Points Point-by-point section for layman’s-terms descriptions for how we addressed each of these areas.
E&A MINIMUM ENERGY PERFORMANCE PREREQUISITES
Under the Energy and Atmosphere section, as a minimum prerequisite (not for points), LEED requires a 5% improvement for new construction in the proposed design over the baseline design as per ASHRAE 90.1-2010 Standard. So while the ASHRAE 2010 standard provides the minimum requirements for energy-efficient design of buildings, the proposed design has to be done using the whole-building energy simulation method (using industry software such as IES, eQuest, EnergyPro, etc.) and show a 5% overall reduction beyond the baseline. At 6% reduction, one point is awarded – all the way up to 50+% reduction where 18 points are awarded. The prescriptive lighting density allowances do not require compliance if using energy modeling to demonstrate compliance for LEED. Only the mandatory provisions should be met to demonstrate compliance.
If the building owner decides not to use the whole building simulation method, he can choose to instead meet the Prescriptive Compliance Path of the ASHRAE 90.1-2010 Standard Advanced Energy Design Guide. This requires meeting both the mandatory and prescriptive provisions of ASHRAE 2010 standard. To achieve this, interior lighting requirements are divided into a set of mandatory requirements (provisions that must be complied with regardless of the quantity of lighting that is installed) and two prescriptive methods for determining the allowed wattage for the building: whole-building and space-by space.
MANDATORY PROVISIONS
ASHRAE Standard 90.1-2010 requires the following mandatory lighting controls:
- Automatic shutoff of indoor and outdoor lighting when not in use
- Occupancy sensors in certain areas like conference rooms, lunch rooms, etc.
- Multilevel lighting in spaces using manual space controls
- Automatic multilevel lighting in certain stairwell, parking garage, and other spaces
- Automatic daylight harvesting control
- Functional testing of controls by the contractor
- Documentation requirements including a control narrative and maintenance schedule
- Exterior lights should have photocells or time clocks
PRESCRIPTIVE PROVISIONS
Through its prescriptive requirements, ASHRAE/IES 90.1-2010 additionally imposes limits on the amount of lighting power installed in the building. This is measured in watts per square foot (WPSF) to promote efficient technology and design. As stated above, designers have a choice of using the Building Area Method (whole building power allowance) or Space-by-Space Method (individual spaces).
When using the Space-by-Space Method of compliance with the standard’s prescriptive lighting power allowance requirements, Standard 90.1-2010 offers lighting power adjustment credits based on use of advanced lighting control strategies in certain offices, meeting spaces, education spaces, retail sales areas, and public spaces. Qualifying technologies range from manual dimming control to much more complex and specific automatic continuous daylight harvesting dimming (the practice of reducing electric light levels when daylight is present) with power adjustment factors (applied to the controlled lighting load of 5-30%).
Building Area Method is mainly used for projects where the entire building is for one primary use and/or for single-occupancy types of buildings. Space-by-space is more flexible and is used if the building has multiple occupancies/spaces. Space-by-space method is often used in these situations because it allows trade-offs between spaces because it compares the total specified lighting wattage for the entire building to the sum of space-by-space allowances.
This article: “ASHRAE Releases 90.1-2010–Part 1: Design, Scope, Administrative Requirements” is an excellent resource for understanding this better. It also includes an informative chart showing how the various wattage allowances have evolved over the years.
E&A CREDIT OPTIMIZING ENERGY PERFORMANCE (1-18 points)
The Energy and Atmosphere for Optimizing Energy Performance credit can be as high as 18 points if total-building energy modeling is performed. The objective of this credit (of which lighting is only a small part) is to increase the level of total energy performance beyond ASHRAE 2010 standards. One point can be achieved by showing a minimum of a 6% increase in the proposed building energy performance compared to ASHRAE 2010 standards. The maximum of 18 points can be achieved if a 50% (or more) increase is shown above ASHRAE 2010 standards.
The other choice is to simply meet the prescriptive requirements of ASHRAE Advanced Energy Design Guide for your specific structure type: Small-to-Medium Office Building, Medium-to-Large Retail Building, K-12 School, or Large Hospital. Without a whole-building energy analysis though, this only awards 1-2 points.
To help people desiring maximum efficiency (and points), the Advanced Energy Design Guides provide prescriptive energy savings guidance and recommendations by building type and geographic location. These are design packages and strategies to help owners and designers achieve 50%+ site energy savings over ASHRAE Standard 90.1 2010. There are four AEDG guides:
- ASHRAE 50% AEDG for small to medium office buildings: applies to office buildings < 100,000 ft2
- ASHRAE 50% AEDG for medium to large box retail buildings: applies to retail between 20,000 to 100,000 ft2
- ASHRAE 50% AEDG for K-12 school buildings
- ASHRAE 50% AEDG for large hospitals: for hospitals > 100,000 ft2
So conducting a whole-building energy analysis and demonstrating 50% efficiency increase above ASHRAE 2010 standards shows that you are not only focused on lighting, but all areas where energy savings and energy generation through renewables are possible. The ASHRAE Advanced Energy Design Guide provides a path to meeting the 50% efficiency increase above ASHRAE 90.1-2010, Appendix G goal. The whole-building energy analysis confirms the results so appropriate points can be awarded.

One Community Duplicable City Center Kitchen Dome | Visualization of 2nd-Floor Dining Hall Lighting
ENVIRONMENTAL QUALITY CREDIT: INTERIOR LIGHTING (1-2 points)
The Indoor Environmental Quality Credit for Interior Lighting can award up to 2 points. One for “Lighting Control” and one for “Lighting Quality.”
LIGHTING CONTROL
For 90% or more of occupant spaces, the project must provide individual lighting controls that allow users to adjust the lighting to suit their individual tasks and preferences with at least 3 lighting levels (on, off, mid-level). Mid-level is 30% to 70% of maximum lighting levels. More levels than this though can be accomplished with dimmers, table lamps for work spaces with a mid-level setting, etc. The idea here being that the building occupant(s) should have maximum control of any space so their comfort level is improved without needing to turn on every light for the space.
LIGHTING QUALITY
This choice features eight strategies, and you must include at least four of the following eight options in your project to get the related point.
- Regularly occupied spaces must have light fixtures that emit a luminance below 2,500 cd/m² (candela/meters2 – the luminous intensity, in a given direction) lighting and at an angle between 45 and 90 degrees from the lowest point being lit (floor, table, etc.). The goal here is maximizing lighting efficiency through more direct (rather than spread out) lighting, and with less glare. LEED v4 does provide exceptions for wall wash fittings that are properly aimed at the walls as well as for adjustable fixtures. This calculator can be used to show that the candela/meters² ratio is 1 to 1 for Lumens/meters² – so candelas = lumens for the purposes of this credit.
- The complete project must have light sources that emanate a color rendering index (CRI) of 80 or more except for lamps and fixtures that supply colored lighting for visual effects.
- A minimum of 75 percent of a project’s total attached lighting load must be from light sources that feature a lifetime rating of at least 24,000 hours. If the project includes LED sources, then the lighting units must have a rating of L70. Usable light levels can be defined as L90, L80 or L70 — the point at which the fixture has dimmed to 90%, 80% or 70% of its original output. The IESNA has developed two standards used to rate the lifespan of LED light sources. LM-80 is a standard for measuring lumen maintenance and depreciation in LEDs.
- For regularly inhabited areas, use direct-only overhead illumination for 25 percent or less of the project’s entire connected lighting load.
- Make sure that 90 percent of a regularly inhabited floor space meets a minimum of 85 percent reflectance for ceilings, 60 percent for the space’s walls, and 25 percent of the area’s floors.
- When the space includes furniture, confirm that the area has a 45 percent minimum reflection for work surfaces and 50 percent for partitions that move.
- For 75 percent of a regularly used area, do not exceed the 1:10 ratio of average wall surface lighting to the space’s regular work surface. The specification excludes window design. A project is also required to meet option 5 and 6 above or display a wall reflectance of 60 percent based on area (i.e. for area-weighted surfaces).
- For 75 percent of a commonly used floor area, do not surpass the 1:10 ratio of average ceiling lighting to work-surface illumination. The requirement omits fenestration, but projects will need to meet strategy 5 and 6 above, or they must establish that the space has an area-weighted surface reflectance of 85 percent for the ceilings.

City Center Control, Automation, and Data Gathering Layout Details – Click for the Complete Open Source Hub
ENVIRONMENTAL QUALITY CREDIT: DAYLIGHTING (1-3 points)
The intent of this credit is to provide occupants a connection to outdoors through daylight and views from regularly occupied spaces. This reinforces circadian rhythms and reduces the use of electrical lighting by introducing daylight into the space. This can be done by providing manual or automatic (with manual override) glare control devices (such as Venetian blinds or adjustable louvers) for all regularly occupied spaces.
To qualify for these points, simulation or measurements are accepted and there are three methods LEED accepts (click here for a resource article):
- Spatial Daylight Autonomy simulation and sunlight exposure simulation: Demonstrate through annual computer simulations that spatial daylight autonomy (sunlight as the exclusive light source for a space) of at least 55%, 75%, or 90% is achieved AND demonstrate through annual computer simulations that annual sunlight exposure of no more than 10% is achieved. (resource PDF) (resource article)
- Illuminance Calculations (should be between 300-3000 lux ) on a clear-sky day at equinox: Demonstrate through computer modeling that illuminance levels will be between 300 lux and 3,000 lux for 9 a.m. and 3 p.m., both on a clear-sky day and at the equinox. Calculate illuminance intensity for sun (direct component) and sky (diffuse component) for clear-sky conditions as follows: Use typical meteorological year data, or an equivalent, for the nearest available weather station. Select one day within 15 days of September 21 and one day within 15 days of March 21 that represent the clearest sky condition. Use the average of the hourly value for the two selected days. Exclude blinds or shades from the model. Include any permanent interior obstructions. Movable furniture and partitions may be excluded. (resource PDF)
- Measurements: Achieve illuminance levels between 300 lux and 3,000 lux for the floor area indicated in Table 3 of this resource PDF. With furniture, fixtures, and equipment in place, measure illuminance levels as follows: Measure at appropriate work plane height during any hour between 9 a.m. and 3 p.m. Take one measurement in any regularly occupied month, and take a second as indicated in Table 4 of this resource PDF. For spaces larger than 150 square feet (14 square meters), take measurements on a maximum 10-foot (3 meter) square grid. For spaces 150 square feet (14 square meters) or smaller, take measurements on a maximum 3-foot (900 millimeters) square grid.

The One Community City Center Social Dome | Visualization of Natural Lighting and Views from the Loft Area
ENVIRONMENTAL QUALITY CREDIT: VIEWS (1 point)
The intent of this credit is to provide quality views and giving occupants a connection to the outdoor natural environment. This can be done by providing vision glazing for 75% of floor area. “Vision glazing” is windows, or the portion of larger windows, that provide a connection to the outdoors. These are typically vertical windows between 2.5 ft and 7.5 ft above the floor. Also known as View Windows and not to be confused with Daylight Windows – windows designed to provide interior illumination and located above eye height (7.5 ft), or the portion of a window more than 7.5 ft above the floor.
To claim this point, you must include a direct line of sight to the outdoors via vision glazing for 75% of all regularly occupied floor area. Regularly occupied floor areas are “areas where one or more individuals normally spend time (more than one hour per person per day on average) seated or standing as they work, study, or perform other focused activities inside a building.”View glazing in the contributing area must provide a clear image of the exterior, not obstructed by frits, fibers, patterned glazing, or added tints that distort color balance. Additionally, 75% of all regularly occupied floor area must have at least two of the following views:
- Multiple lines of sight to vision glazing in different directions at least 90 degrees apart;
- Views that include at least two of the following: (1) flora, fauna, or sky; (2) movement; and (3) objects at least 25 feet from the exterior of the glazing;
- Unobstructed views located within the distance of three times the head height of the vision glazing; and
- Views with a view factor of 3 or greater, as defined in “Windows and Offices: A Study of Office Worker Performance and the Indoor Environment.”
Include in the calculations any permanent interior obstructions. Movable furniture and partitions may be excluded.
Views into interior atria may be used to meet up to 30% of the required area.
Click here for the source resource for all of the above.
LIGHTING POLLUTION REDUCTION CREDIT (1 point)
The intent of this credit is to increase night sky access, improve nighttime visibility, and reduce the consequences of development for wildlife and people. The credit can be achieved by satisfying the uplight and lighting trespass criteria using the backlight-uplight-glare (BUG) method (Option 1) or the calculation method (Option 2). The details of both methods and how to apply them can found at this link on the LEED USGBC website.
IMPLEMENTATION GUIDANCE FOR
LEED LIGHTING
All LEED projects must comply with all applicable mandatory provisions of ASHRAE 90.1-2010. To meet the LEED “Optimize Energy Performance” prerequisite, it must also demonstrate an improvement in the proposed performance beyond the baseline rating as defined by ASHRAE 90.1-2010.
PRESCRIPTIVE COMPLIANCE VS PERFORMANCE-BASED MODELING
Prescriptive Compliance describes exactly what is required in terms of design and performance of the building according to the ASHRAE 2010 standard. The designer has to follow exact instructions and not deviate or use their own approach. A prescriptive approach might make sense in a very simple building design, such as single HVAC, water, and lighting systems. The work associated with creating an energy model is not trivial, and the associated cost is not justifiable for many projects. In those cases, the reduced documentation requirements of the prescriptive-compliance path make more sense.
The alternative to a prescriptive path is a performance-based method where the architect or designer may have greater flexibility and freedom in designing the building but aims to achieve the same performance level, as demonstrated through a building energy simulation. Trade-offs can then be taken while designing the building and using the performance path. For example, if the building has slightly lower U-value for the walls, it can offset the lower performance of the walls by using a highly efficient roof.
If the energy-modeling compliance path is chosen, selection of mandatory lighting controls can help improve the model’s overall performance. LEED looks at the reduction in energy cost, not just energy usage, and encourages projects to use advanced modeling guidelines outlined in ASHRAE 2010 Appendix G. In short, the prescriptive path is simpler and can be achieved without the aid of any software. The performance path is more complicated but can result in substantial savings.
USGBC offers courses on how the energy modeling process works for LEED V4. Click here to learn about the courses. Click here to purchase them.
Note: We are seeking someone (click for ad) to help us complete our building energy simulation for the Duplicable City Center, contact us if you have the necessary expertise and would like to help.
MANDATORY CONTROLS REQUIREMENTS OF ASHRAE 2010
The mandatory controls requirements of ASHRAE 2010 are relatively straightforward. They have to be met by both building simulation and the ASHRAE Advanced Energy Design Guides (AEDG) method. We discuss here all the areas related to these requirements.
AUTOMATIC LIGHTING SHUTOFF
ASHRAE/IES 90.1-2010 requires that all lighting systems be turned OFF when not in use. Controls may be either time-of-day, occupancy sensors, or a signal from another control or alarm system that indicates that the area is unoccupied. See our open source control and automation page for the specifics of how we’re addressing these requirements and much more.
The easiest way to satisfy this requirement is to put in occupancy sensors in areas like these:
- Classrooms and lecture halls
- Conference, meeting, and training rooms
- Employee lunch and break rooms
- Storage and supply rooms of 50-1,000 sq.ft.
- Rooms used for document copying and printing
- Functional testing of controls
- Restrooms
The sensor must turn lights OFF within 30 minutes of the space becoming unoccupied. There are multiple types of occupancy sensors and they should be selected based on the space and occupancy type.
MULTI-LEVEL LIGHTING
In 90.1-2010, automatic shutoff controls must be manual-ON or automatically turn the lighting ON to not more than 50% power. Exceptions include public corridors and stairwells, restrooms, primary building entrance and lobby areas, and areas where manual-ON would endanger safety or security.
SPACE CONTROLS
The lights in each enclosed space in the building must be independently controlled by a conveniently located manual control device or automatic occupancy sensor with manual-ON or auto-ON to 50% operation. The lighting must be configured for multiple levels enabling users to select at a minimum OFF, a step between 30% and 70% (inclusive) of full lighting power, and 100% of full lighting power. Stairwell lighting must be controlled so that lighting power can be reduced by at least 50% within 30 minutes of the stairwell space becoming unoccupied. Each control device shall also control no more than 2,500 sq. ft. for a space of 10,000 sq. ft. or less and a maximum of 10,000 sq. ft. for a space greater than 10,000 sq. ft.
DAYLIGHTING HARVESTING
Main side-lighted areas directly adjacent to daylight apertures in an enclosed space 250 sq. ft. or larger require the general lighting in that area be separately controlled using either a stepped switching or continuous dimming controller. More aggressive daylight harvesting (the practice of reducing electric light levels when daylight is present) in primary and secondary side-lighted areas is rewarded with power adjustment credits. In top-lighted spaces, if the total daylight area under skylights plus the total daylight area under rooftop monitors is larger than 900 sq. ft., the general lighting must be separately controlled using either a stepped switching or continuous dimming controller.
FUNCTIONAL TESTING
ASHRAE/IES 90.1-2010 requires functional testing of lighting controls and systems, a service typically provided by the installing electrical contractor in a new construction project, and sometimes supervised by the designer or a commissioning agent. The standard requires the construction documents identify who will conduct and certify the testing.
PRESCRIPTIVE CONTROL REQUIREMENTS OF ASHRAE 2010
The prescriptive control requirements have to be met only if path 2, ASHRAE 50% Advanced Energy Design Guides (AEDG), is chosen. ASHRAE/IES 90.1 imposes limits on the amount of lighting power installed in the building, expressed in watts per square foot, to promote efficient technology and design. Any new building design has to have lighting within the lighting power density limit. Designers have a choice of meeting the ASHRAE prescriptive requirements using the Building Area Method (whole building power allowance) or Space-by-Space Method (individual spaces, with potential additional and tradable allowances).
The Prescriptive Approach contains a look-up table to determine allowed wattage for each occupancy type. These tables are under the copyrights of the ASHRAE but can be found online by searching. Try searching for “ASHRAE 90.1-2010 Table 9.6.1” and see what you turn up. As a general guide, you’ll find wattage/ft2 ranging from a low .63 for areas like storage rooms, elevators, and stairways and highs around 1.2-1.6 watts/ft2 for areas like classrooms, workshops, “detailed manufacturing,” exhibit spaces, etc. Ranges of 1.8 to as high as 2.2 can be seen for areas like “courtrooms” and “retails sales areas” or “ring sports arena” or “emergency rooms” respectively.
For reference and as an additional resource, here’s a similar lighting density chart (link 1 | link 2) by the International Energy Conservation Code (IECC):

International Energy Conservation Code 2015 Watts per Sq. Ft. Chart – Click for the source website
The Building Area approach can be used for a single occupancy building or separate business entities within a building. The Space-by-Space approach is used for flexibility and for non-standard building types or space configurations.
BUILDING AREA METHOD
This method is used for projects involving an entire building with a single, independent occupancy. The total connected lighting wattage is determined by multiplying the gross lighted area by lighting density factor according to the space type. Gross lighted area (GLA) includes basements, mezzanines and intermediate floor tiers, and penthouses, provided these spaces have a headroom height of 7.5 ft. or greater.
SPACE-BY-SPACE METHOD
This method is applicable for a multiple occupancy building. The gross lighted area of the building is divided into each of the space types listed. The lighting power allowance is calculated by multiplying the area of space type by the lighting power density for that particular space.
BUILDING AREA METHOD VS SPACE-BY-SPACE METHOD
The Building Area Method is sensitive to specific space functions and room configurations and is generally more restrictive. When a specific building type isn’t listed, “selection of a reasonably equivalent type” is permitted. The Space-by-Space Method is more flexible and is applicable to all building types. It accounts for actual room areas (e.g., lighting needs of enclosed office vs. open office) and an increase in the lighting power allowance is allowed for specific space functions.
EASIEST TO HARDEST APPLICATIONS FOR NEW STRUCTURES
The information on this page is meant for application by those seeking LEED Certification and also those just interested in improving their lighting efficiency and sustainability. With this in mind, and based on our research and everything discussed above, here are our recommendations for applying what we’ve learned to achieve these goals.
For new structures, here are our implementation suggestions listed from easiest to hardest based on difficulty to implement, cost, and potential to improve building-sustainability and energy efficiency:
- Mandatory Provisions: These mandatory provisions are already required if the governing body with jurisdiction over your area is following the ASHRAE 2010 standards. Even if not, incorporating several (or all) of these recommendations is probably the easiest way to improve your lighting efficiency and sustainability for your structure. The following is our suggested order of implementation based on difficulty to implement and cost:
- Multilevel/dimmer lighting in spaces using manual space controls
- Automatic shutoff of indoor and outdoor lighting when not in use
- Exterior Lights should have photocells or time clocks
- Automatic multilevel lighting in certain stairwell, parking garage, and other spaces
- Occupancy sensors in certain areas like conference rooms, lunch rooms, etc.
- Automatic daylight harvesting control
- When all of the above are complete, the following should also be included:
- Functional testing of controls by the contractor
- Documentation requirements including a control narrative and maintenance schedule
- Prescriptive Provisions: Using either the space-by-space or building-area methods, limiting the amount of watts per square foot for your structure is the next easiest approach to reducing total energy usage for lighting in new structures.
- Environmental Quality Credit – Interior Lighting: This area of focus can be divided into two areas of focus: “Lighting Control” and “Lighting Quality.” Lighting control implementation is as simple as including dimmers or switches that allow occupants to adjust the lighting to suit their individual tasks and preferences with at least three lighting levels. Lighting Quality can be addressed with a diversity of approaches that are described in detail in the Interior Lighting section and summarized here from our perspective of easiest to hardest:
- A minimum of 75 percent of a project’s total attached lighting load must be from light sources that feature a lifetime rating of at least 24,000 hours. If the project includes LED sources, then the lighting units must have a rating of L70.
- The complete project must have light sources that emanate a color rendering index (CRI) of 80 or more except for lamps and fixtures that supply colored lighting for visual effects.
- Regularly occupied spaces having light fixtures that emit a luminance below 2,500 cd/m² lighting and at an angle between 45 and 90 degrees from the lowest point being lit (floor, table, etc.).
- For regularly inhabited areas, use direct-only overhead illumination for 25 percent or less of the project’s entire connected lighting load.
- Make sure that 90 percent of a regularly inhabited floor space meets a minimum of 85 percent reflectance for ceilings, 60 percent for the space’s walls, and 25 percent of the area’s floors.
- When the space includes furniture, confirm that the area has a 45 percent minimum reflection for work surfaces and 50 percent for partitions that move.
- For 75 percent of a regularly used area, do not exceed the 1:10 ratio of average wall surface lighting to the space’s regular work surface.
- For 75 percent of a commonly used floor area, do not surpass the 1:10 ratio of average ceiling lighting to work-surface illumination.
- Environmental Quality Credit – Daylighting: This consideration is all about window placement and how light falls in a room. It requires computer modeling and there are three different ways to measure the effectiveness of your design. The modeling for this part of design is harder than the modeling for Environmental Quality – Views but the results more directly reduce energy and lighting costs.
- Environmental Quality Credit – Views: This consideration is all about window placement and what you can see outside. Specifically, including direct line of sight to the outdoors (via vision glazing) from 75% of all regularly occupied floor area.
- Lighting Pollution Reduction Credit: This consideration for most projects is fairly easy and cost effective to implement but will probably contribute less to energy savings than all of the above areas.
- Energy and Atmosphere Credit – Optimized Energy Performance: This consideration is probably the most difficult to implement because it requires conducting a whole-building energy analysis and then making adjustments based on what you learn. To do this, you will need the details of all contributors to your building’s energy needs and someone specifically trained and possessing the necessary software.
Click here for a layman’s approach demonstrated with applications in the City Center
EASIEST TO HARDEST APPLICATIONS FOR RETROFITS
LEED Certification guidelines can also be helpful for those interested in improving their lighting efficiency and sustainability in retrofit situations. For retrofit structures, here are our implementation suggestions listed from easiest to hardest based on difficulty to implement, cost, and potential to improve building-sustainability and energy efficiency:
- Mandatory Provisions: The mandatory provisions of the ASHRAE 90.1-2010 standards are probably the easiest way to improve your lighting efficiency and sustainability for retrofitting a structure. The following is our suggested order of retrofit-implementation based on difficulty to implement and cost:
- Automatic shutoff control of indoor and outdoor lighting when not in use
- Exterior Lights should have photocells or time clocks
- Occupancy sensors in certain areas like conference rooms, lunch rooms, etc.
- Automatic daylight harvesting control
- Automatic multilevel lighting in certain stairwell, parking garage, and other spaces
- Multilevel lighting in spaces using manual space controls
- Environmental Quality Credit – Interior Lighting: This area of focus can overlaps a lot with the suggestions in the Mandatory Provisions section. It can be divided into two areas of focus: “Lighting Control” and “Lighting Quality.” Lighting control implementation is a simple as including dimmers or switches that allow occupants to adjust the lighting to suit their individual tasks and preferences with at least 3 lighting levels. Lighting Quality can be addressed with a diversity of approaches that are described in detail in the Interior Lighting section and summarized here from our perspective of easiest to hardest for a retrofit situation:
- A minimum of 75 percent of a project’s total attached lighting load must be from light sources that feature a lifetime rating of at least 24,000 hours. If the project includes LED sources, then the lighting units must have a rating of L70.
- The complete project must have light sources that emanate a color rendering index (CRI) of 80 or more except for lamps and fixtures that supply colored lighting for visual effects.
- Regularly occupied spaces having light fixtures that emit a luminance below 2,500 cd/m² lighting and at an angle between 45 and 90 degrees from the lowest point being lit (floor, table, etc.).
- For regularly inhabited areas, use direct-only overhead illumination for 25 percent or less of the project’s entire connected lighting load.
- Make sure that 90 percent of a regularly inhabited floor space meets a minimum of 85 percent reflectance for ceilings, 60 percent for the space’s walls, and 25 percent of the area’s floors.
- When the space includes furniture, confirm that the area has a 45 percent minimum reflection for work surfaces and 50 percent for partitions that move.
- For 75 percent of a regularly used area, do not exceed the 1:10 ratio of average wall surface lighting to the space’s regular work surface.
- For 75 percent of a commonly used floor area, do not surpass the 1:10 ratio of average ceiling lighting to work-surface illumination.
- Environmental Quality Credit – Daylighting: This consideration is all about window placement and how light falls in a room. Moving or adding windows during a retrofit is usually easy but evaluating the effectiveness of what you’ll get when you are done requires computer modeling. There are three different ways to measure the effectiveness of your design and the modeling for this part of design is harder than the modeling for Environmental Quality – Views but the results more directly reduce energy and lighting costs.
- Environmental Quality Credit – Views: This consideration is all about window placement and what you can see outside. Specifically, including direct line of sight to the outdoors (via vision glazing) from 75% of all regularly occupied floor area.
- Lighting Pollution Reduction Credit: This consideration for most projects is fairly easy and cost effective to implement but will probably contribute less to energy savings than all of the above areas.
- Prescriptive Provisions: Using either the space-by-space or building-area methods, limiting the amount of watts per square foot for your structure is the next easiest approach to reducing total energy usage for lighting in retrofit structures. This suggestion is near the bottom of the list because application of all of the above suggestions should already achieve what you’d be seeking by implementing this design approach. You could still run the calculations and use what you find as a guide though.
- Energy and Atmosphere Credit – Optimized Energy Performance: This consideration is probably the most difficult to implement, especially for retrofit situations, because it requires conducting a whole-building energy analysis and then making adjustments based on what you learn. To do this, you will need the details of all contributors to your building’s energy needs and someone specifically trained and possessing the necessary software. This can be expensive and what your analysis teaches you may be even more difficult and/or costly to implement for a retrofit vs a new construction.
Click here for a layman’s approach demonstrated with applications in the City Center
APPLYING LEED IN THE DUPLICABLE CITY CENTER
(CASE STUDY)
 The Duplicable City Center lighting plan is designed to help the building achieve a LEED Platinum rating. To do so, it meets both the prescriptive and the mandatory requirements of ASHRAE 90.1-2010 as required by LEED. As discussed above, our lighting plan looks at the maximum allowable lighting-wattage levels (as per ASHRAE 90.1-2010) as a baseline and then performs an evaluation to compare our lighting plan to this ASHRAE 90.1-2010 maximum. New structures that incorporate a 50% (or more) increase in total energy efficiency over the baseline (with lighting as a component of this) are eligible for 25 (the maximum number) of LEED points for the energy usage/management category.
Our final design will demonstrate meeting these guidelines by using the Performance-based Energy Modeling method, so our energy usage rating will be for the entire building. This means that exceeding efficiency goals in one area can then provide additional energy availability in another area. Our goal, however, is to keep our numbers as low as possible because it reduces our total up-front energy infrastructure needs and costs.
We share here our complete design process with the following sections:
- Starting the Design Process
- LED vs Incandescent vs CFL Bulbs
- Natural Light and Lighting Placement Considerations
- Lighting Calculations
- Lighting Tests
- Lighting Control and Automation
- Maximizing LEED Points Point-by-point
- Final Building Energy Modeling Results
- Final LEED Points Awarded Summary

Duplicable City Center Kitchen Dome | Visualization of the Dining Area (Click for the Eco-kitchen Open Source Hub)
STARTING THE DESIGN PROCESS
 Before starting the detailed design process, we wanted to generate baseline lighting levels to achieve LEEDv4 Platinum Certification (80+ pts.). To do this, we first looked only at reducing our energy consumption. We chose to focus on reducing energy consumption first because we consider this one of the easiest elements to objectively evaluate and also one of the largest contributors to our overall carbon footprint and project sustainability. We used the following zones, square footages, and power density benchmarks from the Heating, Refrigerating, and Air-conditioning Engineers (ASHRAE) as our starting point:
- Living Dome (5400 sq feet) – Benchmarked as “Hotel” @ 1 W/sq foot
- Social Dome (6570 sq feet) – Benchmarked as “Library” @ 1.18 W/sq foot
- Dining Dome (4185 sq feet) – Benchmarked as “Dining: Family” @ .89 W/sq foot
- Cupola (785 sq feet) – Benchmarked as “Conference/Meeting/Multipurpose” @ 1.23 W/sq foot
- Central Mezzanine – (2453 sq feet) – Benchmarked as “Corridor/Transition” @ .66 W/sq foot
This would mean the following allowable watts per “zone” when using a 50% reduction (needed for maximum points) as our goal:
- Living Dome: 5,400 ft2 * 1 W/ft2 = 5,400 W | 5,400*50% = 2,700 W
- Social Dome: 6,570 ft2 * 1.18 W/ft2 = 7,752 W | 7,752*50% = 3,876 W
- Dining Dome: 4,185 ft2 * .89 W/ft2 = 3,724 W | 3,724*50% = 1,862 W
- Cupola: 785 ft2 * 1.23 W/ft2 = 965 | 965*50% = 483 W
- Central Mezzanine: 2453 ft2 * .66 W/ft2 = 1,618 W | 1,618*50% = 809 W
We then made the assumption that we will exclusively utilize LED lights (click here for details), which have higher upfront costs but consume much less electricity than traditional or compact fluorescent bulbs. Here is how LEDs energy consumption compared to traditional light bulbs to produce the same amount of light:
| LED Wattage | Traditional Wattage |
| 4 W | 25 W |
| 8 W | 40 W |
| 10 W | 60 W |
| 20 W | 100 W |
| 30 W | 150 W |
Assuming the use of 10W LEDs throughout the building, we could very easily calculate an estimated lighting density for each area using this formula:
Wattage allowance for each area divided by 10 = # bulbs allowed. Total area divided by # of bulbs = estimated lighting density.
This produced encouraging results with the following estimated usable lighting densities:
- Living Dome Lighting Density: ≈ 1 bulb per each 26 ft2
- Social Dome: ≈ 1 bulb per each 17 ft2
- Dining Dome: ≈ 1 bulb per each 23 ft2
- Cupola: ≈ 1 bulb per each 16 ft2
- Central Mezzanine: ≈ 1 bulb per each 30 ft2
LED vs INCANDESCENT vs CFL BULBS
For ease of maintenance and inventorying bulbs, we set a goal to design the Duplicable City Center to use only 5 different bulb types for all major receptacles through the building. Because the building will have 1000s of bulbs, careful selection of the correct bulb was important and became part of the initial design and evaluation process. This chart/graphic below summarizes the results of our research into this area and why LED bulbs became the clear choice.

LIGHT COLOR CONSIDERATIONS
Light color was also an important consideration. As color temperature goes higher on the Kelvin scale, it gets whiter and then bluer, and this tends to give a colder outdoor impression. A lower color temperature is yellower and softer, and tends to feel cozy and warm. Here’s an example of the comparison:
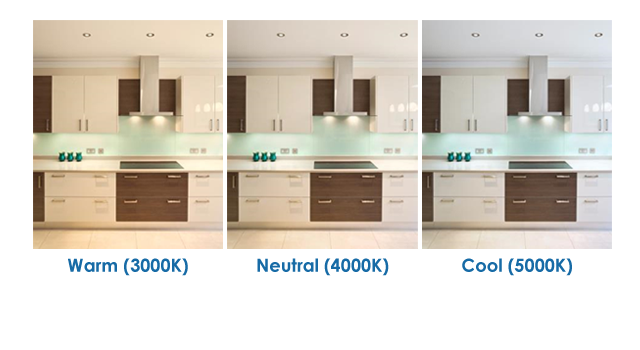
Cooler colors are good to use in big wide-open spaces to enhance the airy feeling. Warmer colors are good to use in more intimate places like next to big chairs in the library, in the living quarters, at the dining counter, etc. LEDs come in all colors, as dimmable and non-dimmable bulbs, and also as full-spectrum bulbs with the ability to change them to any color you desire. We chose full-color bulbs for the social centers like the library, Social Dome, and Dining Dome lighting where this variety of colors would be desirable and beneficial. We further maximized the usability of these full-color lights by combining them with dimmable white lights – see the Lighting Tests section for details. We chose dimmable “warm” colored bulbs for all other areas. The selection of lighting in this case also impacts points under the Interior Lighting – Lighting Quality credit for 1 pt.
NATURAL LIGHTING & LIGHTING PLACEMENT CONSIDERATIONS
 We next explored natural light and lighting placement considerations. Bringing in natural light is one of the most effective ways to make a building feel pleasant and comfortable inside while also reducing power needs for lighting. Natural light is also a hallmark of modern architecture, but the more windows you have the more heat can be lost through them and this can increase HVAC needs.
As discussed in the environmental Quality Credit – Daylighting section, there are 1-3 LEED points that can also be earned for proper designs emphasizing daylighting. Qualifying for these points can be achieved through any one of 3 methods and the details of the method we chose to use can be found in the Maximizing LEED Points Point-by-point section.
Most of the Duplicable City Center will have a good amount of natural light and natural light distribution due to the dome shape and big windows placed high up in the domes, but it is also important to complement that with properly placed interior light sources. When interior lights are chosen and placed correctly, the lighting in the room will feel more “natural,” enhance the open feeling of the building rather than distracting, simulates daylight on dark days or in the winter, and they’ll help keep the interior feeling more physically comfortable.
Using a combination of indistinct ambient light and detailed spotlighting is how this is accomplished. This is important because flat, even lighting is boring and generally less desirable, like this:

In contrast, what we want to create is more along these lines:

Notice how the second example doesn’t have a ton of natural light but it still feels open and airy. White (or very close to it) walls and ceiling accentuate this even more by reflecting light, an experience we have specifically enhanced in our structure by aiming larger lights up to reflect off these white ceiling and walls to maximize ambient light to mix with the lights from the overhead windows like this:

 In areas with a more traditional ceiling (i.e. in bedrooms, bathrooms, and underneath balconies in the domes), a combination of reflective fixtures and in-ceiling can-lights or track lights will be used. A similar feeling of ambient light can be created with fixtures similar to the picture on the right and can-lights create a relatively even amount of light in a room, but still have “hot” spots underneath them that make for a far more interesting visual experience like this:

With these goals in mind, we next moved on to space-by-space lighting calculations and lighting tests.
LIGHTING CALCULATIONS
 Having a general idea of how many bulbs would be allowed for each of the domes and the cupola, and having chosen LEDs for our bulb type, the next steps were dividing the building into zones based on use, choosing the specific bulbs for the different areas, and calculating how many bulbs would be needed to meet optimum and minimum lighting levels. The zones were also important for design and implementation of the control and automation details. Click this graphic for the complete zone plan:
Duplicable City Lighting Zone Plan – Click to enlarge
With the desire for maximizing efficiency and credits, the criteria for number of lights per room was set to be at least a 50% reduction from the American Society of Heating, Refrigerating, and Air-conditioning Engineers (ASHRAE) lighting power density benchmarks while still meeting code-based lighting requirements for safety and comfort. We created a spreadsheet to run the necessary calculations and organize all the related information. Here’s a preview that can be clicked for the most current updates and details:

City Center Lighting Spreadsheet – Click to open in a new tab with the most current updates and details
LIGHTING TESTS
 Lighting tests were the next step after all the steps in the Lighting Calculations section: identifying all the zones, choosing the specific bulbs for the various zones, comparing the lighting results for different fixtures, and calculating how many bulbs would be used in each zone. The lighting and fixture tests were done using free DIALux lighting software that allows you to see how different lighting configurations would look and also to make sure the lighting plan will supply sufficient and properly distributed light to all areas. We discuss all the lighting tests we did and what we learned from them with the following sections:
- Fixture Comparisons
- Social Dome Lighting Tests
- Dining Dome Lighting Tests
- Living Dome Lighting Tests
- Central Pool and Spa Area Lighting Tests
- Mezzanine and Outdoor Lighting Tests
- Cupola Lighting Tests

Outdoor-Areas Lighting Distribution Examples Overview – Click to enlarge in a new tab
FIXTURE COMPARISONS
Fixture comparisons were completed for the following five lighting types to compare how different fixtures affect the way the lighting looks and distributes on the floor and walls.
- Direct Light Fixtures (DL1, DL2, etc.)
- Diffused from Ceiling Fixtures (DF1, DF2, etc.)
- Table Lamps (TL1, TL2, etc.)
- Sconces (DS1, DS2, etc.)
- Diffused Wall Bracket/Sconce Fixtures (WS1, WS2, etc.)
Running these tests was important for aesthetics and to help us meet the ceiling, wall, floor and surface requirements of the LEED Interior Lighting guidelines section (see also the Maximization of Interior Lighting Points section). The DIALux lighting software offers thousands of fixture options, so we used the following criteria to narrow the selections down to 10-12 fixtures for each category: Fixtures must fit a standard bulb, bulbs would be 800 lumens and 4000K for the temperature, and fixtures needed to support dimmable LEDs. Below are the results for each type of fixture. Each column is labeled with a unique bulb number (eg. “DF1” means Diffused Bulb #1) to make discussion and design easier when referencing them.
DIRECT LIGHT FIXTURES

Direct Lighting Fixtures Comparison – Click to enlarge in a new tab
DIFFUSED FROM CEILING FIXTURES

Diffused Lighting Fixtures Comparison – Click to enlarge in a new tab
TABLE LAMPS

Table Lamp Lighting Fixtures Comparison – Click to enlarge in a new tab
DIRECT LIGHTING SCONCES

Direct Lighting Sconces Comparison – Click to enlarge in a new tab
DIFFUSED WALL BRACKET FIXTURES

Diffused Wall Bracket / Sconce Lighting Fixtures Comparison – Click to enlarge in a new tab
Looking at all of our options side-by-side like this then allowed us to make more informed decisions when choosing the various fixtures throughout the building. What follows are the results of our selection process.
SOCIAL DOME LIGHTING TESTS
Lighting tests were especially important for the Social and Dining domes because both of these domes have two foundational lighting systems. The first is a floodlight system designed to fully light the room by reflecting light off of the ceiling. The second is a complete system of full-color spectrum lights for making these domes any color we desire. All the lights chosen are LEDs and both the floodlight system and the full-color lighting systems were designed to provide the minimum amount of light necessary for code compliance and safety. Combined, the two systems allow for maximum energy efficiency through individual lighting options wherever people want them and maximum room-color flexibility through lighting that can provide different color options throughout these primary City Center social and dining spaces.
SOCIAL DOME MAIN-ROOM LIGHT TESTS
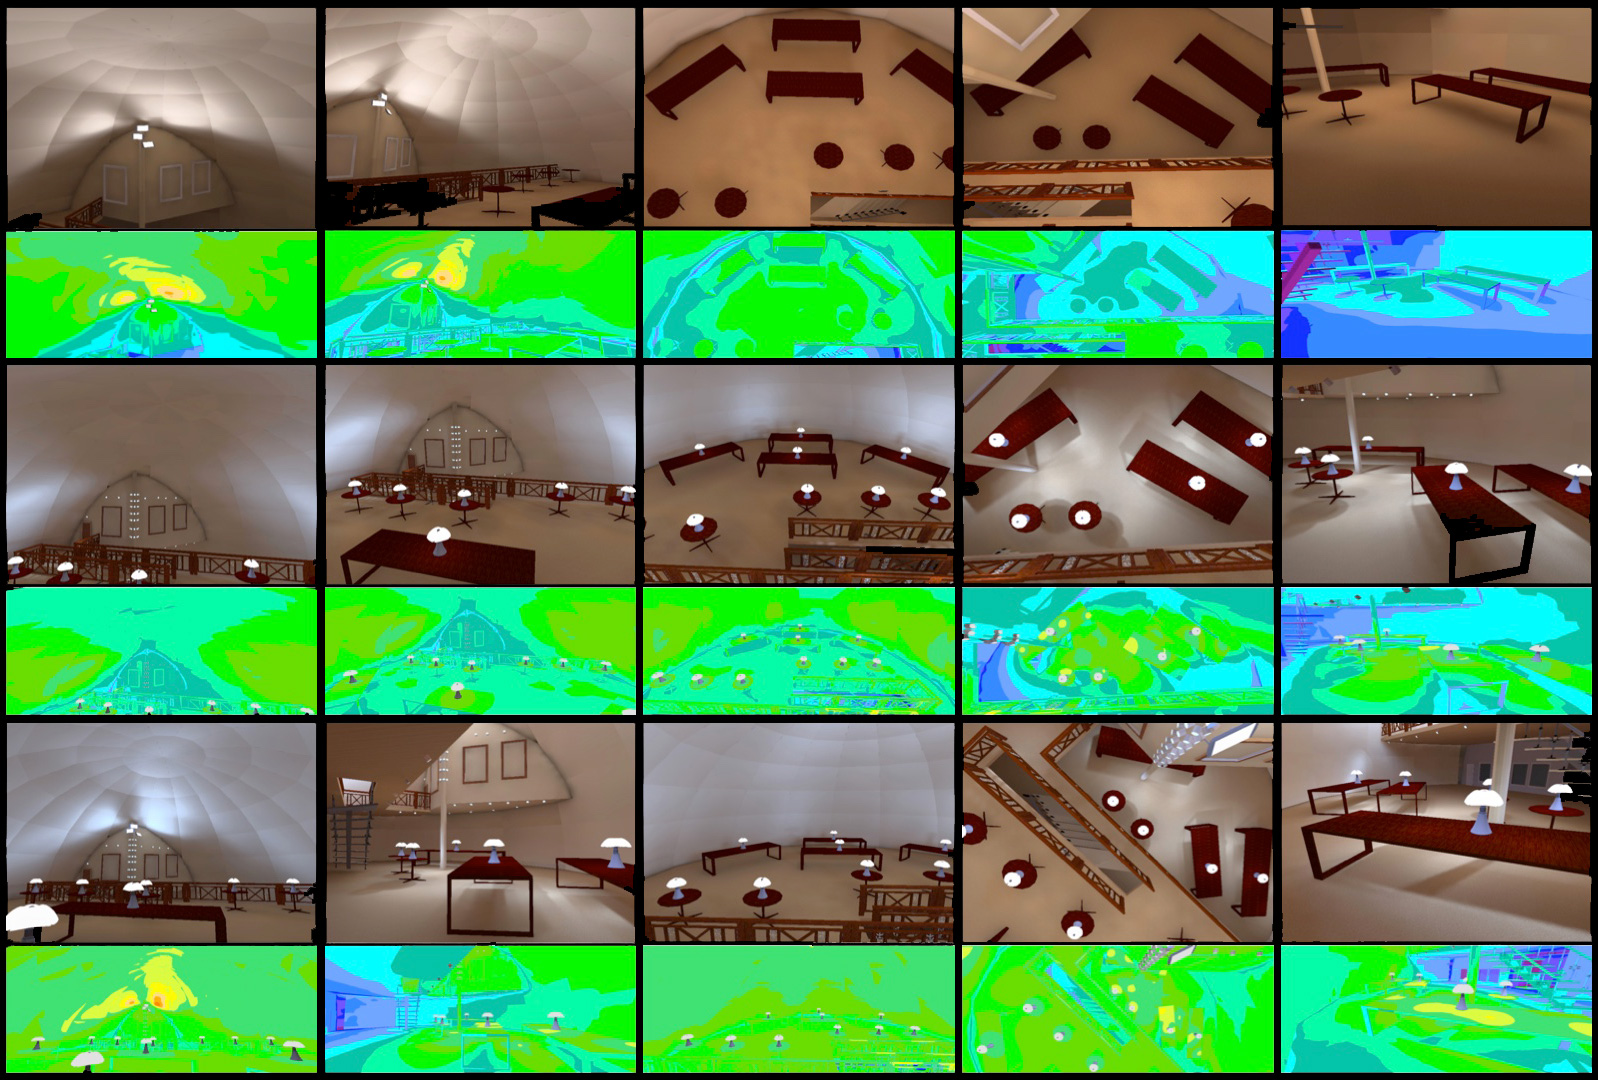
Here are the Social Dome lighting tests with 38,000-lumen LED spotlights pointed at the ceiling and using the reflected light to light the entire dome. These tests show that just these three lights are sufficient to light the entire room if positioned and aimed properly as shown in Angle Test #3.

Here are the lighting tests using the spotlight positions identified as the best above, and then adding in all the other dimmable and full color-spectrum LED lights that will be mounted on the column and wall (fixture DS3) and used in the table lamps (fixture TL10).

Social Dome Lighting Analysis: Spotlights Only | Table and Column Lights | All Lights Together
Using these alone or in conjunction with the spotlights will allow us to make the lighting in the main room of the Social Dome any color we desire. This is shown below using only the colored lights (left two columns) and also with the white lights added (right two columns):

City Center Social Dome Full-spectrum Colored LED Lighting Tests – Click to enlarge in a new tab
These tests confirmed that both of our choices for lighting placement and bulb selections provides the necessary lumens to sufficiently light the main Social Dome room. Independently they will meet minimum lighting needs and combined they will meet these needs and also allow us to far surpass them while being able to change the lighting color for the room (and different parts of the room) to any color we want.
SOCIAL DOME BATHROOM LIGHTING TESTS
Using the same criteria described above and in the Maximizing LEED Points Point-by-point section, here are the Social Dome bathroom lighting tests using DL1 for the ceiling lights and WS1 for the lights over the mirrors.

Social Dome Public Bathroom Lighting Tests – Click to enlarge in a new tab
SOCIAL DOME HALLWAY LIGHTING TESTS
Using the same criteria described above and in the Maximizing LEED Points Point-by-point section, here are the Social Dome hallway lighting tests using WS9 for the fixtures.

Social Dome Hallway Lighting Tests – Click to enlarge in a new tab
SOCIAL DOME LIBRARY LIGHTING TESTS
Using the same criteria described above and in the Maximizing LEED Points Point-by-point section, here are the Social Dome library lighting tests using WS9 for the wall sconces, DL6 for the ceiling lights, DL8 for the accent spot lights, and TL1 for the table lamps.

Social Dome Library Lighting Tests – Click to enlarge in a new tab
DINING DOME LIGHTING TESTS
The Dining Dome lighting, like the Social Dome lighting, has two foundational lighting systems: The floodlight system and the full-color spectrum lighting system for making these domes any color we desire.
DINING DOME MAIN ROOM LIGHTING TESTS
Here are the results of the same tests we did on the Social Dome. The top row of images shows just the spotlights. The middle row shows the column and wall (fixture DS3) plus the table lamps (fixture TL10) but without the spotlights and ceiling lights (Fixture DL1). The bottom row shows the combination of both spotlights and table, ceiling, and column lights. As with the Social Dome, the spotlights are dimmable and the table and column lights are dimmable full color-spectrum LED lights to provide full color-spectrum lighting options for the entire upstairs and downstairs dining areas.
Dining Dome Lighting Analysis: Spotlights Only | Table and Column Lights | All Lights Together – Click to Enlarge
Using these alone or in conjunction with the spotlights will allow us to make the lighting in the main room of the Dining Dome any color we desire, as shown here using only the colored lights (left two columns) and also with the white lights added (right two columns):

City Center Dining Dome Full-spectrum Colored LED Lighting Tests – Click to enlarge in a new tab
These tests confirmed that both of our choices for lighting placement and bulb selections will work to sufficiently light the main Social Dome room. Independently they will meet minimum lighting needs and combined they will meet these needs and also allow us to far surpass them while being able to change the lighting color for the room (and different parts of the room) to any color we want.
DINING DOME KITCHEN LIGHTING TESTS
Here are these same lighting tests done for the complete and open source eco-kitchen area. What you see here is a uniform distribution of DL4 lights throughout the ceiling with hanging DF8 lights to bring more direct light to the work areas.

Dining Dome Kitchen Lighting Tests – Click to enlarge in a new tab
DINING DOME BASEMENT LIGHTING TESTS
Here are the lighting tests showing the ideal configuration using a minimum of 70 lumens per square foot and 190 (DL4) lights to illuminate the basement and hallway.

City Center Dining Dome Basement Lighting – Click to enlarge in a new tab
Here are the lighting tests for the basement entryway also. We chose fixture DL4 along the driveway floor-level perimeter and DS3 for the overhead spotlights.

City Center Dining Dome Basement Entryway Lighting Tests – Click to enlarge in a new tab
LIVING DOME LIGHTING TESTS
Here are the lighting tests for the Living Dome and using the following criteria from the Maximizing LEED Points Point-by-point section: Fixtures must fit a standard bulb, bulbs would be 800 lumens and 4000K for the temperature, and fixtures needed to support dimmable LEDs.
LIVING DOME RENTAL ROOM LIGHTING TESTS
Below are the results of our initial layout testing that also compared different combinations from the Fixture Comparisons section.

Bedroom Light Fixture and Initial Placement Tests – Click to enlarge in a new tab
As highlighted in the above graphic, we chose DF3 for the central lights, DL1 for the ceiling lights, and TL3 for the table lamps (ref: Fixture Comparisons). We then adjusted the locations of all the lights to focus the lighting where it was desired most and updated the wall, floor, and furniture colors for accuracy. Running the tests again then produced the final bedroom lighting results shown here:

City Center Bedroom Light Distribution Test Results – Click to enlarge in a new tab
Here’s a final render of what one of these rooms will look like with the chosen fixtures:

City Center Bedroom Lighting Render – Click to enlarge in a new tab
Here are the same tests as above but showing what one of the bedrooms will look like with LIFX Full-color Bulbs used to provide different colors in the rooms. These tests show what the rooms will look like with various colored lights plus the regular lights on and also with just the colored lights on.

City Center Bedrooms Full-spectrum Colored LED Lighting Tests – Click to enlarge in a new tab
LIVING DOME BATHROOM LIGHTING TESTS
Using the same criteria described above and in the Maximizing LEED Points Point-by-point section, here are the Living Dome bathroom lighting tests using DL1 for the ceiling lights and DS3 for the lights over the mirrors.

Living Dome Bathroom Lighting Tests – Click to enlarge in a new tab
LIVING DOME HALLWAY LIGHTING TESTS
Using the same criteria described above and in the Maximizing LEED Points Point-by-point section, here are the Living Dome hallway lighting tests using WS9 for the fixtures.

Living Dome Hallway Lighting Tests – Click to enlarge in a new tab
LAUNDRY ROOM LIGHTING TESTS
Using the same criteria described above and in the Maximizing LEED Points Point-by-point section, here are the laundry room lighting tests using DL1 for the fixtures.

Laundry Room Lighting Tests – Click to enlarge in a new tab
CENTRAL POOL AND SPA AREA LIGHTING TESTS
Using the same criteria described above and in the Maximizing LEED Points Point-by-point section, here are the Central Pool and Spa Area lighting tests. This image includes the lighting for the main entryway using fixture DL1 as well as the covered entry to the Living Dome using fixture DL4. Fixture DL4 is used for all the other overhead lights here too.

Central Pool and Spa Area Lighting Tests – Click to enlarge in a new tab
MEZZANINE AND OUTDOOR LIGHTING TESTS
Using the same criteria described above and in the Maximizing LEED Points Point-by-point section, here are the Sunrise Patio lighting tests using fixture DL4 along the patio-level perimeter and something like DS3 for the overhead spotlights.

Living Dome Sunrise Patio Lighting Tests – Click to enlarge in a new tab
Here are the 2nd-floor Mezzanine lighting tests using fixture DL4 along the patio-level perimeter and DL4 for the spotlights over the covered areas also.

2nd-Floor Mezzanine Lighting Tests – Click to enlarge in a new tab
CUPOLA LIGHTING TESTS
Using the same criteria described above and in the Maximizing LEED Points Point-by-point section, here are the Cupola lighting tests using fixture DL4 for the fixtures along the patio-level perimeter , DL7 fixtures for the direct lights in the exterior overhang, and DL1 fixtures for the cupola interior lights.

Cupola Lighting Tests – Click to enlarge in a new tab
LIGHTING CONTROL & AUTOMATION
 One Community is open sourcing our complete control and automation systems for the Duplicable City Center. These include sensors for knowing when a space is being well lit by the natural lighting (such as sunlight through the windows or skylights) so lifestyle logic can adjust light levels to a predefined setting. Also automated blinds and shutters to address situations of excessive light or heat and also loss of heat through windows at night. Ambient light sensors in conjunction with motion sensors will also provide automatic modes of operation for detecting occupied versus away behaviors that save resources and create a more comfortable living environment. Visit the complete Control and Automation Systems open source hub for details.
MAXIMIZING LEED POINTS POINT-BY-POINT
 Here we describe in layman’s terms how we applied all the LEED recommendations to the Duplicable City Center. We used this reference along with the ASHRAE 2010 guidelines: 2015 IECC Commercial Electrical Power and Lighting Systems. This section will continue to evolve until the building is complete and we’ve shared all we learned along with the results of our LEED Certification in the Final LEED Points Awarded Summary section. Our goal in all sections was full points for a total of 25 of 25.
We discuss this here with the following sections:
- Mandatory Provisions Maximization
- Prescriptive Provisions Maximization
- Maximization of Energy Performance Points
- Maximization of Interior Lighting Points
- Maximization of Daylighting Points
- Maximization of Environmental Quality Points
- Maximization of Lighting Pollution Reduction Points
MANDATORY PROVISIONS MAXIMIZATION
The Duplicable City Center is designed to go far beyond the requirements of the Mandatory Provisions section. Here’s is how we’ve accomplished this for each of the requirements:
- Automatic shutoff of indoor and outdoor lighting when not in use: This means sensors and automation that turns off lights in areas not being used. The City Center control and automation systems include the sensors and switches to fully address this point for all lighted areas.
- Occupancy sensors in certain areas like conference rooms, lunch rooms, etc.: This means including occupancy sensors in high-volume areas so that the lights automatically turn off in these rooms when they are not in use. The City Center control and automation systems include the sensors and switches to fully address this point for these areas.
- Multilevel lighting in spaces using manual space controls: This means having light switches that allow for at least three levels (low, medium, and high) of lighting options wherever a person can manually turn on or off a light. This is addressed throughout the buildings with dimmable LEDs and dimmer switches everywhere except storage rooms.
- Automatic multilevel lighting in certain stairwells, parking garages, and other spaces: This means having automated lighting that adjusts the lighting levels in areas like these that need ongoing lighting for safety. The adjustments save energy by lowering the lighting levels to the minimum permitted levels when sensors indicate no people are present and elevating the lighting levels whenever these areas are being used. The City Center control and automation systems include the sensors and switches to fully address this point for all these areas.
- Automatic daylight harvesting control: This means using lighting control systems that are able to dim or switch electric lighting in response to changing daylight availability. The City Center control and automation systems include the sensors and switches to fully address this point for all the areas where this is possible.
- Functional testing of controls by the contractor: This means making sure that all the control and automation systems are installed and working properly before the building is signed off as approved for occupancy and use. This is an extremely important step and should be a main focus for the proper functioning of the building. Once complete, we will open source our process for this.
- Documentation requirements including a control narrative and maintenance schedule: This means keeping a log and schedule for keeping all the control and automation systems working properly.
- Exterior Lights should have photocells or time clocks: The details for the specific hardware chosen can be found in the control and automation systems open source hub.
PRESCRIPTIVE PROVISIONS MAXIMIZATION
The Duplicable City Center is designed to go far beyond the requirements of the Prescriptive Provisions section. Using either the space-by-space or building-area methods, limiting the amount of watts per square foot for your structure is one of the easiest and most effective approaches to reducing total energy usage for lighting in new structures. We chose to use the space-by-space method and read this article, “ASHRAE Releases 90.1-2010–Part 1: Design, Scope, Administrative Requirements” to understand how this method works and has evolved over time. We then used a combination of ASHRAE Table 9.6.1 and several other lighting density charts from the International Energy Conservation Code (IECC) (link 1 | link 2) to come up with columns G, H, and I on the City Center Electrical Spreadsheet (tinyurl.com/dcc-lighting-details). Total Watts Per Zone (Column R) divided by Room Area (Column F) gave the applied/actual watts per square foot. Comparing the number here with the numbers in Column G and Column H shows how far we are below the ASHRAE 2013 and IECC 2015 standards. The goal is an average of 50% or greater reduction.
These numbers were then compared (using the same spreadsheet) with optimum and minimum lumen/lighting levels to determine the correct number of lights for each room (Column Q). This was calculated by dividing the Optimum Lumens Chosen (Column O) by 800 lumens – the rating of the most common bulb we’ll be using that is also the lowest-lumen bulb we’ve chosen. This is so we’re sure to meet optimum-lumen minimums even if one of the higher-lumen bulbs (like the LIFX 1100 lumen bulb) is used.
In summary, putting all this together insured we:
- Achieved our goal of identifying the correct number of bulbs for optimum lighting for use of all areas (Column Q)
- Achieved our goal of identifying minimum bulbs (Column W) for code-based lighting safety if our control and automation systems are to turn some bulbs off and also the percentage-reduction allowable (Column X) if our control and automation systems are to dim the bulbs in a zone
- Achieved our goal of an average of 50% or greater improvement in total efficiency over ASHRAE 2010 standards, as well as even more strict standards like ASHRAE 2013 and IECC 2015
MAXIMIZATION OF ENERGY PERFORMANCE POINTS (18 points)
The Energy and Atmosphere Credit for Optimized Energy Performance is probably the most difficult to implement because it requires conducting a whole-building energy analysis and then making adjustments based on what you learn. The goal is a whole-building energy analysis showing the building demonstrates a 50% efficiency increase above ASHRAE 2010 standards. This analysis is not only focused on lighting, but all areas where energy savings are possible. The ASHRAE Advanced Energy Design Guide provides a path to meeting the 50% efficiency increase above ASHRAE 2010 goal. The whole-building energy analysis confirms the results so appropriate points can be awarded.
Note: We are still seeking someone to help us complete our building energy simulation for the Duplicable City Center, contact us if you have the necessary expertise and would like to help.
MAXIMIZATION OF INTERIOR LIGHTING POINTS (2 points)
The Duplicable City Center is designed applying all the requirements of the Environmental Quality Credit for Interior Lighting. This area of focus can be divided into two areas of focus: “Lighting Control” and “Lighting Quality.” Lighting control implementation is a simple as including dimmers or switches that allow occupants to adjust the lighting to suit their individual tasks and preferences with at least 3 lighting levels. Mid-level is 30% to 70% of maximum lighting levels. More levels than this though can be accomplished with dimmers, table lamps for work spaces with a mid-level setting, etc. The idea is a person should be able to use any space without turning on all the lighting for the room.
- To get the first of these two points, we included the dimmer aspects in the control and automation systems design. Inclusion of table lamps and other fixtures (with low, medium, and high settings) over specific work, study, and recreation spaces were also included in the design.

City Center Control, Automation, & Data Gathering Details – Click for the Complete OS Hub
Addressing “Lighting Quality” is necessary to achieve the 2nd of these two points. This can be addressed with a diversity of approaches that are described in detail in the Interior Lighting section and described here from the perspective of how to apply them in layman’s terms. You must include at least four of the following eight options in your project to get the related point and we worked to include all of them so we could maximize the efficiency of our building:
- Regularly occupied spaces must have light fixtures that emit a luminance below 2,500 cd/m² (candela/meters2 – the luminous intensity, in a given direction) lighting and at an angle between 45 and 90 degrees from the lowest point being lit (floor, table, etc.). LEED v4 provides exceptions for wall wash fittings that are properly aimed at the walls as well as for adjustable fixtures. So the goal here is maximizing lighting efficiency through more direct (rather than spread out) lighting, and with less glare.
We accomplished this with fixtures that meet the “lighting at an angle between 45 and 90 degrees from the lowest point being lit” requirement and bulbs that “emit a luminance below 2,500 cd/m² (= to 2500 lumens/m2)”: Main Full-spectrum White Dimmable Bulb | LIFX Full-color Bulbs | Dimmable “Daylight” Bulbs
- The complete project must have light sources that emanate a color rendering index (CRI) of 80 or more except for lamps and fixtures that supply colored lighting for visual effects.
This was achieved through bulb selection – see selections in point above.
- A minimum of 75 percent of a project’s total attached lighting load must be from light sources that feature a lifetime rating of at least 24,000 hours. If the project includes LED sources, then the lighting units must have a rating of L70. Usable light levels can be defined as L90, L80 or L70 — the point at which the fixture has dimmed to 90%, 80% or 70% of its original output.
This was achieved through bulb selection – see selections in point above.
- For regularly inhabited areas, use direct-only overhead illumination for 25 percent or less of the project’s entire connected lighting load.
Direct-only overhead lighting is lighting that points directly down from the ceiling versus more diffuse lighting options. Here is a graphic showing a diversity of approaches to achieving diffuse versus direct lighting. As shown, creating diffuse lighting is mostly about choosing the correct fixtures, which is what we did. Below is an overview and you can visit the Fixture Comparisons section (above) for the specific tests and comparisons we ran.

Click for Source – Lighting Systems and their Design
Task lighting is another way to reduce direct-only overhead lighting, we applied this throughout the structure. Here’s a graphic illustrating how it works:

Click for Source – Lighting Systems and their Design
- Make sure that 90 percent of a regularly inhabited floor space meets a minimum of 85 percent reflectance for ceilings, 60 percent for the space’s walls, and 25 percent of the area’s floors.
This point is about choosing the right colors for your ceilings, walls, and floors. LRV, also commonly known as the Light Reflectance Value or Luminous Reflectance Factor, determines how much light is reflected (versus absorbed) by a paint or material. Black would have a value of 0 and white has a value of 100:

Most paint companies actually post the LRV value of a color right on the fandeck of colors, so meeting the ceiling/wall/floor LRV values of 85/60/25 is as easy as picking a color with an LRV greater than the requirement. For our purposes, we chose light earth tones and off-white colors to achieve this.

One Community Duplicable City Center Kitchen Dome – Kitchen | Concept Render – Kitchen (Click for the Eco-kitchen Open Source Hub)

Living Dome Rental Room with Do-it-Yourself-Replicable Pallet Furniture Designs

One Community Duplicable City Center | Eco-Pool Concept Render – Indoor View – Click to Visit the Natural Pool Page
- When the space includes furniture, confirm that the area has a 45 percent minimum reflection for work surfaces and 50 percent for partitions that move.
As with the ceiling, wall, and floor colors, this point is about choosing the right colors for furniture and work surfaces. Stainless steel in the kitchens, light woods for tables, and light fabrics for furniture have been chosen to meet the 45% minimum reflections goals of this point. Here’s an example from the Open Source City Center Library Furniture Page.

City Center Library – Click for the complete Duplicable City Center open source hub
- For 75 percent of a regularly used area, do not exceed the 1:10 ratio of average wall surface lighting to the space’s regular work surface. The specification excludes window design. A project is also required to meet the ceiling/wall/floor and furniture/work-surface reflectance guidelines above or display a wall reflectance of 60 percent based on area (i.e. for area-weighted surfaces).
Similar to the other reflectance guidelines, this point is about the ratio of lighting on the walls to surface lighting. The simplest approach to achieving the desired goals of this point would be to place lights far enough from walls so that the majority (90%+) of the light falls on the surfaces versus the walls. We used DIALux Lighting Tests to do this. The following steps from LEED V3 (a Pilot Credit that is now part of LEEDv4) are a simpler approach to achieving and demonstrating the required reflectance:
- Create a list that includes representative areas for all regularly occupied spaces in the project. For each area, include an area description, area location(s), work plane description, work plane illuminance value, wall surface illuminance value, and a calculation for work plane illuminance to wall surface illuminance (in the format of 1: X)
- Calculate the average ratio
- Demonstrate that the project also meets the ceiling/wall/floor and furniture/work-surface reflectance guidelines above or has area-weighted surface reflectance of 60% for walls.
- Describe your methods used to determine illuminance values
- For 75 percent of a commonly used floor area, do not surpass the 1:10 ratio of average ceiling lighting to work-surface illumination. The requirement omits fenestration (windows), but projects also need to meet the ceiling/wall/floor and furniture/work-surface reflectance guidelines above or displays an area-weighted surface reflectance of 85 percent for the ceilings.
Again, this point is similar to the other reflectance guidelines. The simplest approach to achieving the desired goals of this point would be to use lighting fixtures that direct the majority (90%+) of light onto the surfaces versus the ceiling. We used DIALux Lighting Tests to do this. The following steps from LEED V3 are a simpler approach to achieving and demonstrating the required reflectance:
- Create a list that includes representative areas for all regularly occupied spaces in the project. For each area, include an area description, area location(s), work plane description, work plane illuminance value, wall surface illuminance value, and a calculation for work plane illuminance to ceiling surface illuminance (in the format of 1: X).
- Calculate the average ratio
- Demonstrate that the project also meets the ceiling/wall/floor and furniture/work-surface reflectance guidelines above or has area-weighted surface reflectance of 85% for ceilings
- Describe your methods used to determine illuminance values
MAXIMIZATION OF DAYLIGHTING POINTS (3 points)
The Duplicable City Center window and door plan is designed to additionally meet the requirements of the Environmental Quality Credit for Daylighting. This consideration is all about window placement and how light falls in a room and requires computer modeling to demonstrate success. There are 3 methods LEED accepts (click here for a resource article about them all) and we’ve yet to choose which one we’ll use. Here are summaries of the three options and we’ll add our results here once they are complete.
- Spatial Daylight Autonomy simulation and sunlight exposure simulation: Demonstrate through annual computer simulations that spatial daylight autonomy (sunlight as the exclusive light source for a space) of at least 55%, 75%, or 90% is achieved AND demonstrate through annual computer simulations that annual sunlight exposure of no more than 10% is achieved. (resource PDF) (resource article). Spatial Daylight Autonomy (sDA) describes how much of a space receives sufficient daylight. Specifically, it describes the percentage of floor area that receives at least 300 lux for at least 50% of the annual occupied hours. Annual Sun Exposure (ASE) describes how much of space receives too much direct sunlight, which can cause visual discomfort (glare) or increase cooling loads. Specifically, ASE measures the percentage of floor area that receives at least 1000 lux for at least 250 occupied hours per year.
- Illuminance Calculations (should be between 300-3000 lux ) on a clear sky day at equinox: Demonstrate through computer modeling that illuminance levels will be between 300 lux and 3,000 lux for 9 a.m. and 3 p.m., both on a clear-sky day and at the equinox. Calculate illuminance intensity for sun (direct component) and sky (diffuse component) for clear-sky conditions as follows: Use typical meteorological year data, or an equivalent, for the nearest available weather station. Select one day within 15 days of September 21 and one day within 15 days of March 21 that represent the clearest sky condition. Use the average of the hourly value for the two selected days. Exclude blinds or shades from the model. Include any permanent interior obstructions. Movable furniture and partitions may be excluded. (resource PDF)
- Measurements: Achieve illuminance levels between 300 lux and 3,000 lux for the floor area indicated in Table 3 of this resource PDF. With furniture, fixtures, and equipment in place, measure illuminance levels as follows: Measure at appropriate work plane height during any hour between 9 a.m. and 3 p.m. Take one measurement in any regularly occupied month, and take a second as indicated in Table 4 of this resource PDF. For spaces larger than 150 square feet (14 square meters), take measurements on a maximum 10 foot (3 meter) square grid. For spaces 150 square feet (14 square meters) or smaller, take measurements on a maximum 3-foot (900 millimeters) square grid.
As can be seen by the methods used to demonstrate compliance, the goal here is to create spaces that are naturally lit during the daytime. We’ve made this possible for the City Center through multiple 12′ wide hexagonal windows and 8′-wide sliding glass doors in the Social and Dining Domes, plus code compliant windows in each of the rental rooms. Several of the hexagonal windows are elevated and South-facing to maximize light harvesting and the dome-shaped structures also help to spread this light more effectively.

One Community Duplicable City Center | Concept Render – Click for the main open source hub
MAXIMIZATION OF ENVIRONMENTAL QUALITY POINTS (1 point)
The Duplicable City Center window and door plan has also been designed with the Environmental Quality Credit for Views as a goal. This consideration is all about window placement and what you can see outside. Specifically, including direct line of sight to the outdoors (via vision glazing) from 75% of all regularly occupied floor area. “Vision glazing” is windows, or the portion of larger windows, that provide a connection to the outdoors. These are typically vertical windows between 2.5 ft and 7.5 ft above the floor. Also known as View Windows and not to be confused with Daylight Windows – windows designed to provide interior illumination and located above eye height (7.5 ft), or the portion of a window more than 7.5 ft above the floor.
COMING:
To claim this point, we’ll demonstrate a direct line of sight to the outdoors via vision glazing for 75% of all regularly occupied floor areas. View glazing in the contributing area will provide a clear view of the outdoors. Additionally, 75% of all regularly occupied floor area will have at least two of the following four kinds of views:
- Multiple lines of sight to vision glazing in different directions at least 90 degrees apart
- Views that include at least two of the following: (1) flora, fauna, or sky; (2) movement; and (3) objects at least 25 feet from the exterior of the glazing
- Unobstructed views located within the distance of three times the head height of the vision glazing
- Views with a view factor of three or greater, as defined in “Windows and Offices: A Study of Office Worker Performance and the Indoor Environment.
Click here for the source resource for all of the above.
We’ll include in the calculations any permanent interior obstructions. Movable furniture and partitions will be excluded. Views into interior atria can and will be used to meet up to 30% of the required area, which is helpful for our design that offers views of the central pool and spa areas. To achieve all this, centrally located windows are in each of the rental rooms, multiple 12′ wide hexagonal windows and 8′-wide sliding glass doors are included in the Social and Dining Domes, and the there are nearly 360º of windows for the cupola.

Duplicable City Center Eco-Pool Concept Render Showing the Dining Dome Views

Cupola Inside View Looking West – Yoga Class Setup
RECEIVING THE LIGHTING POLLUTION REDUCTION POINT (1 point)
Achieving the Lighting Pollution Reduction Credit is accomplished by satisfying the uplight and lighting trespass criteria using the backlight-uplight-glare (BUG) method (Option 1) or the calculation method (Option 2). The details of both of these methods and how to apply them can found at this link on the LEED USGBC website. We have not started modeling these details yet, but will add them here when they are complete.
FINAL BUILDING ENERGY MODELING RESULTS
 When complete, this section will share our complete energy modeling process and results for the Duplicable City Center. We’ll include what software we used, open source spreadsheets with all the data we input, and how we used the energy model to make any decisions it influenced.
Note: We are seeking someone (click for ad) to help us complete our building energy simulation for the Duplicable City Center, contact us if you have the necessary expertise and would like to help.
FINAL LEED POINTS AWARDED SUMMARY
 This section won’t be completed until we receive our final LEED certification. The goal is LEED Platinum, the highest rating, and we will share here our final points report and certification once we have received it. At that time, we’ll also include here any mistakes we had to correct, learnings we got from the process, and things we would do differently if we were to do it all over.
RESOURCES
- Article: “DIY Guide to LED Lighting”
- Article: “The Ups and Downs of Lighting“
- Article: “Summary and critique of “LEED” Building Design & Construction Reference Guide, v4“
- Informative PDF about LEED: “LEED® v4 buildings: Lutron commercial solutions“
- WWW.USGBC.org Resource: LEED Daylighting Points Requirements
- WWW.USGBC.org Resource: LEED Views Points Requirements
- Article: “ASHRAE Releases 90.1-2010–Part 1: Design, Scope, Administrative Requirements
- Article: “Annual Daylighting Performance Metrics, Explained”
- 2015 IECC Commercial Electrical Power and Lighting Systems
- 2015 IECC Lighting Power Densities Space-by-Space PDF Download
- Slide Presentation: “Lighting Systems and Their Design”
- ASHRAE/IES 90.1-2013 and IECC 2015: A Review of the Lighting Requirements
- Use this page (click here) if you have a resource you’d like to suggest be added here
SUMMARY
 One Community’s approach to Highest Good energy is a combination of conservation, functionality, and monitoring, fine tuning, and data sharing. We know people will adopt the solutions we present if we can demonstrate lighting and energy approaches that save people money, still provide functional and aesthetically beautiful environments, and teach people how to replicate them. The Duplicable City Center will do all these things and more while helping us achieve LEED Platinum certification. This page will be where we continue to share all we learn, create, and evolve throughout the process.
FREQUENTLY ANSWERED QUESTIONS
None yet… Click here if you have one to ask
CONSULTANTS ON THESE LIGHTING DESIGNS
Aravind Batra: Electrical Engineer, LEED AP, Principal of P2S Engineering
Dipti Dhondarkar: Electrical Engineer
Erika Yumi Tamashiro: Architecture and Urban Design Student
James Del Monaco: Mechanical Engineer, LEED AP, Sustainability director of P2S Engineering
Joel Newman: Architectural Visualization Designer and owner/operator of Figment
Mike Hogan: Automation Systems Developer and Business Systems Consultant
Satish Ravindran: Senior Mechanical and Industrial Engineer and LEED AP
![]()


Connect with One Community