One Community
Earthbag Construction Dome-Home Electrical Systems
This page is about the installation of electrical systems in earthbag construction domes and other dome-style eco-homes. It is part of the open source Earthbag Crowdfunding Campaign and open source Earthbag Village. It consists of the following sections:
- What is This
- Why Open Source This
- Tools and Materials List
- Initial Considerations
- Creating an Electrical Plan
- Constructing and Installing Anchors
- Running Wire in Conduit and Through Studs
- Hardwiring Heater and Murphy Bed Lighting Specifics
- Installing Outlets and Switches
- Hooking up the Subpanel
- Installation and Labeling of Breakers
- Attaching Face Plates
- Resources
- FAQ
NOTE: THIS PAGE IS NOT CONSIDERED BY US TO BE A COMPLETE AND USABLE TUTORIAL UNTIL
WE FINISH THE CROWDFUNDING CAMPAIGN AND ADD ALL THE VIDEOS AND EXPERIENCE FROM
AN ON-SITE ELECTRICIAN AND THE ENTIRE BUILD TO THIS PAGE. IN THE MEANTIME,
WE WELCOME YOUR INPUT AND FEEDBACK
HERE ARE LINKS TO WHO WE ARE AS AN ORGANIZATION (click icons for complete pages)


")
")
")
")
VISIT THESE DETAILED PAGES FOR MORE ON THE COMPLETE VILLAGE PLANS (click icons)
![]()

![]()
![]()
![]()
")
")
")
WAYS TO CONTRIBUTE TO EVOLVING THIS SUSTAINABILITY COMPONENT WITH US
SUGGESTIONS | CONSULTING | MEMBERSHIP | OTHER OPTIONS
CLICK THESE ICONS TO JOIN US THROUGH SOCIAL MEDIA
![]()
![]()
![]()
![]()
![]()
![]()
![]()
![]()
![]()
![]()
WHAT IS THIS
The domes being designed for the Earthbag Crowdfunding Campaign integrate maximally space efficient furniture and appliance designs. The goal of this page is to teach people how to replicate these designs. In so doing, we are creating the most comprehensive tutorials available for earthbag construction. This will help to show people that sustainable and maximally space efficient construction can be equally (if not more) beautiful than traditional building, significantly more artistic and interesting, and a much more easy and realistic do-it-yourself project.
WHY OPEN SOURCE ELECTRICAL DESIGN
FOR EARTHBAG CONSTRUCTION
 Dispelling the mystery and demonstrating a clear path for replication of earthdome electrical design is important to helping create mainstream adoption of this building approach. Most electricians and other builders have never had experience with earthbag construction so we are creating a resource people can use to understand the complete process. We are also creating this to combine into one place all of the necessary resources for replication because our research demonstrated a huge lack of comprehensive resources in this area. In so doing, we are providing an open source tool set that is both specific to this build and useful and scalable for other builds too.
TOOLS AND MATERIALS
 When undertaking a project and acquiring tools and materials seek out those that best fit your situation. Quality of tools generally correlates with price, but thorough research can save you money if you have the time. What works for us, may not necessarily work for you, but in many cases it will. We share our list here with the hope that it will act as a useful guide for saving you time, money, and frustration. To fully engage in this action item you may require the following tools and materials. If you find a better substitute, please let us know.
- Circular saw
- Cordless drill
- 3/4″ boring bit
- Sawhorses
- Hammer
- Eye protection
- Respirator
- Tape measure
- Carpenter’s square
- Carpenter’s pencil
- Pressure treated lumber (PT)—1″ x 6″
- Pressure treated lumber (PT)—2″ x 4″
- Feeder wire 8 gauge
- Romex wire 12 gauge
- Single-strand wire (black, white and green) 12 gauge
- 2-conductor wire
- 3 -conductor wire
- Poly pull line
- Electrical tape
- Plastic cable clips (2 nail)
- Steel staples 1/2″
- Wire cutter
- Cable slitter
- Wire stripper
- Circuit testers
- Plastic conduit ¾â⒬
- Conduit clamp ¾â⒬
- 90 ¾â⒬
- LB ¾”
- LBT access fitting ¾”
- Pulling elbow ¾”
- Schedule 80 pulling elbow ¾”
- Offset ¾”
- Bends ¾”
- Male adapter ¾”
- Schedule 80 PVC conduit electrical boxes ¾”
- Conduit solvent cement
- Conduit primer
- Black pipe ¾”
- Rubber mallet 2-pound
- Plastic electrical box
- Duplex outlet
- GFCI outlet
- Single pole toggle switch
- Cover plate
- 3-way switch
- Screwdriver
- Single pole 20-amp breaker
- 6-slot electrical subpanel
- Galvanized screw 2 ½”
- Screw bits
- Screw bit holder
- Galvanized finish nail 3 ½”


INITIAL CONSIDERATIONS
The installation of electric in an earthbag dome home is a different process than in a conventional build, and has to be approached in a different manner. In a conventional stick-build, after the structure is closed in, all the electrical wire is installed. With an earthbag structure, the conduit (or UF-B direct burial cable) is run as you are building, otherwise you will have to chip into the hardened earthbags which is vastly more time consuming. With this in mind, and to make electrical installation as easy as possible, we will create an indentation channel by hammering ¾” black pipe into the soft, newly-filled earthbags, then removing it; resulting in a channel for placing the ¾” schedule 80 PVC conduit before hardening of the earthbags is complete. Outlet and switch boxes located on interior earthbag walls are made possible by fabricating wooden anchors within the walls during their construction. The interior stud wall mounts are completed the same as in a conventional build, with a stud side-mount plastic electrical box.
CREATING AN ELECTRICAL PLAN
You will need a very clear understanding of locations of outlets, switches, and the subpanel so they are all conveniently located; the best approach for this is to create an electrical plan. Creating your electrical plan includes the following steps:
- Find out what your local electrical codes require.
- Put together a mental image of what you want.
- Transfer that image to paper, with placement of all lights, switches, outlets and the subpanel.
- Delineate the physical boundaries of your dome and walk through the boundaries while turning on imaginary lights (as though you are walking into your house at night).
- Rework your paper plan after walking through your imaginary plan until you have a practical and comprehensive idea of all the electrical locations for switches, outlets, and lights.
- Designate subpanel location on an interior stud wall and label all breakers.
- If you have Sketch-up capabilities or some other similar program, design an overhead view and a few elevation 3-D sketches to aid in the visualization.
Here are the electrical layouts and plans for each of the Earthbag Crowdfunding Campaign domes to use as a guide or example:

We will add complete detailed and open source plans as we complete them. Click this image if you’d like to help.
To create your own plan, do a mental walk-through and visualization of what you’d like your electrical plan to be. Think about the function of the space you are creating and transfer what you imagine onto a piece of paper showing where you want lights and anything that an outlet will serve (stereo, bedside alarm, kitchen appliances, etc.). Keep rethinking and envisioning your space until you have determined the proper locations as it relates to the electrical boxes.
If necessary, delineate the perimeter of your dome with rope or garden hoses, scratch it out at the beach in the sand, stake it off with string in your yard, etc. so you can have the experience of physically walking through the space and imagining turning on light switches, plugging in appliances, etc. Local code may require an outlet every 12 feet and every 8 feet for counter tops. The subpanel will need to be conveniently located and easily accessible within an interior stud wall with all breakers labeled to the corresponding areas of coverage. Code may have requirements related to the subpanel location and meter placement too, check to be sure.
Here’s a video about how to install a subpanel:
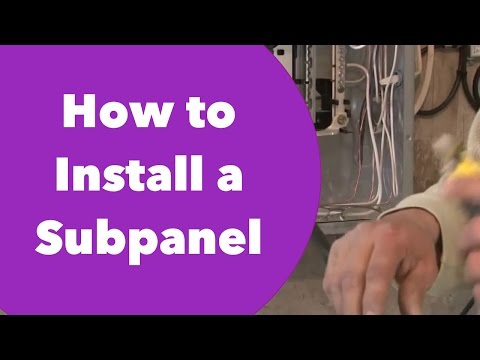
In our case, we will locate our subpanel within an interior stud wall and it will consist of 2-3 20 amp breakers, fed by and 8 gauge feeder cable. For the Earthbag Village, this cable will be coming from another subpanel in the Tropical Atrium, with that subpanel coming off the main disconnect panel. Code generally requires an unobstructed access to the subpanel, so be certain it is openly accessible with no obstructions.
Here is a video tutorial walking you through how we installed the earth dome home subpanels for the Earthbag Crowdfunding Campaign:


VIDEO COMING: DOME HOME ELECTRICAL: INSTALLING YOUR ELECTRICAL SUBPANEL
SEE OUR HOW TO HELP AND/OR CROWDFUNDING CAMPAIGN PAGE TO HELP CREATE ALL THE TUTORIAL VIDEOS FASTER
CONSTRUCTING AND INSTALLING ANCHORS
In an earthbag wall an anchor, or mounting plate, is required to attach the electrical boxes to the earthbag walls. Because you have no stud wall to directly secure to, a simple wooden mounting device is constructed to act as a nailer for attaching and securing the electrical box to the wall and inserted into the earthbag courses during construction. Be certain to check the local codes for what is permissible. This phase of construction includes the following steps:
- Cutting the 1 x 6 and 2 x 4
- Inserting nails in 1 x 6 to ensure stability of anchor
- Assembling the 2-piece anchor
- Attaching the electrical box
- Installation of anchor
- Creating forms for running conduit
The first step in constructing an anchor is to cut a 2 x 4 to a length of 14″ and 1 x 6 that is 16″ long, using pressure treated lumber. Then hammer in several 3½” galvanized nails, randomly spaced, into the 1 x 6, driving them in all the way. Now flip the 1 x 6 over and repeat the process. This task is easily performed by setting the 1 x 6 across a pair of sawhorses. Now perpendicularly center the on-edge 2 x 4 on the 1 x 6 and secure with two 2 ½” galvanized screws; one screw fastened 1 ¼” down from the top of the 1 x 6 and the other 1 ¼” up from the bottom of the 1 x 6, slightly offset by ¼”, to prevent splitting of the 2 x 4. The end product is a 1 x 6 anchor plate (with a 2 x 4 mounting stem for an electrical box) with four protruding corners and two nails that will help solidify the anchor to the earthbags above and below. This, in addition to the pressure from the earth bags, gives stability in the wall to the electrical boxes.
Now match the electrical box up with the end of the 2 x 4 and secure into place with one 2 ½” screw near the top of the box and the other at the lower end of the box (offset if possible) as the existing holes in the back of the box will prevent rotation of the box. If the heads of the screws are smaller than the holes in the back of the box, simply add a washer to provide solid backing for the screw.
The anchor is now ready for installation into the wall. Make sure you know how many electrical boxes you require and make them up ahead of time. You will need them readily available to install as your walls go up. Remember that you must follow code requirements on the minimum/maximum heights of the boxes, making sure the face of the box is about 1 ¼” out from the bags so it will match up with the plaster for a flush mount.
This video shows the installation of the electrical anchors and boxes within an earthbag wall:

When locating anchors for switches, it is done the same way as for the outlet boxes, but an LBT box will be inserted at the junction to project the conduit up to a 4′ level where the switch box will be installed identically as the outlet box.
Here is a video demonstrating this process, as well as the construction of the anchors:
VIDEO COMING: DOME HOME ELECTRICAL: SWITCH INSTALLATION ANCHOR VIDEO DETAILING ITS RELATIVE POSITION TO WHERE THE CONDUIT LINE IS BELOW
SEE OUR HOW TO HELP AND/OR CROWDFUNDING CAMPAIGN PAGE TO HELP CREATE ALL THE TUTORIAL VIDEOS FASTER
¾” black pipe is used as a form to create a slot into the earthbags. The outside diameter of ¾” schedule 40 black pipe is 1.050″, the equivalent of the outside diameter of the conduit we will run in the domes: ¾” schedule 80 PVC. Once the electrical boxes are positioned, just after the bags have been laid, a form is used for creating the space to insert the conduit. First the black pipe is hammered into the earthbags as the courses are laid up; before they harden and at the location you desire for the ¾” schedule 80 PVC conduit. Next, remove the pipe and allow the indentation to harden, creating the form for the ¾” PVC for wiring. Later, you will insert and plaster over the PVC to provide a raceway to pull wire and make repairs for the longevity of the dome without having to demo the plaster.
Here is a video detailing creation of the pipe raceways:
VIDEO COMING: DOME HOME ELECTRICAL: FORM CONSTRUCTION OF PIPE RACEWAYS
SEE OUR HOW TO HELP AND/OR CROWDFUNDING CAMPAIGN PAGE TO HELP CREATE ALL THE TUTORIAL VIDEOS FASTER
RUNNING WIRE IN CONDUIT
AND THROUGH STUD WALLS
An important factor to keep in mind about the electrical installation in an earthbag structure is that running wire can be performed in two different ways. The first is that once the boxes are mounted, you can run electrical wire from box to box in the recesses between earthbags if you use UF-B direct burial wire (code-approved, BUT CHECK WITH YOUR BUILDING INSPECTOR BEFORE INSTALLATION). This wire is much simpler to run, but is more expensive and challenging to strip, but you will not have to buy conduit.
The second choice is using either metal or plastic conduit. Using conduit enables adding more circuits in the future (depending on the size of the conduit) and/or replacing faulty wires without destroying your walls. Due to this benefit, we will use ¾” sched 80 PVC conduit and it will be covered with about 3″ of plaster.
Here is a detailed video showing how to install conduit in an earthbag structure:
VIDEO COMING: DOME HOME ELECTRICAL: WIRE INSTALLATION OF SINGLE STRAND WITH CONDUIT IN EARTHBAG WALLS & ROMEX IN INTERIOR STUD WALLS (WITHOUT CONDUIT), INCLUDING LABELING OF WIRES BACK TO THE PANEL AT THE TIME OF INSTALLATION
SEE OUR HOW TO HELP AND/OR CROWDFUNDING CAMPAIGN PAGE TO HELP CREATE ALL THE TUTORIAL VIDEOS FASTER
On interior 2 x 4 stud walls, use a ¾” boring bit to drill holes in the CENTER of the 2 x 4 stud. Your code will most likely require 1 ¼” of solid wood on each side of the hole. Because a dimensional 2 x 4 stud is actually 3 ½” inches wide, the hole has to be centered to allow for the 1 ¼” of solid wood on each side of the drilled hole. If it is less than 1 ¼” code requires a metal plate on the edge of the 2 x 4. If your interior stud wall is built with 2 x 6’s, you still need the 1 ¼” solid wood edge. Because of the wider stud, centering is not necessary, but be aware the 1 ¼” solid wood edge still applies.
In the interior stud walls you will use staples for securing the wiring to the studs. CLICK HERE for an article with tips on using staples for securing wiring to studs.
Here is a detailed instructional video covering the drilling of holes for the wiring, running the wire, and stapling within a stud wall:
VIDEO COMING: DOME HOME ELECTRICAL: STUD DRILLING, RUNNING WIRE, AND STAPLING WITHIN A STUD WALL
SEE OUR HOW TO HELP AND/OR CROWDFUNDING CAMPAIGN PAGE TO HELP CREATE ALL THE TUTORIAL VIDEOS FASTER
HARDWIRING HEATER
AND MURPHY BED LIGHTING SPECIFICS
Our electric heaters will be hard wired in (as required by code) and the custom and DIY murphy bed furniture will have wiring built in that we will simply tie in with the embedded wire to our Romex runs.
Some applications will require (if not, it is still suggested) dedicated circuits. This includes the following:
- Microwave
- Stove
- Electric baseboard heater
- Refrigerator
- Tankless water heater
- Dryer
Work closely with a qualified electrician to assure you are running the proper sized wire and matching breaker for the above items.
Here is a video showing the heater and internal custom and DIY murphy bed furniture connections:
VIDEO COMING: DOME HOME ELECTRICAL: HEATER & MURPHY BED CONNECTION AND SHORT NARRATION OF DEDICATED CIRCUITS AND HOW IT RELATES TO WIRE SIZE AND BREAKER AMPERAGE
SEE OUR HOW TO HELP AND/OR CROWDFUNDING CAMPAIGN PAGE TO HELP CREATE ALL THE TUTORIAL VIDEOS FASTER
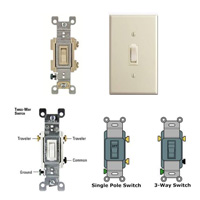
INSTALLING OUTLETS AND SWITCHES
Once you have run the wire to all your electrical boxes, you can connect the wire to the outlets and switches. The electrical plan in our domes is relatively easy to set up and the four areas of most concern are the installation of:
- Outlets (#11 in the tutorials below)
- Single pole switches (#16in the tutorials below)
- 3-way switches (#18in the tutorials below)
- Overhead or sconce lighting(#23 in the tutorials below)
The following is a series of 23 short and explicit videos covering the basics of electricity. This includes the four listed above in addition to the following related topics:
- Basics of electricity
- Service panels
- Grounding
- Circuit breakers
- Household wiring
- Understanding amperage
- Short circuits
- Amps, volts, and watts
- Rough-in wiring
- Safety and testing
- Electrical outlets
- Middle-of-run receptacles
- Two-gang receptacles
- GFCI’s (ground fault circuit interrupters)
- AFCI’s (arc fault circuit interrupters)
- Single pole switches
- Repairing broken switch
- Three-way switches
- Four-way switches
- Switch controlling receptacle
- Switch loop
- Switch loop controlling half a receptacle
- Light fixtures
The entire series can be viewed in one showing by starting with the video below:
http://www.youtube.com/watch?v=cdGEF6i73tU&list=PL8FD57D47AD69C0F6
Here’s a video of the additional specifics you need to be aware of when installing switches and outlets in domes homes and/or a complete Earthbag Village:
VIDEO COMING: SWITCH AND OUTLET INSTALLATION DETAILS SPECIFIC TO DOME HOMES
SEE OUR HOW TO HELP AND/OR CROWDFUNDING CAMPAIGN PAGE TO HELP CREATE ALL THE TUTORIAL VIDEOS FASTER
HOOKING UP THE SUBPANEL
For 3-dome cluster homes, the subpanel is located in the interior stud wall of the earthbag domes. For the complete Earthbag Village, each subpanel is fed from another subpanel in the Tropical Atrium that feeds about 10 domes and has a single cutoff switch to shutoff all electricity to those 10 domes in an emergency. From each individual dome, there will be 2-3 20-amp breakers that can be individually shutoff. This will allow for safe maintenance or troubleshooting of an individual circuit within any particular dome.
The components are as follows:
- Running feeder cable from Tropical Atrium to individual domes and isolating/protecting cable
- Specific designation of entry of cable to stud wall location
- Running single-strand wire undergound in conduit before floor construction and isolating/protecting wires
- Mounting subpanel
- Running feed wire into subpanel
An 8-gauge feeder cable is run underground from the subpanels of the main disconnect panel in the Tropical Atrium. This line is buried 24″ below ground and will enter under the earthbag walls to a point directly under the interior stud wall. Once that wall is built the feeder cable is connected to the subpanel. In the meantime, the excess wire is coiled and protected until installation.
Here’s a video showing how to run and connect your feeder wire:
VIDEO COMING: RUNNING AND CONNECTING THE DOME HOME FEEDER WIRE
SEE OUR HOW TO HELP AND/OR CROWDFUNDING CAMPAIGN PAGE TO HELP CREATE ALL THE TUTORIAL VIDEOS FASTER
INSTALLATION AND LABELING OF BREAKERS
We will use two or three 20-amp breakers, depending on the final heat source. Ideally, one breaker is dedicated to a heat source, another to half of the outlets and lights and the third to the remaining outlets and lights. Dividing the outlets and lights on different breakers then provides us with continued power and lights if one circuit goes down. Be certain to properly label the breakers so the proper breaker can be turned off in case of an emergency or for routine maintenance.
- Installation of breakers
- Connecting wires to breakers
- Labeling breakers
To avoid electrical shock, the installation of the subpanel & breakers and connecting of wires to breakers should be completed by a licensed electrician. Though it is a relatively easy process, if one is not familiar with the process, it can be dangerous. For your general knowledge we are including a video below, but we still advise a licensed electrician carry out the process.
The labeling of breakers in the panel is generally one of the last steps. To make the process as easy as possible, as you run a wire, either label the wire with a piece of tape or write on the plastic sheathing (if using Romex) where the circuit runs so in the end when it is hooked to the panel, you know exactly what area that particular circuit controls.
Here’s a video showing connection and labeling of the wires and breakers:
VIDEO COMING: DOME HOME ELECTRICAL: INSTALLATION AND LABELING OF SUBPANELS AND BREAKERS
SEE OUR HOW TO HELP AND/OR CROWDFUNDING CAMPAIGN PAGE TO HELP CREATE ALL THE TUTORIAL VIDEOS FASTER
ATTACHING FACE PLATES
Attaching faceplates to all your outlet and switch boxes is the final step for completion of the electrical setup phase. This process is the simplest step of all and includes the following three easy steps:
- Sort faceplates according to outlets and switches
- Attach plates
- Test all switches, outlets, and lights
This is the final step to completing the electrical process. Categorize your face plates into two groupings: those that belong to outlets and those that belong to switches. Use a screwdriver to attach the faceplates to the electrical boxes. The screws are included and it is a quick process of inserting either one or two screws to attach the plate (depending on the size of the box). The final step is to test all your outlets with a circuit tester or by simply plugging in a radio or lamp and also turning on and off all the switches. Sometimes a switch can be faulty coming out of the box, so it is a good idea to test the entire installation to know if you have received a faulty product from the manufacture.
Here is a video of the face plate attachment and circuit testing:
VIDEO COMING: DOME HOME ELECTRICAL: FACE PLATE ATTACHMENT AND USE OF CIRCUIT TESTERS FOR TROUBLESHOOTING
SEE OUR HOW TO HELP AND/OR CROWDFUNDING CAMPAIGN PAGE TO HELP CREATE ALL THE TUTORIAL VIDEOS FASTER
RESOURCES
- Comprehensive earthbag building source – very informative.
- Electrical box installation with anchor
- Comprehensive instructional video covering the basics of wiring
- Code requirements for securing non-metallic sheathed cable (Romex)
- Switch and outlet requirements for meeting ADA requirements
- Wire guide for gauging proper breaker amperage to wire size
FREQUENTLY ANSWERED QUESTIONS
Q: I know a little bit about electricity, do I really need a licensed electrician?
Absolutely. There are serious consequences when dealing with electricity. Don’t take any chances. Have a licensed electrician onsite for all electrical work performed.
Q: How do I know what sized wire to use?
If you don’t know, this is another reason to have a licensed electrician onboard. Incorrect sizing of wire can be catastrophic. If you want to know more about it, work directly with the electrician, ask questions, and learn it the proper way.
Q: Where do I use a GFCI?
A GFCI (ground fault circuit interrupter) is used anywhere there is an accumulation of moisture or humidity. This is required by code and includes bathrooms, kitchens, basements, garages, crawl spaces, outdoors, etc.
![]()