One Community
Aircrete Engineering and Research: Compression Testing, Mix Ratios, R-value, and More
Welcome to the Aircrete Engineering open source engineering hub. The purpose of this page is to share the engineering steps, research, resources, and tools we’ve used to verify the safety of our Aircrete designs and structures. We will continue to evolve this page until our Aircrete dome home is permitted. If building that structure demonstrates Aircrete is a better choice than Earthbag construction, we will build the entire Earthbag Village as Aircrete instead – open source sharing complete plans for both an Aircrete and an Earthbag Village.
For easy reference, the page is divided into the following sections:
- Related Pages
- What is Aircrete Construction
- Why Open Source Aircrete Engineering
- Ways to Contribute to Evolving This Sustainability Component With Us
- Aircrete Research Details
- Past Aircrete Testing
- Common Mistakes and Considerations While Making Aircrete
- Aircrete Testing:
- Aircrete Testing Summary and Findings
- Key Observations
- Mix Ratio Reference Guide
- How Aircrete Strength Compares To Concrete
- Compression Results Using Different Aircrete Densities
- Compression Results Using Different Cure Times
- Compression Results Adding Stucco Reinforcement
- Compression Results Using Different Mix Methods
- Compression Results Comparing Standard Mixes To Variations
- Compression Results Using Different Foams
- Limitations Of This Testing Process
- Discussion
- Our Thoughts On This As A Building Method
- Analysis of Primary Aircrete Foaming Agents
- Aircrete Mixing Tutorials
- Equipment Tutorials
- Waste Management
- Past Compression Testing Results
- Future Plans for Aircrete and Other Sustainable Building Materials
- Resources
- Summary
- Frequently Answered Questions
NOTE: AFTER HUNDREDS OF HOURS OF MIXING AND TESTING, WE WERE ABLE TO GET CONSISTENT RESULTS TO PRODUCE THE DATA ON THIS PAGE. READ THE “LIMITATIONS OF THIS TESTING PROCESS” TO UNDERSTAND WHY LARGE-SCALE PRODUCTION MAY YIELD MORE CONSISTENT RESULTS THAT JUSTIFY ADDITIONAL COMPRESSION TESTING.
PLEASE ALSO NOTE: WHILE OUR RESEARCH HERE IS EXTENSIVE, IT SHOULD BE USED FOR EDUCATIONAL PURPOSES ONLY. WE DO NOT RECOMMEND BUILDING ANYTHING WITHOUT PROPER ENGINEERING AND STAMPED AND APPROVED ENGINEERING PLANS.
RELATED PAGES (Click icons for complete pages)
![]()
![]()
![]()


")
")
WHAT IS AIRCRETE CONSTRUCTION
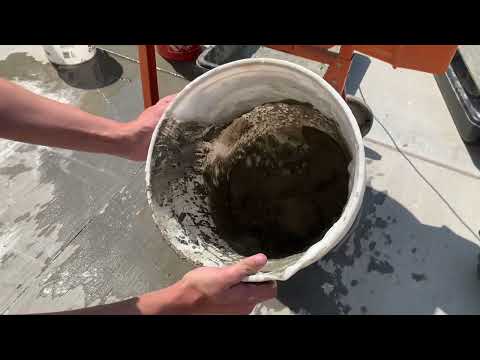
 Aircrete is a building material that resembles concrete but is closer to cement. Aircrete is aerated cement made with three simple, easy-to-find ingredients: cement powder, water, and detergent foam. It is not considered concrete because it doesn’t include a solid aggregate mixed with cement, like sand or gravel. Instead, the “filler” in Aircrete is foam, and microscopic bubbles are produced by it. The many bubbles distributed throughout the Aircrete make it a far lighter alternative to traditional concrete with better insulation. Like concrete, Aircrete is often poured into molds and then cured over a certain period to allow the product to harden and strengthen. The result is a cementitious block with a uniform composition.
Benefits of Aircrete for the sustainable home include:
- Fairly inexpensive
- Lightweight
- Fire-resistant
- Resistant to moisture and sulfates
- DIY friendly
- Better thermal performance
- Uses less concrete, so it’s more sustainable
- Not susceptible to pests such as termites, insects or rodents
Aircrete is intended to be utilized to build structures, but as of now, the compressive strength of Aircrete is not well documented. This team’s mission was to document their scientific approach to defining the compressive strength of Aircrete with different ratios of foam, cure times, and with an added fiber stucco coating. This effort was pursued because of the many benefits associated with Aircrete, primarily its replicability and increased R-Value/insulation properties.
As stated above,Aircrete only consists of three relatively affordable ingredients that are available around the world: detergent, water, and cement. It can also be produced without heavy machinery or intensive labor. As a result, Aircrete has the potential to be a cost-effective, lightweight, and easily accessible building material that is more eco friendly than concrete.
WHY OPEN SOURCE AIRCRETE ENGINEERING
Open-sourcing our Aircrete research is essential to replicate it, allowing other builders to use it for themselves, improve upon our work, or add to it. At the moment, there is very little information on the engineering and structural applications of Aircrete. So, by creating this comprehensive Aircrete resource, we’re attempting to fill the void we see in this area.
Our goal in sharing what we’ve learned is to increase the safety and improve the performance of Aircrete-made structures. We hope this work can serve as a solid foundation for further research into the properties and applications of Aircrete, with others building off of our findings.
Research into sustainable and reliable building materials is at the core of One Community’s open-source strategy for building a global collaboration of self-sufficient and self-sustainable teacher/demonstration communities, villages, and cities for The Highest Good of All. One of the most significant steps to building more sustainably is conducting well-designed research to answer questions of structural strength for furthering the use of non-mainstream building materials. With this in mind, we have researched the compressive strength of Aircrete as part of our open-source contribution to comprehensive sustainable living. This page is a collection of our initial research and will evolve with our experience.
WAYS TO CONTRIBUTE TO EVOLVING THIS SUSTAINABILITY COMPONENT WITH US
SUGGESTIONS | CONSULTING | MEMBERSHIP | OTHER OPTIONS
CLICK THESE ICONS TO JOIN US THROUGH SOCIAL MEDIA
![]()
![]()
![]()
![]()
![]()
![]()
![]()
![]()
![]()
![]()
RESEARCHERS FOR THIS COMPONENT
Charles Gooley: Web Designer
Devendranath Chowdary Maganti: Data Analyst
Dominick Banuelos: Civil Engineering Intern
John Sullivan: CBU Chemical Engineering Student
Jonathan Crago: Civil Engineering Intern
Jarot Tamba: Civil Engineering Intern
Julia Meaney: Web and Content Reviewer and Editor
John Paul D. Matining: Civil Engineer Intern
Marcus Nguyen: Civil Engineering Intern
Preston Thompson: Civil Engineering Student
Tad Matlock: Environmental Science Student
Sarah Boyd: Civil Engineering Student Researcher
Yiwei He: Mechanical Engineer
Zhide Wang: Mechanical Engineer
AIRCRETE RESEARCH DETAILS

Below we discuss our engineering findings and the process we used to get the results we did. We also share how to use the various spreadsheets we created. Note that all structures using Aircrete must still be checked and signed off on by an engineer licensed in your state before beginning any construction. The research and hands-on experimentation journey are shared in the following sections:
- Related Pages
- What is Aircrete Construction
- Why Open Source Aircrete Engineering
- Ways to Contribute to Evolving This Sustainability Component With Us
- Aircrete Research Details
- Past Aircrete Testing
- Common Mistakes and Considerations While Making Aircrete
- Aircrete Testing:
- Aircrete Testing Summary and Findings
- Key Observations
- Mix Ratio Reference Guide
- How Aircrete Strength Compares To Concrete
- Compression Results Using Different Aircrete Densities
- Compression Results Using Different Cure Times
- Compression Results Adding Stucco Reinforcement
- Compression Results Using Different Mix Methods
- Compression Results Comparing Standard Mixes To Variations
- Compression Results Using Different Foams
- Limitations Of This Testing Process
- Discussion
- Our Thoughts On This As A Building Method
- Analysis of Primary Aircrete Foaming Agents
- Aircrete Mixing Tutorials
- Equipment Tutorials
- Waste Management
- Past Compression Testing Results
- Future Plans for Aircrete and Other Sustainable Building Materials
- Resources
- Summary
- Frequently Answered Questions
PAST AIRCRETE TESTING
In the past few years, we have conducted trials to test the viability and compression strength of various Aircrete mixes, working to evaluate the “standard” mix and evaluate the properties of lighter mixes too. We tested lighter mixes because they have a higher air-bubble content that creates a better R-Value. R-value is the capacity of an insulating material to resist heat flow. The higher the R-value, the greater the insulating power.
Overall, the results were inconsistent, with no repeatable successes found. Still, some general trends were observed as the teams worked with many mixes, using different tools, recipes, and varied concentrations of foam and cement.
What was made clear early on was that online resources and recipes for creating Aircrete were scarce. Using them, we also found it hard to generate consistent results. This led to a lengthy process of trial and error, providing more information for future teams to build on.
One prominent trend observed was the instability and inconsistency of standard Aircrete batches and those with higher concentrations of foam (lighter batches). The heavier Aircrete mixes with 60% or less foam (and more cement) did not experience collapse but were more challenging to thoroughly mix, leading to weight inconsistencies. High moisture content was another significant trend with these Aircrete samples, especially in high-foam mixtures. Some proposed fixes were longer curing times or outdoor curing.
Click these links to learn about our Past Successes from previous testing:
- Trial 9: Narrow Mixing Container
- Trial 15: Heavy Aircrete Mix
- Trial 16: Foaming Agent Tests
- Trial 21: Higher Dose of Drexel
- Trials 22 & 23: Varied Mixing Recipe
- Testing Dragon vs Aircrete Harry’s Foam Quality/Durability
- Trial 26: Testing the Foam Limit
PAST SUCCESSES
The past set of trials (linked here) did not produce consistent results, but there were still many successful tests that provided helpful information. Below, we share the most significant/useful of these.
This spreadsheet shares the complete testing results and the trial details that follow share the most applicable findings and things learned.

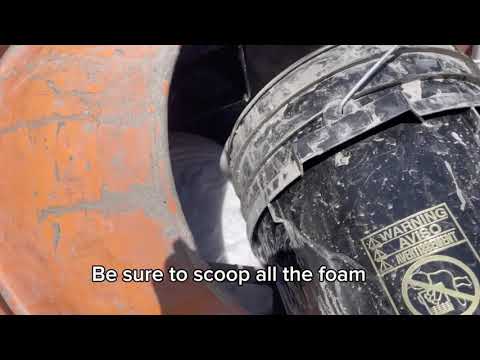
TRIAL 9: NARROW MIXING CONTAINER
Trial 9 was the first successful trial. Instead of mixing the cement slurry in a wide 5 gallon bucket, the team mixed the slurry in a narrower testing cylinder directly. Mixing the same volume of slurry in a container with a smaller diameter allowed the mixing drill bit to be fully submerged in the slurry, ensuring that it was properly mixed.
TRIAL 15: HEAVY AIRCRETE MIX
Trial 15 was the second successful trial. In this test, the team formulated the “heaviest” Aircrete mix with the highest concentration of cement slurry and the lowest concentration of foam (60% slurry and 40% foam). The higher concentration of cement led to the success of this trial.
TRIAL 16: FOAMING AGENT TESTS
Trial 16 was the third successful trial, even though it wasn’t a normal mixing trial. Trial 16 evaluated the integrity of foam made with different brands of dish soap and Drexel. Detailed results can be found here. In summary, foam made with Suave dish soap held its volume best and Drexel greatly outperformed 7th Generation Dish Soap in a one-on-one test.


TRIAL 21: HIGHER DOSE OF DREXEL
Trial 21 was the fourth successful trial. The foam in this test was made with a higher dose of Drexel, 6 oz instead of the recommended 4 oz. As a result, the foam was noticeably stronger, revealing that higher doses of foaming agent can improve foam quality.


TRIALS 22 & 23: VARIED MIXING RECIPE
Trials 22 and 23 were the fifth and sixth successful trials. Trials 22, 23, and 24 were run in the same span of time with similar methodologies, but minor changes. Each was meant to produce 4.5 gallons of Aircrete. Trial 22 was a standard mix made with 9.4 lbs of cement, 0.6 gallons of water, and 5.6 gallons of foam. Trial 23 used 20% more cement mix in the slurry, with 11.28 lbs of cement, 0.7 gallons of water, and 4.5 gallons of foam. Trial 24 was a standard mix with less water in the slurry, and was a failure.
TRIAL 25: TESTING DRAGON VS AIRCRETE HARRY’S FOAM QUALITY/DURABILITY
Trial 25 compared the Little Dragon to Aircrete Harry’s Foam Generator. Aircrete Harry’s Foam Generator performed slightly better than Domegaia’s Little Dragon when testing the loss in height of the foam over a span of 75 minutes.

TRIAL 26: TESTING THE FOAM LIMIT
Trial 26 was the seventh successful trial. It tested the maximum foam limit for a successful Aircrete mix. The upper limit of foam that worked the best was 85% foam to 15% cement slurry by volume. The successful foam limit was 7% more foam than the standard mix.
PAST SUCCESSES SUMMARY
While past Aircrete testing wasn’t entirely successful, useful information was gained through the process. The central finding was that heavier mixtures made with high doses of Drexel are sturdier. Reducing the diameter of the mixing container and mixing more thoroughly also produce more reliable results. Even though heavier mixes were found to be stronger, lighter Aircrete batches with more foam are desired; they have also been the target for One Community’s Aircrete testing.
Progress has been made towards formulating a reliable, light Aircrete mix, but these past successes still show that higher volumes of cement mix can be a temporary fix for failing batches. Later testing also showed that our method of weighing and/or measuring foam before mixing it in led to collapse.
For more information on these past trials and the resources created and used by past teams, visit these links:
COMMON MISTAKES AND CONSIDERATIONS WHILE MAKING AIRCRETE
Looking past the valuable successes in these past trial runs (found here), there is much to be learned from failed tests. Even though the results were not perfectly consistent, both the scrapped ideas and variables analyzed are still very useful.
FINDINGS FROM PAST AIRCRETE TESTING
Here are our key findings for 100s of hours of past Aircrete testing.
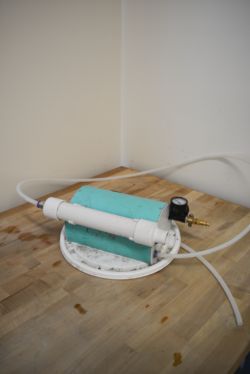
MIXING DEVICE DIFFERENCES
 & Egg Beater (Right) Drill Attachments")
Auger (Left) & Egg Beater (Right) Drill Attachments
Three different mixer styles were used: the egg beater drill attachment, cement mixer, and auger drill attachment. The egg beater was implemented after the auger was used for three failed trials. The main contribution of the egg beater was a faster mixing time, but the trial it was used in still failed. The quicker mixing led the Aircrete to be overmixed or the foam bubbles to be beaten out. The effect could also have been negligible. However, the egg beater drill attachment was rarely used after. The cement mixer was used in the seventh trial, but it was never used again. The Aircrete mixed in the cement mixer stuck to the sides, leading to lost material and incomplete integration. The mixing device that was used most consistently was the auger drill attachment. In later trials, a more significant auger attachment replaced the regularly used auger attachment.
WATER HARDNESS
Water quality, hardness specifically, has been mentioned in various online Aircrete forums as one determinant of foam stability. Hard water, which has more dissolved calcium and magnesium, is more challenging to produce bubbles when mixed with a foaming agent. Also, the bubbles produced are less resilient than those with softer water. Trial 8 was conducted using deionized water (water treated with reverse osmosis to remove excess particles and ions, resulting in zero hardness), and no effect was observed; the trial still failed. This test of varying water hardness was only attempted once, so the impact of water quality in these trials could have been more evident. However, companies utilizing Aircrete, like Domegaia, have had success simply using water from a hose.
MIXING CONTAINER DIFFERENCES
The use of smaller mixing containers could lead to lost bubbles in foam. Mixing in a small container means that the foam could be overmixed, losing precious bubbles. Similarly, in a small container, vibrations caused by mixing or contact with container walls would be more aggressive and cause more disturbance to the foam. If foam stability is a concern, mixing the slurry and foam in a larger container would be an ideal solution. Another approach when trying to preserve foam stability is to create a denser Aircrete mix with more concrete.
FOAMING AGENT DIFFERENCES
The primary two foaming agents used were 7th Generation Dish Soap and Drexel. Dawn and Suave were also tested and compared in Trial 16. Throughout the trials, Drexel performed better than all other options. The foam made with Drexel was better at retaining volume, and less material was used to make the same volume of foam. Aircrete can be made successfully using 7th Generation Dish Soap (and it’s easier to purchase), but Drexel has been seen to deliver better results. Sustainability and cost analyses of both foaming agents can be found here.
FOAM GENERATOR DIFFERENCES
Two different foam generators were used by past teams, the Little Dragon (seen here) and Aircrete Harry’s model (seen here). The Little Dragon, from Domegaia, was used for the past trials linked throughout this page. Still, a pros and cons list was created comparing both:
| Model | Little Dragon (found here) | Aircrete Harry (found here) |
 |  | |
| Pros |
|
|
| Cons |
|
|
RECENT COMPLICATIONS WITH THE DOMEGAIA MIX
In the most recent set of Aircrete compression tests, conducted in 2024, batches with greater percentages of foam* using Domegaia’s mixing method consistently resulted in collapse. There are two likely reasons for this: choice of foaming agent and the scale of the mixer.
* Note: Domegaia’s standard mix using 7th Generation Dish Soap was successful
CHOICE OF FOAMING AGENTS: DREXEL VS 7TH GENERATION DISH SOAP
The explanation for this repeated failure of higher-foam mixes with the most evidence is that the traditional foaming agent used by Domegaia, 7th Generation Dish Soap, is the batch’s central issue. Many other Aircrete mixing methods use Drexel as the foaming agent, and trials that substituted 7th Generation Dish Soap for Drexel while following the rest of Domegaia’s general procedure succeeded. Domegaia’s standard mix using 7th Generation Dish Soap was successful but the only reliable success of higher-foam mixes following Domegaia’s method was achieved after swapping foaming agents.
The more stable Drexel comes at increased cost and lower sustainability though.
SCALE OF THE MIXER
Another likely reason for the collapsing cylinders is that Aircrete does not down-scale well. Domegaia typically uses an entire 94 pound bag of cement for their Aircrete batches while these tests only use about 15 to 20 pounds. They also have been seen creating their mixes in a 50 gallon drum with their larger foam generator the Dragon XL, while this team only mixed Aircrete in 7 gallon, or less frequently 5 gallon, buckets. Additionally, DomeGaia uses a mixer that releases foam while mixing, called a foam-injection mixer, which may make their mixes have more consistently mixed foam throughout.
When scaling down as much as we did, it is possible that the foam doesn’t mix as well, increased vibration causes more foam collapse during the mixing process, and/or the amount of foam doesn’t scale linearly/as accurately with the cement and water.
In short, we think the Dragon XL would make a significant difference. Being able to pour the foam towards the bottom of the mixing container should create a more uniform mixture. The difference in densities of foam and cement will help mix if the foam is infused at the bottom.
COMMON MISTAKES AND CONSIDERATIONS SUMMARY
At times, working with Aircrete can be tedious. The foam needed is delicate and mixing cement requires a great deal of precision. The Aircrete mixing device, mixing container, hardness of water, cement quality, mix ratio, foaming agent, and foam generator have all contributed to at least one failed trial. When mixing Aircrete at home, it is helpful to consider seemingly minute variables like these if faced with consistent failure. In addition to these small sources of error, the previous set of Aircrete trials revealed that the foaming agent recommended by Domegaia could be unreliable.
Based on our experience, here’s how we’d rank these areas from highest (#1) to lowest potential to create problems in your Aircrete mixes:
- Variation in mixing time
- Drying conditions
- Cure time
- Mix Ratio
- Age of cement
Note: Standard Aircrete batches are normally much larger than our test batches and this could improve results by reducing large bubble build ups and giving more exposure for evaporation to occur.
AIRCRETE TESTING
In the most recent series of Aircrete tests, mixing trials were performed to determine the most reliable mixing methods that had the highest concentration of foam to create the lightest possible mixes. Two primary mixing procedures were followed: one from Domegaia and one from Aircrete Harry. Trials following Aircrete Harry’s mixing methodology were more successful and batches high in foam were able to be achieved. On the other hand, Domegaia’s Aircrete mixes were observed to be much too moist and were oftentimes unable to be subjected to further compression testing. We think this is a result of the foaming agent, as you’ll see in the notes below. We think this because variations in mixing containers, mixing devices, and cement content were made, but the only thing that was able to meaningfully change this general trend was using Drexel instead of 7th Generation Dish Soap. Below are the results of all our tests.
INITIAL TRIAL PHASE
The primary goal of the initial trial phase was to test the viability of different Aircrete mixes varying in foam or cement concentration. It was necessary to get a solid grasp of the Aircrete mixing process and to streamline each method before moving onto the final compression testing phase. Additionally, this initial testing was used to reveal any flaws in the proposed and previously used mixing methods before the final data was gathered. Some noteworthy findings from this phase include: the unreliability of 7th Generation Dish Soap as a foaming agent and the consistent success of Aircrete Harry’s recipe.
Here are the summaries of the trials we did:
- Trial 1: First Attempts
- Trial 2: First Attempts
- Same Procedure, scaled upTrial 3: Same Procedure, Scaled Up
- Trial 4: Trial 3 Without Lids
- Trial 5: Longer Mixing Time
- Trial 6: Lightest Mix Tests Begin – Standard Mix
- Trials 7 & 8: Lightest Mix Tests – Standard Mix – 5% More Foam
- Trial 9: Lightest Mix Tests – Standard Mix – 10% More Foam
- Trial 10: Lightest Mix Tests – Standard Mix – 15% More Foam
- Trial 11: Lightest Mix Tests – Higher Cement Concentration – 5% More Foam
- Trial 12: Lightest Mix Tests – Standard Mix – 5% More Foam Repeat
- Trial 13: Lightest Mix Tests – Domegaia Mix
- Trial 14: Lightest Mix Tests – Domegaia Mix – Less Dish Soap
- Trial 15: Lightest Mix Tests – Domegaia Mix – Less Dish Soap and a 5 Gallon Bucket
- Trial 16: Lightest Mix Tests – Aircrete Harry Mix
- Trial 17: Lightest Mix Tests – Aircrete Harry Mix – With Added Foam
- Trial 18: Lightest Mix Tests – Domegaia Mix – Concrete Mixer
- Trial 19: Lightest Mix Tests – Domegaia Mix – Concrete Mixer and Sand
- Trial 20: Lightest Mix Tests – Domegaia Mix – Concrete Mixer and High Cement Mix
- Trial 21: Lightest Mix Tests – Domegaia Mix – Accounting for Extra Water
- Trial 22: Lightest Mix Tests – Domegaia Mix – High Cement Mix and 5 Gallon Bucket
- Trial 23: Lightest Mix Tests – Domegaia Mix – High Cement Mix and Drill Mixer
- Trial 24: Lightest Mix Tests – Domegaia Mix – High Cement Mix in a 5 Gallon Bucket
- Trials 25-27: Lightest Mix Tests – Domegaia Mix – High Cement Mix With 5% More Foam
- Trial 28: Lightest Mix Tests – Domegaia Mix – High Cement Mix With Separated Foam
- Trial 29: Lightest Mix Tests – Aircrete Harry Mix – Standard Procedure
- Trial 30: Lightest Mix Tests – Aircrete Harry Mix – Concrete Mixer
- Trial 31: Lightest Mix Tests – Aircrete Harry Mix – 5% More Foam
- Trial 32: Lightest Mix Tests – Aircrete Harry Mix – 10% More Foam
- Trial 33: Lightest Mix Tests – Aircrete Harry Mix – 15% More Foam
TRIAL 1: FIRST ATTEMPTS
The first trial set followed the standard procedure for mixing Aircrete, found in the Aircrete Procedures Manual and Instructional Video
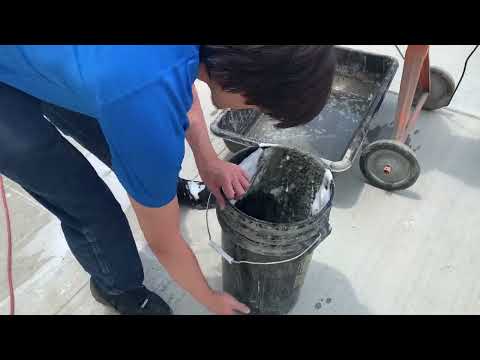
from the past volunteer team. However, some minor changes were made to test for more consistent results: the cement was mixed with a mortar mixer and a 5 gallon bucket was filled with foam instead of a 7 gallon bucket. Still, this batch ended as a failure. While mixing, the cement got stuck to the walls of the mixer, so 4 more pounds of cement and 2 more pounds of water were added to remedy this. In the end, this trial only produced 1.5 cylinders of Aircrete. The mortar mixer also broke in the process, so the cement, water, and foam will be mixed in a 7 gallon bucket instead of the mortar mixer.
Here is the most current video tutorial covering the standard Aircrete mixing procedure:
TRIAL 2: FIRST ATTEMPTS
In the second trial, the two small changes made in Trial 1 (use of the mortar mixer and 5 gallon bucket) were undone. Trial 2 followed the past team’s procedure exactly, and the objective of this trial was to gain a better understanding of their process. This test still ended in a failure, only producing 2.75 cylinders of Aircrete, and the Aircrete cylinders that were made were noticeably weak and had water at their bases. The individual weights of each cylinder were not taken.
TRIAL 3: SAME PROCEDURE, SCALED UP
The third trial was scaled up after Trial 2 failed to produce a full 3 cylinders of Aircrete, so enough materials were used to produce a theoretical 3.5 cylinders. The same procedure was followed in Trial 3, but in this test, lids were put on the cylinders. Trial 3 ended up producing 3 cylinders, but they had drastically different weights. The lightest cylinder weighed 5.1 pounds, slightly collapsed, had water at the base after 5 days, and was given the shortest curing time. One of the cylinders weighed in at 7.9 pounds, was removed from the mold after 36 days, but failed due to breaking while opening. The third cylinder weighed 11.6 pounds, was removed after 23 days, and remained stable while opening. The 11.6 pound cylinder had a stress load of 114.1. There was great weight disparity among the batch.

TRIAL 4: TRIAL 3 WITHOUT LIDS
The fourth trial followed the same procedure as Trial 3, except without lids on the cylinders. The three cylinders produced had drastically different weights again. The lightest cylinder weighed 5.8 pounds, the next highest weight was 8.5 pounds, and the heaviest cylinder weighed 11.4 pounds. Only the lightest cylinder collapsed, likely because it contained the most foam. The suspected issue with Trials 3 and 4 was the mixing. It was assumed that the cement and foam needed to be homogenized, leading to different foam contents and weights across the three cylinders. Also, the lids showed no apparent effect on the process.
TRIAL 5: LONGER MIXING TIME
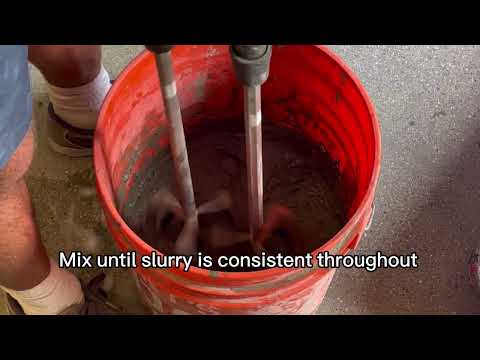
The fifth trial followed the same standard procedure as the past four, but the Aircrete was mixed for a longer time and poured differently to reduce weight disparity. The cement, water, and foam mixture was drill-mixed until the consistency was uniform. Also, the cylinders were first filled up halfway and then topped off. This trial saw more consistent cylinder weights, but there was still some variation. The three cylinders weighed 6.17, 6.18, and 7.08 pounds, respectively. The lightest cylinder, with a weight of 6.17 pounds, had a cure time of 4 days, and its Aircrete had a high moisture content. The cylinder weighing 6.18 pounds ended up weighing 5.89 pounds after 14 days of curing. Again, this cylinder had a high moisture content after curing. This prevented successful compression testing on both the 6.17 and 6.18-pound cylinders. However, the longer mixing time and new pouring method fixed the initial weight variation problem.
These results also lend credibility to the hypothesis that mixing larger batches and mixing them more thoroughly helps produce more consistent results.


TRIAL 6: LIGHTEST MIX TESTS BEGIN – STANDARD MIX
Since there has only been minimal collapse in the past few trials, testing begins for the lightest possible Aircrete mix using three different procedures. The standard mixing method used in Trials 1-5 is being followed, and the new pouring method from Trial 5 is being added. However, the cement-to-foam ratio is adjusted across each batch in each set of tests. Most/all are 2:1 Concrete to Water. You can see specifics on our excel file(Aircrete Final Documentation Spreadsheet.xlsx – Google Sheets). Trial 6 follows the standard cement-to-foam ratio. The 6.49-pound cylinder produced in this trial weighed 5.87 pounds after nine days of curing; this was the lightest cylinder. A compression test was done on this cylinder but was unsuccessful as the Aircrete squished down and didn’t crack, indicating that this sample was too moist.

TRIALS 7 & 8: LIGHTEST MIX TESTS – STANDARD MIX – 5% MORE FOAM
In the seventh and eighth trials, the second of the standard Aircrete Harry method lightest mix tests, 5% less cement slurry (cement and water) was used. In its place, 5% more foam was added. In Trial 7, some cylinders showed a slight decrease in volume at first but eventually remained constant. Overall, this trial was a success. In Trial 8, the same procedure was followed, but the cylinders were left to cure outside instead of inside the lab. The results of Trial 7 mirrored those of Trial 6, with a moderate decrease in volume (e.g. 6.84 pounds to 6.09 pounds after 9 days) and a failed compression test due to high moisture content. The cylinders in Trial 8 also had a moderate decrease in volume (e.g. 8.18 pounds to 7.15 pounds after 9 days). However, Trial 8’s cylinders could not be compression tested as the Aircrete cracked as it was removed from the cylinders. This was due to the weakness of the mix.
")
TRIAL 9: LIGHTEST MIX TESTS – STANDARD MIX – 10% MORE FOAM
In the ninth trial, 10% less cement slurry was used, in relation to the original recipe. Again, the standard mixing procedure was followed, but 10% more foam was added. The lightest cylinder, weighing 6.94 pounds, dropped to a weight of 5.99 pounds after 8 days. This cylinder also was squished during compression testing, showing a similar excess of moisture.

TRIAL 10: LIGHTEST MIX TESTS – STANDARD MIX – 15% MORE FOAM
In the tenth trial, 15% less cement slurry was used in relation to the original recipe. Again, the standard mixing procedure was followed, but 15% more foam was added. The lightest cylinder, weighing 7.76 pounds, dropped to 7.32 pounds after 8 days. This cylinder had a more significant excess of moisture, with water pooling at the base. This meant that compression testing could not be conducted, and the higher moisture content explains the low decrease in volume.

TRIAL 11: LIGHTEST MIX TESTS – HIGHER CEMENT CONCENTRATION – 5% MORE FOAM
In the eleventh trial, 5% less cement slurry was used, in relation to the original recipe. The standard mixing procedure was still followed, except a higher quantity of cement was used. Normally, a standard batch with 5% more foam would have 14.3 pounds of cement mix and 7.67 pounds of water. In this batch, 19.17 pounds of cement mix and 7.67 pounds of water were used to test the effects of cement concentration on cylinder collapse volume. The lightest cylinder, weighing 7.65 pounds, ended up with a weight of 6.77 pounds after 7 days. It was dry enough for a successful compression test, having a peak load of 2080 psi and a stress load of 73.59 psi.

TRIAL 12: LIGHTEST MIX TESTS – STANDARD MIX – 5% MORE FOAM REPEAT
In the twelfth trial, Trial 7 was repeated as 5% less cement slurry was used in the standard mixing process. This trial aimed to test for more consistent results, namely, final volume and collapse. The lightest cylinder weighed 8.58 pounds and 7.78 pounds after 7 days. This cylinder was also dry enough for a compression test. The peak load was 1930 psi, and the stress load was 68.16 psi. However, the cylinder compressed quite a bit during this process, and a crack in the center formed, so this data should be taken with a grain of salt. This was the final test using the standard Aircrete Harry procedure in the lightest mix test set; the next set of trials will use the mixing method from Domegaia.

TRIAL 13: LIGHTEST MIX TESTS – DOMEGAIA MIX
In the thirteenth trial, the mixing procedure from Domegaia is being used (found here). The main variable being changed (from the standard procedure) is the foaming agent. In this trial, 16 ounces of 7th Generation Dish Soap were used in the 5 gallons of water in place of 4 ounces of Drexel. In the 7 gallon bucket after mixing, there was minimal collapse, which was likely due to the higher concentration of 7th Gen. Dish Soap. This mix filled up 4 cylinders, and the first 3 cylinders poured were consistent in weight, but the 4th cylinder was 3 pounds heavier. After around 30 minutes, all cylinders started bubbling and eventually collapsed. Again, this was most likely due to the higher concentration of 7th Gen. Dish Soap.

TRIAL 14: LIGHTEST MIX TESTS – DOMEGAIA MIX – LESS DISH SOAP
In the fourteenth trial, the same Domegaia procedure was followed, but 12 ounces of 7th Gen. Dish Soap were used instead of 16 ounces. Still, the cylinders collapsed around the same amount as they did in the previous trial. This method also filled 4 cylinders and maintained an even weight distribution between all four, like Trial 13. However, during the creation process, the foam was not fully mixed in the bucket, so the foam will be added to the top of the 5 gallon bucket instead of the 7 gallon bucket in Trial 15.

TRIAL 15: LIGHTEST MIX TESTS – DOMEGAIA MIX – LESS DISH SOAP AND A 5 GALLON BUCKET
In the fifteenth trial, the same Domegaia method used in Trial 14 was followed, except the foam was poured to fill a 5 gallon bucket instead of the 7 gallon bucket. Even though a different pouring method was used, the results were the same as in Trial 14 and the cylinders collapsed.
Based on this, we feel the Domegaia approach won’t work for lighter mixes, mainly due to its use of foaming agent: 7th Generation Dish Soap. Going forward, the Aircrete Harry recipe will be followed, with its use of Drexel (see Aircrete Harry Aircrete Recipe and Mixing Instructions)
TRIAL 16: LIGHTEST MIX TESTS – AIRCRETE HARRY MIX
In the sixteenth trial, Aircrete Harry’s mixing method was followed again. Like normal, the cement and water were mixed into a slurry, then the 7 gallon bucket they were being mixed in was topped off with foam and thoroughly mixed again. While mixing, the foam lost some air and the final volume of the mixture was lower than normal. Only 2.5 cylinders were able to be filled. No compression tests were conducted.

TRIAL 17: LIGHTEST MIX TESTS – AIRCRETE HARRY MIX – WITH ADDED FOAM
In the seventeenth trial, the same procedure was followed. The only change made was to continue adding foam to the 7 gallon bucket during mixing to fix the foam compression problem. As the volume of the foam decreased, more was added to maintain a constant volume of foam. This strategy worked, and 3 cylinders were produced. These 3 cylinders did not collapse.
TRIAL 18: LIGHTEST MIX TESTS – DOMEGAIA MIX – CONCRETE MIXER
In the eighteenth trial, the concrete mixer was fixed, so the Domegaia method was tested again using the concrete mixer instead of a drill in an attempt to get better results. The standard Domegaia procedure to make the cement slurry was followed, but the foam was added on top of the slurry rather than mixed in immediately. The 7 gallon bucket with a top layer of foam was then put into the concrete mixer and mixed until it all was well integrated. 10% more cement slurry could be added to account for the material stuck to the sides of the mixer by the end. Even though a new method was employed, the cylinders all collapsed. However, they took longer to collapse and collapsed less than in previous trials.

TRIAL 19: LIGHTEST MIX TESTS – DOMEGAIA MIX – CONCRETE MIXER AND SAND
In the nineteenth trial, one change was made to the Domegaia method performed in Trial 18. 6 pounds of sand were added to the 7 gallon bucket and mixed into the cement slurry before the foam was poured. This was all put into the concrete mixer again, and mixed until everything was integrated. This addition only worsened the results, with heavier cylinders and deeper collapse.
TRIAL 20: LIGHTEST MIX TESTS – DOMEGAIA MIX – CONCRETE MIXER AND HIGH CEMENT MIX
In the twentieth trial, the procedure of Trial 18 was followed, and the higher cement mixture seen in Trial 11 was used as well. The high cement mix is a 0.4 water to cement ratio meant to increase the strength of the mixture and prevent collapse. Enough materials were used to produce 3.3 cylinders, because a 10% loss of material to the concrete mixer was estimated. Also, 2 pounds of water were added to flush out all cement in the 7 gallon bucket. This mix produced 4 cylinders of Aircrete, but the material in each cylinder collapsed soon after pouring, later maintaining a constant volume.
Here’s the video tutorial covering this trial’s mixing procedure (failing results): Watch Video
Domegaia Procedure – Trial 20 Concrete Mixer and High Cement Mix

TRIAL 21: LIGHTEST MIX TESTS – DOMEGAIA MIX – ACCOUNTING FOR EXTRA WATER
In the twenty-first trial, the same Domegaia method from Trial 20 was used, but with one small change. This time, the water that was used to flush out the 7 gallon bucket was accounted for when preparing the proper ingredients. 19.03 pounds of cement were used with 6.5 pounds of water, mixed, poured into a 7 gallon bucket, and then the bucket was filled with foam. This was then poured into the concrete mixer and 1 pound of water was used to flush out the material in the 7 gallon bucket. 3 cylinders were filled and none collapsed, so this trial was a success.
Here’s the video tutorial covering this trial’s mixing procedure (successful results):
TRIAL 22: LIGHTEST MIX TESTS – DOMEGAIA MIX – HIGH CEMENT MIX AND 5 GALLON BUCKET
In the twenty-second trial, the same Domegaia method from Trial 20 was used, again with one small change. In this trial, both the cement slurry and foam were added to a 5 gallon bucket instead of a 7 gallon bucket, this reduces the volume of foam in the mixture and makes the Aircrete stronger. As in Trial 20 and 21, a high cement mix was used. 3 cylinders were filled and again, none of them collapsed. Trial 22 was a success.
An up-to-date video tutorial covering this trial’s mixing procedure can be found here (successful results):
TRIAL 23: LIGHTEST MIX TESTS – DOMEGAIA MIX – HIGH CEMENT MIX AND DRILL MIXER
In the twenty-third trial, the Domegaia method from the past three trials was repeated due to consistent success. However, in this trial, the cement mixer was replaced with the handheld drill mixer. In a 7 gallon bucket, 19.03 pounds of cement mix and 7.6 pounds of water were mixed. This slurry was mixed with the drill, then foam was added to the top and mixed again until everything was uniformly combined. The drill ran slowly and contact with the bucket’s sides was avoided to prevent vibrations that we think were leading to the loss of too many foam bubbles. In the end, enough material was created to fill 4 cylinders. As a result, the pouring method was thrown off and the cylinders varied in weight. The cylinders also collapsed, so this trial was a failure.
An up-to-date video tutorial covering this trial’s mixing procedure can be found here (failed results):
DOMEGAIA PROCEDURE – TRIAL 23

Mixing Cement Slurry and Foam Using a Drill
TRIAL 24: LIGHTEST MIX TESTS – DOMEGAIA MIX – HIGH CEMENT MIX IN A 5 GALLON BUCKET
In the twenty-fourth trial, the Domegaia method from Trial 23 was repeated, but the material was mixed in a 5 gallon bucket, again with a drill mixer. The goal of this change was to make fewer cylinders with a smaller bucket, reducing the weight inconsistency. Again, the cylinders collapsed.
An up-to-date video tutorial covering this trial’s mixing procedure can be found here (failed results):
TRIALS 25-27: LIGHTEST MIX TESTS – DOMEGAIA MIX – HIGH CEMENT MIX WITH 5% MORE FOAM
In the twenty-fifth and twenty-sixth trials, the same process from Trials 20-22 was used, only with 5% more foam. The foam was added to the top of the slurry in a 7 gallon bucket, then poured into the concrete mixer. The high cement mix ratio was used in the concrete mixer. In the end, Trial 25 resulted in failure, all but one of the cylinders collapsed. The cylinder that didn’t collapse had an air pocket in the center, and was not viable. The same method was employed in Trial 26, but the cylinders collapsed again.
In the twenty-seventh trial, both the slurry and foam were mixed in a 5 gallon bucket instead of a 7 gallon bucket. Aside from this, the same method from the past two trials was followed.
The same as the past two trails, Trial 27 also resulted in failure.

TRIAL 28: LIGHTEST MIX TESTS – DOMEGAIA MIX – HIGH CEMENT MIX WITH SEPARATED FOAM
In the twenty-eighth trial, two changes were made to the typical Domegaia mixing method. However, this test still used the high cement mix and concrete mixer. The first change was that all the water in this recipe was added at the beginning, and no extra water was used to flush the cement stuck in the concrete mixer. The second change was that the foam was measured in a separate container and then added directly into the concrete mixer, reducing the time it takes to add the foam into the mixer. Still, this trial resulted in failure.
Since tests following the Domegaia method have been inconsistent and usually result in collapse, more planning is needed for these trials and upcoming tests will follow the Aircrete Harry mixing procedure that reliably produces sturdy cylinders that are ready for compression testing, primarily through the use of a more powerful foaming agent, Drexel, and a lower foam density of 68 g/qt. Both have led to sturdier foam that takes longer to decompress.
An up-to-date video tutorial covering this trial’s mixing procedure can be found here (failed results):

TRIAL 29: LIGHTEST MIX TESTS – AIRCRETE HARRY MIX – STANDARD PROCEDURE
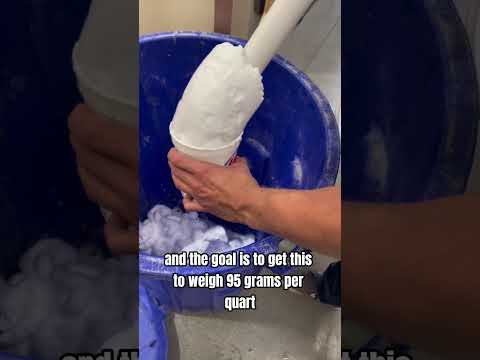
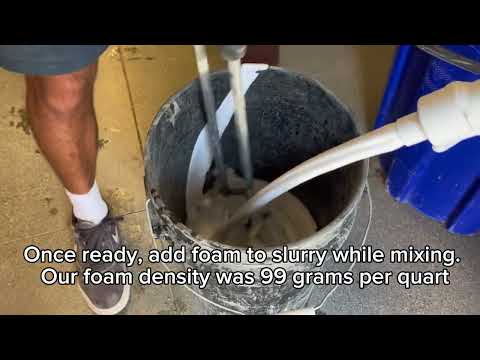
In the twenty-ninth trial, Aircrete Harry’s mixing method was employed. 16.1 pounds of cement and 8.5 pounds of water were mixed in a 7 gallon bucket with a drill mixer, then foam was added until the bucket was filled. The density of the foam was 63 grams per quart, which is the ideal density for this mixing method. This was all mixed in the bucket for 5 minutes, and then poured into 3 cylinders. This trial was a success, and none of the cylinders collapsed.
TRIAL 30: LIGHTEST MIX TESTS – AIRCRETE HARRY MIX – CONCRETE MIXER
In the thirtieth trial, Trial 29 was repeated, but the slurry and foam were both mixed in the concrete mixer rather than the bucket directly. After the foam was added to the 7 gallon bucket, the bucket’s contents were immediately poured into the concrete mixer. The concrete mixer ran for 10 minutes, and the trial resulted in success.
TRIAL 31: LIGHTEST MIX TESTS – AIRCRETE HARRY MIX – 5% MORE FOAM
In the thirty-first trial, the standard Aircrete Harry mixing recipe was followed, but with 5% more foam. This trial resulted in success.
TRIAL 32: LIGHTEST MIX TESTS – AIRCRETE HARRY MIX – 10% MORE FOAM
In the thirty-second trial, the standard Aircrete Harry mixing recipe was followed, but with 10% more foam. This trial resulted in success, and none of the cylinders collapsed.
TRIAL 33: LIGHTEST MIX TESTS – AIRCRETE HARRY MIX – 15% MORE FOAM
In the thirty-third trial, the standard Aircrete Harry mixing recipe was followed, but with 15% more foam. This trial also resulted in success as none of the cylinders collapsed. After this, final testing could begin.
END OF INITIAL TRIAL TESTING PHASE SUMMARY
Overall, the initial testing phase revealed how much more reliable Aircrete Harry’s mixing method is compared to Domegaia’s, when performed under our lab’s conditions. Aircrete Harry uses Drexel with a foam density of 68 g/qt. From our observation, the foam takes longer to decompress. Domegaia uses 7th Gen dish soap with a foam density of 90-100 g/qt and has faster decompression.
As a result, more compression tests will be performed and more data collected on batches following Aircrete Harry’s procedure. One additional possible explanation for Domegaia’s unreliability is their foam generator, the Little Dragon, which was used for their trials. It is no longer sold and they now only offer their Dragon XL, which adds the foam towards the bottom of the mixing container to create a more uniform mixture. This would mean a more uniform mix and less time for it to collapse.
FINAL TESTING PHASE
After preliminary Aircrete tests were complete and consistent results were achieved, each mixing method was repeated in batches of 6 cylinders. The standard Aircrete Harry and Domegaia mixing procedures were followed, then performed again with slight variations.
Additional cylinders made with Aircrete Harry’s recipe had stucco mesh reinforcement added along the cylinders’ walls and additional Domegaia batches were made with a substituted foaming agent, Drexel instead of 7th Generation. The foam-cement ratios were altered as well. Using Aircrete Harry’s mixing method, additional foam (5%, 10%, and 15%) and cement (5% and 10%) variations were tested successfully. When Domegaia’s mixing procedure was employed, the only ratio change we were confident testing was 10% more cement. Cure times varied from 2 to 4 weeks.
Click the links below to visit the following summaries for the following trials:
- Trial 34: Final Testing – Standard Mix
- Trial 35: Final Testing – Standard Mix – 5% More Foam
- Trial 36: Final Testing – Standard Mix
- Trial 37: Final Testing – Standard Mix – Heavier Mix
- Trial 38: Final Testing – Aircrete Harry Mix
- Trial 39: Final Testing – Aircrete Harry Mix – 5% More Foam
- Trial 40: Final Testing – Aircrete Harry Mix – 10% More Foam
- Trial 41: Final Testing – Aircrete Harry Mix – 15% More Foam
- Trial 42: Final Testing – Aircrete Harry Mix – 5% More Concrete
- Trial 43: Final Testing – Aircrete Harry Mix – 10% More Concrete
- Trial 44: Final Testing – Aircrete Harry Mix – Added Stucco Reinforcement
- Trial 45: Final Testing – Aircrete Harry Mix – 5% More Foam and Added Stucco
- Trial 46: Final Testing – Aircrete Harry Mix – 10% More Foam and Added Stucco
- Trial 47: Final Testing – Aircrete Harry Mix – 15% More Foam and Added Stucco
- Trial 48: Final Testing – Aircrete Harry Mix – 5% More Concrete and Added Stucco
- Trial 49: Final Testing – Aircrete Harry Mix – 10% More Concrete and Added Stucco
- Trial 50: Final Testing – Domegaia Mix – High Cement Mix
- Trial 51: Final Testing – Domegaia Mix – 10% More Concrete
- Trial 52: Final Testing – Control Group – Normal Cement
- Trial 53: Final Testing – Aircrete Harry Mix – 5% More Foam and 3 Week Cure Time
- Trial 54: Final Testing – Aircrete Harry Mix – 10% More Foam
- Trial 55: Final Testing – Aircrete Harry Mix – 15% More Foam
- Trial 56: Final Testing – Aircrete Harry Mix – 5% More Concrete
- Trial 57: Final Testing – Aircrete Harry Mix – 10% More Concrete
- Trial 58: Final Testing – Aircrete Harry Mix – Standard and 2 Week Cure Time
- Trial 59: Final Testing – Aircrete Harry Mix – 5% More Foam
- Trial 60: Final Testing – Aircrete Harry Mix – 10% More Foam
- Trial 61: Final Testing – Control Group – Normal Cement
- Trial 62: Final Testing – Aircrete Harry Mix – 15% More Foam
- Trial 63: Final Testing – Aircrete Harry Mix – 5% More Cement
- Trial 64: Final Testing – Aircrete Harry Mix – 10% More Cement
Comprehensive compression data from these final tests can be found in this spreadsheet:

TRIAL 34: FINAL TESTING – STANDARD MIX
In the thirty-fourth trial, the standard Aircrete Harry mixing procedure from Trial 6 was followed. This mixing method was similar to Domegaia’s, but Drexel was used as the foaming agent, rather than 7th Generation Dish Soap. Both the cement slurry and foam were mixed in a 7 gallon bucket with the drill mixer. This trial was a success as none of the cylinders collapsed.
TRIAL 35: FINAL TESTING – STANDARD MIX – 5% MORE FOAM
In the thirty-fifth trial, the same standard procedure from Trials 6 and 34 was followed, but 5% more foam was used. This trial was also a success, and all of the cylinders were stable.
TRIAL 36: FINAL TESTING – STANDARD MIX
In the thirty-sixth trial, Trial 34 was repeated, and the foam-cement ratio was not changed. This trial produced 3 cylinders.
TRIAL 37: FINAL TESTING – STANDARD MIX – HEAVIER MIX
In the thirty-seventh trial, the same standard procedure was followed, but with more water and cement to make a heavier mix. This process, which makes 3 cylinders, was repeated, creating a total of 6 cylinders.
TRIAL 38: FINAL TESTING – AIRCRETE HARRY MIX
In the thirty-eighth trial, the Aircrete Harry mixing method from Trial 29 was followed. It was repeated twice and produced a total of 12 cylinders, half of which will be cured for 3 weeks while the other half will cure for 4 weeks.
 - Peak Load: 2200 psi, Stress Load: 77.7 psi - 3 Week Curing")
TRIAL 39: FINAL TESTING – AIRCRETE HARRY MIX – 5% MORE FOAM
In the thirty-ninth trial, the Aircrete Harry mixing method was followed, but 5% more foam was used. The mix was repeated twice, producing a total of 6 cylinders that will be cured for 4 weeks.
 - Peak Load: 1260 psi, Stress Load: 44.68 psi - 4 Week Curing")
TRIAL 40: FINAL TESTING – AIRCRETE HARRY MIX – 10% MORE FOAM
In the fortieth trial, the same Aircrete Harry mixing method was followed, but 10% more foam was used. Again, the trial was repeated to produce 6 cylinders in total, curing for 4 weeks.
 - Peak Load: 2080 psi, Stress Load: 73.49 psi - 4 Week Curing")
TRIAL 41: FINAL TESTING – AIRCRETE HARRY MIX – 15% MORE FOAM
In the forty-first trial, Aircrete Harry’s mixing method was followed, but 15% more foam was used. It was repeated and produced 6 cylinders, they will again be cured for 4 weeks.
 - Peak Load: 2080 psi, Stress Load: 73.49 psi - 4 Week Curing")
TRIAL 42: FINAL TESTING – AIRCRETE HARRY MIX – 5% MORE CEMENT
In the forty-second trial, the same Aircrete Harry mixing method was followed, but 5% more concrete was used, instead of additional foam. As in the past few tests, this trial was repeated to produce 6 cylinders that would cure for 4 weeks.
 - Peak Load: 2080 psi, Stress Load: 73.49 psi - 4 Week Curing")
TRIAL 43: FINAL TESTING – AIRCRETE HARRY MIX – 10% MORE CEMENT
In the forty-third trial, Aircrete Harry’s mixing method was still followed, but 10% more concrete was used, creating the heaviest Aircrete Harry batch. This trial was repeated, producing 6 cylinders that will again be cured for 4 weeks.
 - Peak Load: 3140 psi, Stress Load: 111 psi - 4 Week Curing")
TRIAL 44: FINAL TESTING – AIRCRETE HARRY MIX – ADDED STUCCO REINFORCEMENT
In the forty-fourth trial, Aircrete Harry’s standard mixing method (from Trial 38) was followed, but stucco mesh fiber was added to the walls of the Aircrete cylinders. This trial was also repeated to produce 6 cylinders.
 - Peak Load: 3710 psi, Stress Load: 131.1 psi - 4 Week Curing")
TRIAL 45: FINAL TESTING – AIRCRETE HARRY MIX – 5% MORE FOAM AND ADDED STUCCO
In the forty-fifth trial, Aircrete Harry’s mixing method was followed, using 5% more foam and stucco reinforcement along the cylinders’ walls. This trial was repeated to produce 6 cylinders.
 - Peak Load: 3030 psi, Stress Load: 107.3 psi - 4 Week Curing")
TRIAL 46: FINAL TESTING – AIRCRETE HARRY MIX – 10% MORE FOAM AND ADDED STUCCO
In the forty-sixth trial, the Aircrete Harry mixing method was still followed, but 10% more foam was used and stucco reinforcement was added. 6 cylinders were produced after the trial was repeated.
 - Peak Load: 6120 psi, Stress Load: 216.3 psi - 4 Week Curing")
TRIAL 47: FINAL TESTING – AIRCRETE HARRY MIX – 15% MORE FOAM AND ADDED STUCCO
In the forty-seventh trial, Aircrete Harry’s mixing method was followed, using 15% more foam and stucco reinforcement along the cylinders’ walls. This trial was repeated, producing 6 cylinders.
 - Peak Load: 6140 psi, Stress Load: 217 psi - 4 Week Curing")
TRIAL 48: FINAL TESTING – AIRCRETE HARRY MIX – 5% MORE CEMENT AND ADDED STUCCO
In the forty-eighth trial, the Aircrete Harry mixing method was followed, but 5% more concrete was used and stucco reinforcement was added. 6 cylinders were produced after the trial was repeated.
 - Peak Load: 6140 psi, Stress Load: 217 psi - 4 Week Curing")
TRIAL 49: FINAL TESTING – AIRCRETE HARRY MIX – 10% MORE CEMENT AND ADDED STUCCO
In the forty-ninth trial, Aircrete Harry’s mixing method was used with 10% more concrete and added stucco; this was the last of Aircrete Harry’s 4 week cure tests. Again, this test was repeated to produce 6 cylinders.
 - Peak Load: 11450 psi, Stress Load: 404.9 psi - 4 Week Curing")
TRIAL 50: FINAL TESTING – DOMEGAIA MIX – STANDARD HIGH CEMENT MIX
In the fiftieth trial, mixing methods were switched and Domegaia’s was used again. This was the high cement mix, and the concrete mixer was used. Foam was added by topping off a 5 gallon bucket. As in the previous trials, this one was repeated to produce 6 cylinders.
 - Peak Load: 3830 psi, Stress Load: 135.6 psi - 4 Week Curing")
TRIAL 51: FINAL TESTING – DOMEGAIA MIX – 10% MORE CONCRETE
In the fifty-first trial, Domegaia’s mixing method was used again. The high cement mix was followed, but with 10% more cement and water in a 5 gallon bucket. This batch was mixed in the concrete mixer. Again, it was repeated to produce 6 cylinders.
 - Peak Load: 3330 psi, Stress Load: 117.8 psi - 4 Week Curing")
TRIAL 52: FINAL TESTING – CONTROL GROUP – NORMAL CEMENT
In the fifty-second trial, no Aircrete mixing method was used. Instead, normal cement was made to be a control group for compression testing. One bag of Portland Cement, which was 94 pounds, produced just under 5 cylinders. This cement mix was scaled up to produce 18 cylinders in total.
 - Peak Load: 127100 psi,")
TRIAL 53: FINAL TESTING – AIRCRETE HARRY MIX – 5% MORE FOAM AND 3 WEEK CURE TIME
In the fifty-third trial, the Aircrete Harry mix was used again. 5% more foam was used, but this batch will cure for 3 weeks. As in recent trials, this process was repeated to produce 6 cylinders.
 - Peak Load: 8800 psi, Stress Load: 311.2 psi - 3 Week Curing")
TRIAL 54: FINAL TESTING – AIRCRETE HARRY MIX – 10% MORE FOAM
In the fifty-fourth trial, the Aircrete Harry mix was still used, but with 10% more foam. This batch was repeated to produce 6 cylinders and will cure for 3 weeks.
 - Peak Load: 2970 psi, Stress Load: 105 psi - 3 Week Curing")
TRIAL 55: FINAL TESTING – AIRCRETE HARRY MIX – 15% MORE FOAM
In the fifty-fifth trial, the Aircrete Harry mixing method was followed, but with 15% more foam. This batch was repeated to produce 6 cylinders and will again cure for 3 weeks.
 - Peak Load: 3830 psi, Stress Load: 135.4 psi - 3 Week Curing")
TRIAL 56: FINAL TESTING – AIRCRETE HARRY MIX – 5% MORE CEMENT
In the fifty-sixth trial, the Aircrete Harry mixing method was followed, but with 5% more cement for a heavier mix. This batch was repeated to produce 6 cylinders and will cure for 3 weeks.
 - Peak Load: 6710 psi, Stress Load: 237.4 psi - 3 Week Curing")
TRIAL 57: FINAL TESTING – AIRCRETE HARRY MIX – 10% MORE CEMENT
In the fifty-seventh trial, the Aircrete Harry mixing method was followed, but with 10% more cement for a heavier mix. This batch was repeated to produce 6 cylinders and will cure for 3 weeks. This is the last of the Aircrete Harry 3 week cure time mixes.
 - Peak Load: 6710 psi, Stress Load: 237.4 psi - 3 Week Curing")
TRIAL 58: FINAL TESTING – AIRCRETE HARRY MIX – STANDARD AND 2 WEEK CURE TIME
In the fifty-eighth trial, the Aircrete Harry mixing method was still followed, but with no changes in the foam-concrete ratio. This batch was repeated to produce 6 cylinders and will cure for 2 weeks.
 - Peak Load: 9900 psi, Stress Load: 350.1 psi - 3 Week Curing")
TRIAL 59: FINAL TESTING – AIRCRETE HARRY MIX – 5% MORE FOAM
In the fifty-ninth trial, the Aircrete Harry mixing method was followed, but with 5% more foam. This batch was repeated, producing 6 cylinders and will cure for 2 weeks.
 - Peak Load: 7150 psi, Stress Load: 253 psi - 2 Week Curing")
TRIAL 60: FINAL TESTING – AIRCRETE HARRY MIX – 10% MORE FOAM
In the sixtieth trial, the Aircrete Harry mixing method was followed, but with 10% more foam. This batch was repeated to produce 6 cylinders and will cure for 2 weeks.
 - Peak Load: 3830 psi, Stress Load: 135.4 psi - 2 Week Curing")
TRIAL 61: FINAL TESTING – CONTROL GROUP – NORMAL CEMENT
In the sixty-first trial, another control group of normal cement was created. A bag and a half of Portland Cement was used to produce 6 cylinders that will be cured for 2 weeks.
 - Peak Load: 179500 psi, Stress Load: 6348 psi - 2 Week Curing")
TRIAL 62: FINAL TESTING – AIRCRETE HARRY MIX – 15% MORE FOAM
In the sixty-second trial, Aircrete Harry’s mixing method was followed, but with 15% more foam. This procedure was repeated to produce 6 cylinders that will cure for 2 weeks.
 - Peak Load: 179500 psi, Stress Load: 6348 psi - 2 Week Curing")
TRIAL 63: FINAL TESTING – AIRCRETE HARRY MIX – 5% MORE CEMENT
In the sixty-third trial, Aircrete Harry’s mixing method was followed, but with 5% more cement mix. This procedure was repeated to produce 6 cylinders that will cure for 2 weeks.
 - Peak Load: 6360 psi, Stress Load: 224.9 psi - 2 Week Curing")
TRIAL 64: FINAL TESTING – AIRCRETE HARRY MIX – 10% MORE CEMENT
In the sixty-fourth trial, Aircrete Harry’s mixing method was followed, but with 10% more cement mix. This procedure was repeated to produce 6 cylinders that will cure for 2 weeks.
 - Peak Load: 7940 psi, Stress Load: 280.7 psi - 2 Week Curing")
END OF FINAL TESTING PHASE SUMMARY
In the final testing phase, more compression tests were conducted with the Aircrete Harry mix than with Domegaia’s, mostly due to the inconsistency in results observed with Domegaia’s mixes and their high moisture content. In addition to standard Aircrete Harry and Domegaia mixing methods, stucco reinforcement was added to many of Aircrete Harry’s cylinders and Domegaia’s procedure was repeated using Drexel. Unlike the initial trial phases, these tests were repeated to produce 6 cylinders each and with organized curing-time variability, so we had more data to draw clearer conclusions from.
AIRCRETE TESTING SUMMARY AND FINDINGS
Aircrete is a lightweight building material made by combining cement slurry with a foamed soap solution. Compared to traditional concrete, it is much lighter and offers better insulation, making it an appealing option for sustainable and low-cost construction.
However, this comes with a tradeoff – aircrete is much weaker than concrete. Understanding how strong it actually is, and what factors influence that strength, is critical before using it in real-world applications.
Here are the areas covered in this section:
- Key Observations
- Mix Ratio Reference Guide
- How Aircrete Strength Compares To Concrete
- Compression Results Using Different Aircrete Densities
- Compression Results Using Different Cure Times
- A Surprising Result About Cure Time
- What We Learned From Talking With Domegaia
- Stress Load By Cure Time – All Variations
- Cure Time Benefits Are Amplified By Higher Cement Content
- Foam-Heavy Mixes Show Minimal Recovery Over Time
- Stress Load By Cure Time Vs. Concrete
- Stress Load Across Cure Weeks By Mix Ratio
- Compression Results Adding Stucco Reinforcement
- Compression Results Using Different Mix Methods
- Compression Results Comparing Standard Mixes To Variations
- Compression Results Using Different Foams
- Limitations Of This Testing Process
- Discussion
- Our Thoughts On This As A Building Method
All compression readings were taken from 3-inch diameter cylinders, with PSI calculated as stress load divided by 7.07 in².
The standard mix baseline used throughout this study is approximately 78% foam / 22% cement slurry (see Mix Ratio Reference Guide below for full details).
KEY OBSERVATIONS
Despite the inconsistency of some mixing methods, certain trends were observed that can help streamline the Aircrete making process in the future. Following the Domegaia procedure, better testing reliability was achieved when their standard foaming agent, 7th Generation Dish Soap, was swapped for Drexel. While 7th Generation mixes failed to dry fast enough for 48-hour testing , Drexel stabilized the drying process and ultimately produced the highest overall strength when paired with the Aircrete Harry method.
Batches using 7th Generation Dish Soap could not be cured or tested within 48 hours because the batches had not yet fully dried. We think the reason for this is the 7th Generation mixtures were less thick and more water-like than Drexel. Also, inconsistencies with mixing due to using a handheld mixer can lead to incorrect cure times. The inconsistency of smaller mixers may also be why the Little Dragon is not being sold anymore – bigger mixers mixing in 50 gal drums and putting the foam directly in at the mixing point gets more-even mixing. Because of this, it is recommended to use a concrete mixer for trials using Domegaia’s mixing method.
Across both main mixing methods, Domegaia’s and Aircrete Harry’s, there was initially a weight difference when observing the cured cylinders. This was fixed by a new pouring method, where freshly mixed Aircrete is poured to fill a mold halfway, poured the same way for as many molds as necessary, then each mold was fully filled with the remaining aircrete. This mixes the top of the batches with the bottom and seems to balance them out better.
IMPORTANT CONTEXT: AIRCRETE VS CONCRETE
Before interpreting the results, it’s important to understand the scale of performance.
- Standard concrete: ~19,192 psi
- Strongest aircrete (10% more cement + stucco): ~1,262 psi
This means: Aircrete is ~26–49× weaker than concrete.
TAKEAWAY: Aircrete is not a structural replacement for concrete. It is best suited for:
- Non-load-bearing walls
- Insulation systems
- Lightweight and sustainable construction applications
TOP FINDINGS
To make this easier to follow, we’ve summarized the most important patterns observed across all tests.
- Increasing cement content is the most effective way to improve strength
- Increasing foam content consistently reduces strength
- Stucco reinforcement delivers the largest performance gain
- Mix ratio matters more than cure time
- Foam quality and mixing method greatly affect reliability
Together, these findings highlight a central tradeoff: Strength vs. Weight vs. Insulation
The summary of all we learned can be seen in the following sections and graphics covering the results of each of our tests.
WHAT AIRCRETE IS, AND WHAT IT IS NOT
Aircrete is best described as a more sustainable alternative to concrete, rather than a sustainable material on its own. It still uses cement, which carries a large carbon footprint, but it uses far less cement per unit of volume than traditional concrete does. That reduction is where its sustainability benefit comes from.
We do not consider aircrete a replacement for concrete. At the same time, it is important to be clear that builders such as DomeGaia and AircreteHarry have been constructing real structures with aircrete for years. To our knowledge, none of those structures have failed or fallen down. Also, none of them have been permitted. Most are single-story dome structures, and a dome spreads its load across the whole shape far more evenly than a vertical wall does, which helps a weaker material perform well enough in that specific form.
We carried out this testing to find out whether we could get an aircrete structure permitted. Based on what we found, we do not believe we would be able to. That is not the same as saying it cannot be done. It means only that we do not see aircrete as structurally sound enough for us to keep putting energy in this direction. If you are planning a permanent, permitted structure, this is not a method we would recommend.
MIX RATIO REFERENCE GUIDE
Standard Mix Baseline: The standard aircrete mix used in this study is approximately 78% foam / 22% cement slurry. All ratio changes are relative to this baseline.
FOAM VARIATIONS
Mix ratios for various foam variations.
- 5% More Foam = ~83% foam / 17% cement
- 10% More Foam = ~88% foam / 12% cement
- 15% More Foam = ~93% foam / 7% cement
More foam = lighter material, more air pockets, lower compressive strength, better insulation (higher R-value).
CEMENT VARIATIONS
Mix ratios for various cement variations.
- 5% More Cement = ~73% foam / 27% cement
- 10% More Cement = ~68% foam / 32% cement
More cement = denser mix, higher compressive strength, heavier material.
PSI Conversion: All stress load readings were recorded in lbs using 3-inch diameter cylinders. PSI = Stress Load ÷ 7.07 in².
Reinforcement: Stucco mesh fiber reinforcement was applied to the outer walls of select cylinders before compression testing. All unreinforced samples are labeled N/A in the dataset.
CURE TIMES TESTED
Cure times that we tested cylinders.
- 2 Week — early strength reading
- 3 Week — mid cure
- 4 Weeks — near full cure for aircrete under standard conditions
Mix Ratio Reference Guide (Refer this dataset)
HOW AIRCRETE STRENGTH COMPARES TO CONCRETE
To begin, let us look at how aircrete strength compares to concrete across every mixing method we tested. The graph below shows the average compressive strength of each method. The scale climbs in powers of ten; without that, the aircrete bars would be too short to see next to concrete.

As the chart shows, even the strongest aircrete method we tested reached only a small fraction of concrete’s strength. The best single configuration, which was Aircrete Harry with stucco and 10% extra cement, averaged about 315 PSI, or roughly 11.5% of concrete. Most aircrete configurations landed between 3% and 7% of concrete strength. This is the clearest reason aircrete suits non-structural roles such as interior partitions, insulation infill, and lightweight non-load-bearing walls, rather than anything that has to carry a heavy load.
SEEING THE SIZE OF THE GAP
To make the size of that gap easy to picture, here are two views of the same numbers side by side. The left view zooms in on the aircrete mixes only, so they can be compared to each other. The right view places those same bars next to concrete on a single scale.

On the left, the differences between aircrete mixes look meaningful, and they are useful for choosing between aircrete recipes. The moment concrete is added on the right, every aircrete bar nearly disappears. This is the single most useful picture for setting expectations: aircrete is a different material for a different job, not a lighter version of concrete.
COMPRESSION RESULTS USING DIFFERENT AIRCRETE DENSITIES
This section looks at how changing the balance of foam and cement in a mix affects its strength. It starts with the overall tradeoff, then breaks the results down by density.
THE FOAM AND CEMENT TRADEOFF AT A GLANCE
To see the foam-versus-cement tradeoff in one picture, here is a graph showing how much stronger or weaker each mix is compared to the standard recipe. Bars above the line are stronger than standard, and bars below it are weaker

As the chart shows, increasing the foam content lowers strength, while increasing the cement content raises it. Two patterns stand out:
- Cement raises strength: 10% extra cement made the mix about 63% stronger than standard.
- Heavy foam lowers strength: heavy foam loading causes major strength drops. 10% extra foam dropped strength by about 28%, and 15% extra foam by about 35%.
ONE RESULT WORTH A NOTE OF CAUTION
The mix with 5% extra foam came out slightly stronger than the standard mix in our numbers, which runs against the general trend. We would not read much into this. The batch-to-batch results for both of these mixes varied by about the same amount as the difference between them, so the two are close enough that we cannot honestly say one is stronger than the other. The clear, reliable strength drop from foam only appears once you add 10% or more.
* Note: The previous analyst’s version of this comparison showed 5% extra foam as slightly weaker than standard. The fact that the two analyses disagree on the direction is itself a sign the difference is too small to matter.*
READING THE TRADEOFF AS A SMOOTH CURVE
The same pattern can be read as a smooth curve. The graph below plots average strength across the full range of mixes, from the most foam-heavy on one side to the most cement-heavy on the other. The thin vertical lines on each point show how much the results varied from batch to batch.

Moving toward the cement-heavy side increases strength but also adds weight. Moving toward the foam-heavy side reduces weight, which improves insulation and makes the material easier to handle by hand, but at a steep cost in strength. There is no recipe that is both very light and very strong on its own; the two move in opposite directions.

Higher foam was tested because it is a lighter building material that would function as a better insulator (higher R-value).
STRESS LOAD ACROSS FOAM AND CEMENT DENSITIES
This graphic compares the stress loads for aircrete with different foam densities (standard, 5%, 10%, and 15% more foam). The purpose was to see how increasing foam content affects compressive strength. This analysis helps assess how aircrete’s density impacts its structural integrity, showing that higher foam content leads to lower strength.

OBSERVATIONS
Here is what we observed during this testing.
- Standard Mix (Baseline ~78% foam / 22% cement ): Starts at ~6000 MPa, decreases with density, then rises after 10%.
- Foam Variations: Higher foam content weakens compressive strength. 10% & 15% More Foam are the weakest.
- Cement Variations: Higher cement improves strength. 10% More Cement starts at ~9000 MPa and remains the strongest.
INSIGHTS
Here is what this data tells us.
- Foam reduces strength, with higher foam content leading to major weakening.
- Cement enhances strength, with 10% more Cement performing best.
- Stress load recovers beyond 10% density for Standard and Cement mixes.
- 10% More Cement is the optimal mix for durability.
The following chart re-visualizes the same data in a cleaner format, making it easier to compare average compressive strength across all mix types at a glance.

Cement-heavy mixes clearly exceed the baseline, with a 10% increase in cement nearly doubling compressive strength compared to the standard mix. In contrast, foam-heavy mixes consistently fall below the baseline, with strength decreasing as foam content increases. This demonstrates a clear and consistent tradeoff: increasing cement improves structural strength, while increasing foam reduces it.
Even small increases in foam result in measurable strength loss, indicating that mix ratio plays a critical role in determining aircrete performance.
AVERAGE STRESS LOAD BY MIX VARIATION (PSI)
This bar chart below compares the average stress load for different aircrete mix variations and traditional concrete. It includes a standard aircrete mix, aircrete with increased foam content (5%, 10%, 15%), aircrete with increased cement content (5%, 10%), and concrete. The purpose of the chart is to illustrate how different material compositions impact the stress load capacity of aircrete and concrete. The x-axis represents the mix type, while the y-axis represents the average stress load in megapascals (MPa).

OBSERVATIONS
Here’s what we’ve observed while testing different aircrete densities.
- Standard Mix
- The standard aircrete mix achieves an average stress load of approximately 6,000 MPa.
- This serves as the baseline for comparing the effects of foam and cement variations on compressive strength.
- Foam Variations
- 5% More Foam: Compressive strength decreases noticeably compared to the standard mix.
- 10% More Foam: Further reduction in strength is observed as foam content increases.
- 15% More Foam: Shows the weakest performance with the lowest stress load, highlighting the major impact of high foam content on structural integrity.
- Cement Variations
- 5% More Cement: Stress load improves compared to foam-heavy mixes, surpassing the strength of the standard mix.
- 10% More Cement: Further strength enhancement is observed.
INSIGHTS
Here is what this data tells us.
- Increasing foam content weakens the compressive strength of aircrete but improves insulation properties.
- Adding cement counteracts the weakening effects of foam and strengthens the material.
- Concrete, with an average stress load of ~15,000 MPa, remains far superior in structural strength, making it the optimal choice for load-bearing applications.
The standard aircrete mix achieves an average stress load of approximately 6,000 MPa — roughly 39% of standard concrete (~15,300 MPa). The chart below re-expresses the same data as percentage change relative to the standard aircrete mix as baseline, making it easier to see exactly how much each variation gains or loses in strength.

WHAT THE DATA SHOWS
Here is what we observed during this testing.
- Standard mix: 389.4 psi
- 5% more cement: +36% strength (530.8 psi)
- 10% more cement: ~2× strength (743.5 psi)
- 15% more foam: −22% strength (302.6 psi)
- 5% more foam: -8% → ~358.2 psi
- 10% more foam: -18% → ~319.3 psi
Even small increases in foam reduce strength consistently.
This makes the tradeoff clear:
- Cement increases strength rapidly
- Foam decreases strength steadily
WHAT THIS MEANS
Here is what this data tells us.
- Use more cement when strength is required
- Use more foam when insulation and weight reduction matter
For sustainable construction at small scale, this highlights the importance of optimizing mix ratios based on use case. Cement-heavy mixes may be necessary for structural reliability, while foam-heavy mixes remain valuable for insulation-focused builds where weight and material efficiency are priorities.
COMPRESSION RESULTS USING DIFFERENT CURE TIMES
This section looks at what happened when a thin stucco mesh coating was added to the outside of the cylinders. It turned out to be the single biggest improvement we tested.
A SURPRISING RESULT ABOUT CURE TIME
One of the most surprising results from our testing was about cure time, because it contradicts what you would expect from concrete. With ordinary concrete, longer curing generally produces stronger material, since the cement keeps hardening over weeks. With aircrete, our testing showed the reverse. In every comparison we ran at a fixed mix recipe, the cylinders cured for four weeks were weaker than the ones cured for two weeks.

Click for source spreadsheet
We think this happens because aircrete holds a great deal of water, since the foam itself is mostly water. In our dry indoor lab, that water evaporated quickly. Cement needs water to harden properly, so if the water leaves before the cement has finished hardening, the result is a more brittle, under-set material. Several of the long-cured cylinders failed in a way that matches this idea: they squished rather than cracked, which is how an under-hardened material behaves.
WHAT WE LEARNED FROM TALKING WITH DOMEGAIA
This connects to something we learned in conversation with DomeGaia. They have never done compression testing on their material. They state that their structures get stronger over time, and that is likely true, but our testing suggests the added strength comes from the stucco coating on the outside, not from the aircrete itself. On its own, the aircrete in our tests did not get stronger with more curing time. That was a big surprise, and it is the kind of result that only appears once the material is actually tested in compression.
It is worth being clear about what this does and does not mean. This is what happened in our lab, under dry conditions. DomeGaia and others are building in the field under different conditions, and we did not test their structures. To really know whether cure time behaves differently in the field, we would need to repeat this testing under those conditions. Based on our results, we would not assume that longer curing makes aircrete stronger the way it does for concrete.
STRESS LOAD BY CURE TIME – ALL VARIATIONS
This graphic looks at stress loads for aircrete with different curing periods (2-week, 3-week, and 4-week curing times). Curing time is critical in building materials as it affects compressive strength. This analysis shows how aircrete becomes stronger with longer curing periods, though it still remains weaker compared to traditional concrete. The week 3 error likely resulted from the use of older cement in the mix for that batch, which had small clumps. These clumps may not have mixed thoroughly, leading to uneven distribution of the material and weaker bonding within the aircrete. This inconsistency reduced the compressive strength of the material, causing a noticeable dip in the stress load values during testing.

Aircrete Stress Load by Cure Time Detail – Click to enlarge.
OBSERVATIONS
Here’s what we’ve observed while compression testing different cure times.
- Standard Mix
- The stress load decreases at the 3-week mark before recovering in the 4th week.
- The dip at week 3 was due to the use of older cement in that batch, which had developed small clumps and reduced overall bond quality.
- Foam Variations
- 5% More Foam:
- Noticeable drop in compressive strength compared to the standard mix.
- Strength remains relatively stable over curing time but lower overall.
- 10% More Foam:
- Significant reduction in strength.
- Stress load is lowest at week 3, with only slight improvement in week 4.
- 15% More Foam:
- Weakest performance among all mixes.
- Minimal improvement in strength across curing times.
- The lowest recorded stress load suggests high foam content severely impacts structural integrity.
- 5% More Foam:
- Cement Variations:
- 5% More Cement:
- Stress load follows a similar pattern to the standard mix but maintains higher values overall.
- Strength improves significantly after week 3.
- 10% More Cement:
- Highest strength among variations.
- The stress load drops slightly at week 3 but shows a strong upward trend in week 4, indicating improved material integrity over time.
- 5% More Cement:
INSIGHTS
Here is what this data tells us.
EXTENDED CURE TIMES DO NOT GUARANTEE STRENGTH
Across most mix variations, extending the cure time to four weeks resulted in a net loss of compressive strength compared to the two-week mark. The dry indoor lab conditions caused the moisture necessary for cement hydration to evaporate too quickly, leading to a more brittle material.
- Across nearly all mix variations, stress load increased from week 2 to week 4, consistent with how cement-based materials behave as they cure.
- The exception was week 3, where a noticeable dip occurred across mixes. This was due to the use of older cement in that batch, not a reversal of the curing trend.
- While some mixes showed a minor stabilization between weeks 3 and 4, the final 4-week strength generally failed to match the initial 2-week strength expectations, confirming that in dry environments, extended curing does not yield continuous strength gains.
CURE TIME BENEFITS ARE AMPLIFIED BY HIGHER CEMENT CONTENT
The benefit of longer curing was not the same across every mix. It showed up most in the cement-heavy mixes, as the points below explain.
- Mixes with 5% and 10% more cement showed the strongest recovery and growth between weeks 3 and 4, suggesting cement-rich mixes gain more from extended curing.
- This makes cure time especially important when optimizing for structural applications.
FOAM-HEAVY MIXES SHOW MINIMAL RECOVERY OVER TIME
The foam-heavy mixes told the opposite story, gaining little from extra curing time no matter how long they sat.
- Higher foam percentages (10% and 15%) not only start weaker but show little improvement across curing periods.
- Cure time does not offset the strength penalty from excess foam, making extended curing less beneficial for foam-heavy mixes.
The chart below re-visualizes the same cure time data in PSI, adds concrete as a benchmark for direct comparison, and labels final values at each cure stage for easier interpretation.

Aircrete Stress Load by Cure Time Across All Variations – Click to enlarge.
WHAT THE DATA SHOWS
Here is what we observed during this testing.
- Strength generally decreases over extended curing in dry lab conditions.
- A dip at 3 weeks was caused by cement mixing inconsistency (bad batch)
- Foam-heavy mixes remain weak at all cure times
- Cement-heavy mixes outperform others at every stage
- The apparent drop in strength at later cure stages is not a true material behavior. It is caused by failed test cylinders recorded as zero, which artificially lowers the average.
KEY INSIGHT
A strong mix early will outperform a weak mix later. Example: 10% cement at 2 days > 15% foam at 2 weeks
WHAT THIS MEANS
Here is what this data tells us.
- Cure time helps, but it cannot fix a weak mix
- Focus on mix ratio first, then curing
STRESS LOAD BY CURE TIME VS. CONCRETE
This line chart below depicts the relationship between stress load (in MPa) and cure time (in weeks) for different aircrete mix variations and traditional concrete. The x-axis represents the cure time in weeks, while the y-axis represents the stress load in MPa. Each line represents how the stress load changes over time for a specific mix type. The graph aims to show how different compositions of foam and cement in aircrete influence stress load during the curing process compared to traditional concrete.

Aircrete Cure Time Strength vs Concrete – Click to enlarge.
OBSERVATIONS
Here’s what we’ve observed while compression testing different cure times. The main difference here is including the data for regular concrete.
- Standard Mix
- The stress load decreases significantly from week 2 to week 3 before showing a slight improvement by week 4.
- This pattern suggests initial curing challenges but potential long-term stabilization.
- Foam Variations
- 5% More Foam:
- The compressive strength decreases significantly over time compared to the standard mix.
- The mix does not recover well after week 3.
- 10% More Foam:
- Further reduction in strength is observed as foam content increases.
- The material remains weaker throughout the curing process.
- 15% More Foam:
- Shows the weakest performance, with the lowest stress load.
- There is minimal improvement in strength over curing time, making it unsuitable for high-stress applications.
- 5% More Foam:
- Cement Variations
- 5% More Cement:
- The stress load improves compared to foam-heavy mixes.
- The mix approaches the strength of the standard mix but remains slightly lower.
- 10% More Cement:
- Significant improvement in strength over time is observed.
- The stress load follows a consistent upward trend, showing that higher cement content enhances structural integrity.
- 5% More Cement:
INSIGHTS
Here is what this data tells us.
- Adding more cement (5% or 10%) enhances the material’s ability to withstand stress, especially after extended curing.
- Increasing foam content (especially at 10% and 15%) weakens the structure, leading to poor load-bearing capacity.
- Concrete remains the strongest material, showing steady and high stress resistance over time.
The charts below re-visualize the same data in two focused panels, the left isolating aircrete mix comparisons with key annotations, and the right placing the best-performing mix directly against concrete to show the performance gap.

Aircrete Cure Time Compared Against Concrete – Click to enlarge.
LEFT PANEL : The dip at week 3 reflects a testing anomaly caused by an older cement batch with small clumps, not a true drop in material strength
RIGHT PANEL : Even the strongest aircrete mix (5% more cement) remains approximately 2x weaker than concrete at every cure stage, confirming that cure time alone cannot close the performance gap.
STRESS LOAD ACROSS CURE WEEKS BY MIX RATIO
This updated line chart shows the relationship between Stress Load (MPa) and Cure Time (weeks) for different aircrete mix variations. The x-axis represents Cure Time (weeks), while the y-axis represents Average Stress Load (MPa). The graph displays multiple lines representing various mix ratios, including standard aircrete, increased foam content (5%, 10%, and 15% more foam), and increased cement content (5% and 10% more cement). The purpose of this visualization is to analyze how variations in foam and cement content impact the compressive strength of aircrete over time. The interactive slider allows filtering by cure time to observe changes at different stages.

OBSERVATIONS
Here is what we observed during this testing.
- Standard Mix:
- The stress load decreases significantly over time.
- After week 2, it follows a declining trend without any recovery.
- Foam Variations:
- 5% More Foam: Starts with a moderate stress load but shows a sharp decline over time.
- 10% More Foam: Has a lower initial stress load than the standard mix and declines steadily.
- 15% More Foam: Maintains the lowest stress load throughout the period with minimal variations.
- Cement Variations:
- 5% More Cement: Starts with a higher stress load than the standard mix and maintains a gradual decline.
- 10% More Cement: Exhibits the highest stress load at week 3 before experiencing a steep drop.
INSIGHTS
Here is what this data tells us.
- Increasing Cement Content (5% and 10%) initially enhances the material’s stress resistance, but prolonged curing may lead to reduced strength over time.
- Higher Foam Content (10% and 15%) significantly lowers stress resistance, and additional curing time does not improve its structural integrity.
- The Standard Mix performs better than foam-enhanced mixtures but is outperformed by cement-enhanced mixtures in the earlier stages.
- The 10% More Cement mix shows peak strength at week 3, but the rapid decline afterward suggests it may be prone to degradation over time.
While the chart above shows how strength changes over time, the heatmap below makes it easier to compare strength across mixes at each cure stage.

Aircrete Compressive Strength Heatmap by Mix and Cure Time – Click to enlarge.
The heatmap makes it clear that cement-heavy mixes consistently outperform foam-heavy mixes at every cure stage, and that mix ratio has a stronger impact on strength than curing time. Since curing time has less impact than mix design, efforts should focus on getting the mix right rather than extending build timelines. This is especially important in community-driven construction, where faster iteration and reliable results matter more than waiting for marginal strength gains.
COMPRESSION RESULTS ADDING STUCCO REINFORCEMENT
This section looks at what happened when a thin stucco mesh coating was added to the outside of the cylinders. It turned out to be the single biggest improvement we tested.
THE SINGLE MOST USEFUL CHANGE WE TESTED
The graph below compares each mix with and without stucco mesh reinforcement. The thin vertical lines on top of each bar show how much the results varied from one batch to the next; the longer the line, the less consistent that mix was.

Aircrete Strength With and Without Stucco Mesh – Click to enlarge.
Of everything we tested, which included mix recipe, cure time, mixing method, and foaming agent, adding stucco mesh to the outside of the cylinders had the biggest practical effect. It helped in two separate ways:
- Strength: on the heavier mixes, stucco roughly doubled the average strength. The mix with 5% extra cement went from about 133 to 256 PSI, and the mix with 10% extra cement went from about 191 to 315 PSI.
- Reliability: this may matter even more. Of the 36 stucco-reinforced cylinders we tested, none failed. Of the 108 plain Aircrete Harry cylinders, 9 failed. They either broke while being removed from the mold or collapsed before they could be tested. Adding stucco removed that problem entirely.
A COUPLE OF RESULTS THAT LOOK MISLEADING
A couple of the mixes, the one with 5% extra foam and the standard mix, look as though stucco made them weaker, but that result is not trustworthy. The batch-to-batch variation on those mixes was large enough that the apparent difference could easily be down to chance. On top of that, all of our stucco cylinders were cured for four weeks, while the plain cylinders included two-week and three-week samples, so the comparison is not a fair one given that longer curing weakened the material. The honest takeaway is that the clear strength benefit from stucco shows up on the heavy and very light mixes, the middle mixes are roughly a tossup on strength, and stucco improves reliability everywhere.
THE PRACTICAL RECOMMENDATION
For any aircrete application where it matters that a pour does not have to be redone, and where a thin stucco coating on the outside is acceptable, use stucco mesh reinforcement. It is the most consistent improvement available without changing the mix itself, and it ties directly back to what we learned from DomeGaia, whose structures likely owe much of their durability to the stucco rather than the aircrete underneath.
This section also examines how applying a stucco coating to the outside of aircrete samples affects compressive strength. Stucco reinforcement was tested across all mix variations, including foam and cement adjustments, to determine whether surface reinforcement could offset the strength trade-offs observed in earlier trials. The results show that stucco consistently boosts performance across every mix type, in some cases more than doubling compressive strength.
COMPRESSIVE STRENGTH WITH VS. WITHOUT STUCCO
This compares the compressive strength of aircrete with and without stucco reinforcement for different foam and cement variations. Stucco reinforcement is used to strengthen aircrete, and this analysis demonstrates how the addition of stucco significantly improves its compressive strength, making it more viable for certain applications.

Aircrete Compressive Strength With vs Without Stucco – Click to enlarge.
OBSERVATIONS
Here is what we observed during this testing.
- Standard Mix: Without stucco: ~6,000 MPa; with stucco: ~13,500 MPa
- Foam Variations: Increasing foam content (5%, 10%) decreases strength, dropping to ~2,700 MPa and ~1,500 MPa respectively without stucco
- With stucco reinforcement, 5% and 10% more foam mixtures improve to ~7,000 MPa and ~5,000 MPa
- Cement Variations: Higher cement content (5%, 10%) increases strength to ~7,300 MPa and ~8,000 MPa without stucco, and ~16,200 MPa and ~17,000 MPa with stucco
INSIGHTS
Here is what this data tells us.
- Stucco reinforcement consistently doubles or triples compression strength across all variations
- Foam reduces structural capacity while cement enhances it
- 10% more cement with stucco provides the highest overall strength
- Standard mix with stucco offers balanced performance
The chart below re-visualizes the same stucco reinforcement data as grouped bars in PSI, with percentage gain labels on each reinforced bar to make the strength improvement immediately readable.

Aircrete Stucco Strength Gain in PSI – Click to enlarge.
Stucco reinforcement consistently increases strength across every mix tested, making it the single most impactful improvement observed in this study.
WHAT THE DATA SHOWS
Here is what we observed during this testing.
- Every mix with stucco outperforms the same mix without stucco
- Strength gains range from ~69% to over 250% depending on mix type
- The 10% more cement mix achieves the highest strength, increasing from ~386 psi to ~1,262 psi
- Foam-heavy mixes see the largest percentage gains, with some mixes more than tripling in strength
- Even the weakest stucco-reinforced mix outperforms several non-reinforced mixes
Stucco reinforcement is the most effective way to increase aircrete strength without changing the mix ratio.
WHAT THIS MEANS
Here is what this data tells us.
- Cement-heavy mixes + stucco = maximum strength performance
- Foam-heavy mixes + stucco = usable strength with lightweight benefits
- Reinforcement significantly reduces the performance gap between weaker and stronger mixes
STUCCO IMPACT BY MIX, BENCHMARKED TO CONCRETE
This bar graph below titled “Detailed Compression Results” compares stress load capacity (MPa) of six material compositions (Standard Mix, 5% More Foam, 10% More Foam, 5% More Cement, 10% More Cement, and Concrete) with and without stucco reinforcement. Orange bars represent materials without stucco, while yellow bars show the same materials with stucco added. The graph demonstrates how stucco reinforcement consistently increases the compression strength across all material variations, with concrete showing the highest overall stress load capacity.

Aircrete Stucco Impact Benchmarked to Concrete – Click to enlarge.
OBSERVATIONS
Here is what we observed during this testing.
- Standard Mix
- Without stucco: ~6,000 MPa
- With stucco: ~12,000 MPa (doubled)
- Foam Variations
- More foam decreases strength (5% foam: ~4,000 MPa, 10% foam: ~2,000 MPa without stucco)
- Stucco mitigates strength loss in foam mixes (5% foam: ~8,000 MPa, 10% foam: ~6,000 MPa with stucco)
- Cement Variations:
- More cement increases strength (5% more: ~8,000 MPa, 10% more: ~8,500 MPa without stucco)
- With stucco: 5% more cement reaches ~16,000 MPa, 10% more cement reaches ~17,000 MPa
- Concrete
- Highest strength overall (~20,000 MPa without stucco, ~22,000 MPa with stucco)
INSIGHTS
Here is what this data tells us.
- Stucco reinforcement significantly improves strength across all materials
- Foam reduces strength but stucco can offset this reduction
- Higher cement content substantially increases strength, especially with stucco
- Concrete remains superior for structural applications
- For balance between weight and strength, 10% more cement with stucco offers ~75% of concrete’s strength
The chart below re-visualizes the same stucco impact data with clearer color contrast between reinforced and unreinforced samples, and value labels on each bar for direct comparison across all mix types.

Aircrete Stucco Impact Benchmarked to Concrete – Click to enlarge.
STUCCO VS. UNREINFORCED BY MIX RATIO
This updated bar chart below compares average stress loads for different material mix ratios (5%, 10%, 15% more foam and 5%, 10% more cement versus standard mix) with and without stucco reinforcement. Blue bars represent unreinforced samples (N/A) while orange bars show samples with stucco reinforcement. The y-axis measures average stress load from 0-9,000. The graph demonstrates how both material composition and reinforcement affect structural strength, with reinforced high-cement mixes showing the highest stress tolerance while higher foam content generally reduces strength.

Aircrete Stucco vs Unreinforced Strength by Mix Ratio – Click to enlarge.
OBSERVATIONS
Here is what we observed during this testing.
- General Pattern: Across almost all mix ratios, samples with stucco reinforcement (orange bars) show higher stress load capacity than their unreinforced counterparts (blue bars).
- Highest Performance: The “10% More Cement w/ Stucco Reinforcement” configuration shows the highest stress load capacity at approximately 8.9K.
- Standard Mix: The standard mix with no reinforcement (blue bar in rightmost column) shows a stress load of about 2.7K, which is nearly identical to its stucco-reinforced version at about 2.7K. This is the only case where reinforcement doesn’t seem to provide significant benefit.
- Cement Variations:
- 5% More Cement: Unreinforced shows ~3.8K, while reinforced reaches ~7.3K
- 10% More Cement: Unreinforced shows ~5.2K, while reinforced reaches ~8.9K
- Foam Variations:
- 5% More Foam: Unreinforced shows ~2.5K, while reinforced shows only ~2.2K
- 10% More Foam: Unreinforced shows ~2.2K, while reinforced reaches ~4.2K
- 15% More Foam: Unreinforced shows ~2.1K, while reinforced reaches ~4.6K
INSIGHTS
Here is what this data tells us.
- Stucco Reinforcement Effect: Stucco reinforcement significantly improves stress load capacity in most configurations, with the most dramatic increases seen in cement-enhanced mixes.
- Optimal Mix: The 10% More Cement with Stucco Reinforcement appears to be the optimal configuration for maximum stress load capacity.
- Foam’s Impact: Generally, increasing foam content reduces structural strength in unreinforced samples. However, when combined with stucco reinforcement, higher foam content (10% and 15%) still achieves reasonable strength values.
- Cement vs. Foam Trade-off: Increasing cement content improves structural strength considerably, while increasing foam generally decreases it. This suggests a fundamental trade-off between the materials.
- Unexpected Standard Mix Result: The standard mix shows minimal benefit from stucco reinforcement, contrary to the pattern seen with other mix ratios. This might warrant further investigation.
The chart below re-visualizes the same reinforcement data in PSI with concrete added as a benchmark on a dual axis, showing exactly how stucco-reinforced aircrete scales relative to traditional concrete.

Aircrete Strength Comparison by Mix Method – Click to enlarge.
While stucco significantly improves aircrete strength, it remains substantially weaker than concrete. This highlights that aircrete is best suited for non-load-bearing and insulation-focused applications rather than structural replacements.
COMPRESSION RESULTS USING DIFFERENT MIX METHODS
This section compares the three mixing methods we used, looking at how each one affected both how reliably the cylinders survived to testing and how strong they turned out.
HOW OFTEN EACH METHOD ACTUALLY SUCCEEDED
Beyond how strong each method was, it is worth looking at how reliable each one was, meaning how often a cylinder survived long enough to be tested at all. The chart below shows that. Read it like a grid: each square is one method-and-recipe combination, green means every cylinder in that group made it to testing, and the warmer orange and red colors mean some of them failed first.

Aircrete Cylinder Survival Rate by Mixing Method – Click to enlarge.
The pattern is clear. The Aircrete Harry method with stucco, plain concrete, and standard Domegaia all reached a 100% survival rate. Plain Aircrete Harry had occasional failures in the middle of its recipe range. The weakest performer by far was Domegaia with Drexel, where only half of the standard-mix cylinders survived testing.
THE RELATIONSHIP BETWEEN WEIGHT AND STRENGTH
The mixing method also changes how heavy the finished material is, and weight turns out to track closely with strength. The graph below plots every cylinder by its weight and its strength so the relationship is visible. Each dot is a single cylinder.

Aircrete Cylinder Weight vs Strength – Click to enlarge.
There is a clear relationship: the heavier a cylinder was, the stronger it tended to be. This makes sense, because the extra weight comes from more cement. The aircrete cylinders cluster between about 4 and 9 pounds, while the concrete cylinders sit far off to the side at 22 to 25 pounds, which is another way of seeing how different the two materials are. This relationship is useful when planning a build. If you have a target weight, whether for easier handling or for a roof load, you can read off roughly what strength to expect, and the other way around. Within the aircrete range, you cannot get a mix that is both very light and very strong without adding reinforcement, which is exactly what the stucco does.
This section also examines how the choice of mixing method affects aircrete’s compressive strength and weight after curing. Three methods were tested: Aircrete Harry, Domegaia, and Domegaia with Drexel. While all three produce aircrete, differences in how the foam and slurry are combined result in measurably different structural outcomes. The results show a clear tradeoff between weight and strength depending on the method used.
An important distinction: Domegaia w/ Drexel showing the weakest long-term compressive strength here does not contradict earlier observations that Drexel helped stabilize the mix sooner. Batches using 7th Generation Dish Soap could not be compression-tested within 48 hours because they had not fully dried, the mixes were too water-like. Switching to Drexel resolved this drying issue, allowing earlier testing. However, earlier compression readiness does not mean higher final strength. When measured at 4 weeks, Domegaia w/ Drexel still produced lower compressive strength than Aircrete Harry across all tested variations.
STRESS LOAD AND WEIGHT BY MIXING METHOD
This graphic compares the stress load and weight after curing for three different mix methods: Aircrete Harry, Domegaia, and Domegaia with Drexel. The mixing method can dramatically impact the material’s performance. This comparison shows that Aircrete Harry outperforms the others in compressive strength, while the other methods are lighter but weaker. Aircrete Harry had the highest compressive strength and was heavier, while Domegaia and Domegaia with Drexel were lighter but had significantly lower stress loads, with Domegaia with Drexel being the weakest.

Aircrete Stress Load and Weight by Mixing Method – Click to enlarge.
OBSERVATIONS
Here is what we observed during this testing.
- Aircrete Harry
- Heavier than Domegaia and Domegaia with Drexel, weighing ~12-15 lbs after curing.
- Achieves the highest compressive strength among non-concrete mixes.
- Shows a significantly higher stress load than the other aircrete variations.
- Domegaia
- Lighter than Aircrete Harry, weighing ~8-10 lbs after curing.
- Lower stress load compared to Aircrete Harry.
- Moderate performance in terms of weight-to-strength ratio.
- Domegaia with Drexel
- Lightest mix, weighing ~7-8 lbs.
- Lowest stress load, making it the weakest among the tested aircrete variations.
- Concrete
- Heaviest mix, weighing over 25 lbs.
- Highest compressive strength, surpassing 350 MPa.
- Consistently superior stress load performance across all samples.
INSIGHTS
Here is what this data tells us.
- Weight vs. Strength Tradeoff: Lighter mixes (Domegaia and Domegaia with Drexel) sacrifice compressive strength, while heavier mixes (Aircrete Harry and Concrete) provide significantly higher stress load capacities.
- Aircrete Harry as the Best Aircrete Option: Among aircrete mixes, Aircrete Harry offers the best balance between weight and strength, making it superior to Domegaia and Domegaia with Drexel.
- Domegaia with Drexel is the Weakest: While the lightest, it also has the weakest structural integrity, making it less viable for high-stress applications.
- Concrete is the Strongest Overall: With the highest compressive strength and weight, concrete remains the best choice for structural applications requiring durability and load-bearing capacity.
The chart below re-visualizes the same weight and stress load scatter data with distinct color coding per mix method and cleaner axis scaling, making it easier to compare both weight and strength across all four mixing methods.

Aircrete Weight and Strength by Mixing Method – Click to enlarge.
COMPRESSION RESULTS COMPARING STANDARD MIXES TO VARIATIONS
This section compares the compressive strength of the standard aircrete mix against variations that adjust foam and cement content. The goal was to isolate how individual changes to mix composition affect structural performance, using the standard mix as a consistent baseline. Results confirm that foam and cement have opposite and predictable effects on strength.
STANDARD MIX VS. FOAM AND CEMENT VARIATIONS
This compares the compressive strength of the standard mix to various foam (5%, 10%, 15% more foam) and cement variations (5%, 10% more cement). The goal was to see how altering the foam and cement ratios affected the material’s performance. The analysis shows that more foam reduces compressive strength, while increasing cement content helps boost strength.

Standard Aircrete Mix vs Foam and Cement Variations – Click to enlarge.
OBSERVATIONS
Here is what we observed during this testing.
- Standard Mix: Shows stress load of ~5800 MPa.
- Foam Variations:
- 5% More Foam: ~2600 MPa (55% decrease from standard)
- 10% More Foam: ~1500 MPa (74% decrease from standard)
- 15% More Foam: ~6300 MPa (unexpectedly higher than standard)
- Cement Variations:
- 5% More Cement: ~7300 MPa (26% increase from standard)
- 10% More Cement: ~7900 MPa (36% increase from standard)
INSIGHTS
Here is what this data tells us.
- Cement Effect: More cement consistently improves strength.
- Foam Pattern: 5% and 10% more foam reduce strength substantially.
- Anomaly: 15% More Foam unexpectedly increases strength above standard mix.
- Best Performance: 10% More Cement achieves highest overall strength.
The chart below re-visualizes the same data with color coding by mix category and value labels on each bar, making the foam vs cement tradeoff immediately visible against the standard mix baseline.

Aircrete Standard Mix vs Variations With Value Labels – Click to enlarge.
STRESS LOAD BY MIX TYPE WITH DATA POINTS
This scatter plot titled “Compression Results: Standard Mix vs Foam/Cement Variations” displays stress load (MPa) measurements for different building material mixtures. The y-axis shows stress load values ranging from 0 to 16,000 MPa, while the x-axis shows eight different mix types: Standard Mix, 5%/10%/15% More Foam, 5%/10% More Cement, Concrete, and Cement. Each mix type shows both individual data points (smaller crosses) and average values (larger crosses) in corresponding colors according to the legend. The graph clearly illustrates how compression strength varies across different material compositions, with cement and concrete showing the highest stress load values around 12,000-15,000 MPa, while mixes with increasing foam content show progressively lower stress tolerance, with 15% More Foam having the lowest values around 1,500 MPa.

Aircrete Stress Load by Mix Type With Data Points – Click to enlarge.
OBSERVATIONS
Here is what we observed during this testing.
- Foam Variations (5%, 10%, 15% More Foam)
- Stress load decreases significantly as foam percentage increases.
- 15% More Foam shows the lowest stress load, confirming foam additions weaken the mix.
- Data points for foam variations are tightly clustered, indicating consistent performance.
- Cement Variations (5%, 10% More Cement)
- 5% More Cement shows a substantial improvement in stress load over the Standard Mix.
- 10% More Cement performs even better, with stress loads approaching those of pure Cement.
- Data points for cement variations are slightly more scattered, suggesting variability in test results.
- Concrete vs. Cement
- Cement has the highest stress load overall, nearing 16,000 MPa.
- Concrete performs slightly below Cement, indicating that it’s strong but not as durable under stress as pure cement.
- Standard Mix
- The baseline stress load is significantly higher than foam variations but much lower than cement-based variations.
INSIGHTS
Here is what this data tells us.
- Adding foam consistently reduces stress load, making the material less capable of withstanding stress.
- Adding cement significantly improves the stress load, with performance scaling up as more cement is added.
- Concrete performs well but is outperformed by pure Cement, which shows the highest stress capacity.
The chart below re-visualizes the same data as a color-coded bar chart with error bars showing trial variability, making average stress load per mix type easier to read than the scatter plot above.

Average Aircrete Stress Load by Mix Type – Click to enlarge.
STRESS LOAD BY RATIO AND MIX METHOD
This updated bar graph below titled “Ratio Changes / Type” compares average stress load capacities across different material compositions. It shows various formulations of “Aircrete Harry,” “Domegaia,” and “Domegaia w/ Drexel” with different cement and foam ratios (from 10% more cement to 15% more foam). The vertical axis measures average stress load from 0-5500, while the horizontal axis displays different material variations. The graph demonstrates how modifying cement and foam content affects the structural strength of these building materials, with higher cement content generally showing higher stress tolerance than higher foam content.
Note: Domegaia and Domegaia w/ Drexel are only shown for Standard and 10% More Cement variations. Due to the inconsistency observed in Domegaia’s results and the high moisture content of its mixes, the decision was made to focus the full range of ratio testing on Aircrete Harry, using Domegaia’s Standard and 10% More Cement as a single benchmark comparison across the three methods rather than repeating every variation.

Average Aircrete Stress Load by Mix Type – Click to enlarge.
OBSERVATIONS
Here is what we observed during this testing.
- Aircrete Harry Performance: Aircrete Harry with 10% More Cement shows the highest stress load at approximately 5250, significantly outperforming all other variations.
- Material Type Comparison: Across similar mix ratios, Aircrete Harry generally demonstrates higher stress load capacity than Domegaia or Domegaia w/ Drexel.
- Standard Mix: In the standard mix category, Domegaia shows a higher stress load (approximately 2850) than Aircrete Harry (approximately 2750).
- Cement Content Effect: Increasing cement content improves stress load capacity for
- Aircrete Harry:
- 10% More Cement: ~5250 stress load
- 5% More Cement: ~3750 stress load
- Standard: ~2750 stress load
- Foam Content Effect: Increasing foam content decreases the stress load capacity for Aircrete Harry:
- Standard: ~2750 stress load
- 10% More Foam: ~2250 stress load
- 15% More Foam: ~2100 stress load
- Domegaia w/ Drexel: This variation shows consistently lower stress load capacities:
- Standard mix: ~750 stress load
- 10% More Cement: ~1100 stress load
INSIGHTS
Here is what this data tells us.
- Cement Content Significance: Cement content has a dramatic positive impact on stress load capacity, with 10% more cement nearly doubling the strength compared to standard mix.
- Foam’s Weakening Effect: Higher foam content consistently reduces structural strength, as seen in the declining performance of Aircrete Harry with 10% and 15% more foam.
- Material Selection Impact: Material type plays a crucial role in determining stress load capacity, with Aircrete Harry generally outperforming Domegaia.
- Drexel Additive Effect: The addition of Drexel to Domegaia appears to significantly reduce stress load capacity compared to standard Domegaia.
- Optimal Material Choice: For maximum strength applications, Aircrete Harry with 10% more cement appears to be the optimal choice.
- Standard Mix Variation: In the standard mix category, Domegaia slightly outperforms Aircrete Harry, suggesting that baseline formulations may have different strengths depending on the material type.
The chart below re-visualizes the same ratio change data with value labels, category dividers, and a clear legend distinguishing all three mix methods across each ratio variation.

Aircrete Stress Load by Ratio and Mix Method – Click to enlarge.
COMPRESSION RESULTS USING DIFFERENT FOAMS
This section looks at how the choice of foaming agent affected strength, and why the foaming agent and the mixing method have to be judged together rather than on their own.
WHY THE FOAMING AGENT AND THE MIXING METHOD WORK TOGETHER
It would be reasonable to assume that a higher-quality foaming agent like Drexel should improve any aircrete mix it is used in. Our results show it is not that simple. The clearest example is what happened when Drexel was used in the Domegaia method. The switch did two things, in opposite directions:
- It helped with drying: Domegaia mixes made with 7th Generation dish soap were so watery that they could not be tested within 48 hours, because they had not dried enough. Switching to Drexel fixed that and let the batches dry on schedule.
- Chemical Compatibility: While Drexel solved the critical drying failure of the 7th Generation soap, its specific chemical interaction with the Domegaia mixing method resulted in a lower final PSI. However, Drexel remains the superior choice overall because it is the only agent that allowed the highest-performing method (Aircrete Harry) to reach maximum strength.
So the lesson is not that Drexel is a worse foaming agent. In fact, Drexel produced the strongest results of all when it was used in the Aircrete Harry method. The point is that the foaming agent and the mixing method work together as a pair. A foaming agent that performs well in one method can perform poorly in another, so you cannot simply swap one for the other and expect the same result. Any substitution needs to be re-tested in the method you actually plan to use.
This section compares the compressive strength produced by three different foaming agents: Aircrete Harry, Domegaia (7th Gen), and Domegaia with Drexel. The foaming agent determines the quality and consistency of the air bubbles introduced into the mix, which directly affects density and load-bearing capacity. This analysis shows that the foaming method alone can produce significant differences in structural performance, independent of mix ratio.
*Note: This refers to long-term compressive strength at 4 weeks. Earlier in testing, switching to Drexel actually helped Domegaia’s mixes stabilize for compression testing sooner — batches using 7th Generation Dish Soap could not be tested within 48 hours because they were too water-like to have fully dried. Drexel resolved that drying issue, but did not ultimately produce higher final strength than Aircrete Harry.
STRESS LOAD BY FOAMING AGENT (WITH DATA POINTS)
This graphic compares the stress load of different foaming agents (Aircrete Harry, Domegaia, and Domegaia with Drexel). Different foaming agents can affect the performance of aircrete. This analysis highlights that Aircrete Harry’s foam performs better than Domegaia’s and Domegaia with Drexel, with the latter being the weakest in terms of compressive strength.

Aircrete Strength Comparison by Foaming Agent – Click to enlarge.
AVERAGES
Average values for different foam types to stress load.
- Aircrete Harry (Drexel): 184.79 MPa (highest performance)
- Domegaia (7th Gen): 119.14 MPa
- Domegaia w/ Drexel: 79.90 MPa (lowest performance)
OBSERVATIONS
Here is what we observed during this testing.
- Aircrete Harry (Drexel): Shows the highest stress load at approximately 185 MPa average with data points ranging from ~170-200 MPa.
- Domegaia (7th Gen): Shows moderate stress load with an average of approximately 120 MPa and data points ranging from ~100-135 MPa.
- Domegaia w/ Drexel: Shows the lowest stress load with an average of approximately 80 MPa and data points ranging from ~70-90 MPa. This lower long-term strength is separate from Drexel’s earlier benefit of faster stabilization, which allowed compression testing to begin sooner than with 7th Generation Dish Soap.
- Data Consistency: Aircrete Harry shows the greatest variation between data points, while Domegaia w/ Drexel shows the least variation.
- Performance Ranking: Aircrete Harry > Domegaia (7th Gen) > Domegaia w/ Drexel.
INSIGHTS
Here is what this data tells us.
- Foaming Agent Impact: The choice of foaming agent significantly affects compressive strength.
- Drexel Effect: Drexel improved Domegaia’s compression readiness by helping mixes dry faster, but did not improve its final compressive strength compared to Aircrete Harry. When used in Aircrete Harry’s method, Drexel produced the strongest results overall.
- Performance Gap: Aircrete Harry (Drexel) delivers approximately 54% higher strength than Domegaia (7th Gen) and 131% higher than Domegaia w/ Drexel.
- Application Considerations: For structural applications requiring maximum strength, Aircrete Harry with Drexel is clearly superior.
- Consistency Trade-off: While Aircrete Harry offers highest strength, it also shows more variability, which might affect quality control in production.
The chart below re-visualizes the same foaming agent data with distinct color coding per agent and average value labels, making the performance gap between Aircrete Harry, Domegaia, and Domegaia w/ Drexel immediately clear.

Aircrete Stress Load by Foaming Agent – Click to enlarge.
WHAT THE DATA SHOWS
Here is what we observed during this testing.
- Cement increases outperform the standard mix, with strength rising as cement content increases
- Foam variations show a steady decrease in strength as foam percentage increases
- The 10% more cement mix achieves the highest overall strength
- The 10–15% foam mixes show the lowest performance
Mix composition is a primary driver of strength, with cement acting as a strengthening factor and foam introducing structural weakness.
Increasing foam reduces material weight but comes at the cost of structural performance, while increasing cement improves strength but results in heavier mixes.
WHAT THIS MEANS
Here is what this data tells us.
- Use cement-heavy mixes when strength is required
- Use foam-heavy mixes when weight reduction and insulation are priorities
- There is no configuration where increasing foam improves strength, the tradeoff is unavoidable
For sustainable construction at small scale, optimizing mix ratios is critical. Cement-heavy mixes may be necessary for structural reliability, while foam-heavy mixes are better suited for insulation-focused applications where reduced weight and material efficiency are more important.
AVERAGE STRESS LOAD BY FOAMING AGENT
This visual below shows a bar graph titled “Compression Results: Different Foaming Agents.” The graph compares the stress load capacity (measured in MPa) of three different foam types: “Aircrete Harry,” “Domegaia,” and “Domegaia w/ Drexel.” The vertical y-axis displays stress load values ranging from 0 to 175 MPa, while the horizontal x-axis categorizes the three foam type options. Each foam type is represented by a purple bar indicating its respective compression strength. The graph illustrates how different foaming agents affect the compressive strength of building materials, providing a visual comparison of their structural performance under pressure testing.

Average Aircrete Strength by Foaming Agent – Click to enlarge.
AIRCRETE HARRY (DREXEL)
Shows the highest compressive strength among the tested foams. The data points cluster above 200 MPa, indicating consistent performance.
DOMEGAIA (7TH GEN)
Compressive strength is lower than Aircrete Harry but higher than Domegaia with Drexel. Data points center around 120-140 MPa.
DOMEGAIA W/ DREXEL
Demonstrates the weakest performance, with compressive strength clustering below 120 MPa.
SUMMARY
The visualization highlights that Aircrete Harry’s foam provides superior compressive strength, while Domegaia w/ Drexel results in the weakest. The chart below re-visualizes the same foaming agent averages in PSI with distinct color coding per agent and value labels, making the strength ranking across all three methods immediately readable.

Aircrete Strength by Foaming Agent in PSI – Click to enlarge.
Aircrete Harry clearly produces the highest compressive strength, while Domegaia with Drexel results in the weakest performance.
WHAT THE DATA SHOWS
Here is what we observed during this testing.
- Aircrete Harry achieves the highest strength (~480 psi)
- Domegaia performs moderately (~396 psi)
- Domegaia with Drexel produces the lowest strength (~195 psi)
- The gap between the strongest and weakest methods is significant, showing that foaming method alone can drastically impact performance
Foaming method is a critical factor in determining aircrete strength, with Aircrete Harry providing the most reliable and strongest results among the tested options.
WHAT THIS MEANS
Here is what this data tells us.
- Aircrete Harry is the best choice when strength is a priority
- Domegaia methods may be useful for lighter, non-structural applications
- Foaming method selection can have as much impact on strength as mix composition
For sustainable, small-scale construction, selecting the right foaming method is essential for achieving reliable results. Aircrete Harry offers the most consistent strength performance, while lighter methods may be appropriate where insulation and reduced weight are more important than structural capacity.
LIMITATIONS OF THIS TESTING PROCESS
Before drawing firm conclusions, it is worth being clear about the limits of this testing. The results were shaped by small batch sizes, the equipment we had, and the dry indoor conditions we cured in. Each of these is covered below.
SMALL BATCH SIZES & MIXING SCALE
The testing process faced several limitations, particularly due to the small batch sizes used in the trials. Aircrete Harry recommends large-scale batches that use 94 pounds of cement, whereas the testing relied on much smaller batches of about 15-20 pounds. These small batches were then further divided into three cylinders, introducing potential inconsistencies in density and crush resistance. In a larger batch, small differences in foam or wet cement mixture distribution would likely be minimized, leading to more consistent results. However, in these small-scale tests, slight variations had a major impact, affecting the uniformity and performance of the aircrete. Additionally, the relative intensity of the drill typically used to mix the foam and wet cement mixture changes based on container size. In a small mixing bucket, the vibrations produced by the drill will not spread and dampen as they would in a large container, making them more aggressive given the smaller volume. Also, the drill mixer created bubbles of uneven sizes which later produced weak points in the dried Aircrete, made worse by the smaller batch sizes.
Another limitation was the scale of the mixer. Domegaia typically uses a 50-gallon drum with a foam-injection mixer called the Dragon XL, but our tests were conducted with smaller 7-gallon or 5-gallon buckets and the “Little Dragon”, a much smaller foam creator that is no longer sold by them possibly because of challenges like the ones we experienced. This downscaling likely led to uneven foam distribution and increased foam collapse, as smaller mixers don’t inject the foam into the bottom of the mix like the Dragon XL and may not blend the materials as consistently. The small-scale batches had more issues with maintaining the correct foam-to-cement ratio too, which could have also been a source of the inconsistency of the results.
FOAMING AGENT FAILURES
A major issue with the Domegaia method arose from the choice of foaming agent. The tests revealed that when higher percentages of foam were used with Domegaia’s method and 7th Generation Dish Soap, the aircrete consistently collapsed. This issue was offset when Drexel, a more stable foaming agent, was used instead. However, Drexel comes at a higher cost and lower sustainability value, which makes its use less desirable. However, the failure of higher-foam mixes with 7th Generation Dish Soap highlights the importance of selecting the right foaming agent for the mix. Despite these challenges, the team overcame some issues by switching to Drexel as the foaming agent and carefully controlling mixing times. However, the limitations of using small batches and non-industrial equipment mean that the results do not fully reflect the performance of aircrete in larger-scale construction. Overall, while the tests provided valuable insights, they highlight the challenges of scaling down aircrete production and the importance of careful control over variables in the mixing process.
DRY INDOOR CURING CONDITIONS
Another possible limitation was the mixing and curing environment. These trials were performed in a sterile, indoor lab environment and the batches were cured in plastic containers. Domegaia cures their Aircrete outdoors, often in hotter and drier climates, and not in plastic. This could be an additional contributor to Domegaia’s successes with shorter curing times. Our cylinders were cured indoors in dry conditions. The finding that longer curing produced weaker aircrete may be specific to that dry environment. Curing in a more humid setting, or keeping the cylinders covered, could change the result. This would need to be tested before treating it as a general rule for aircrete everywhere. Our experimentation showed several common factors also contributed to the inconsistency in results, including mixing time, cure time, water hardness, and cement quality. Even minor differences in these variables can have a major effect on the performance of the aircrete.
INCONSISTENT SAMPLE SIZES
Some recipes were tested with many cylinders and others with only a few. Where we had only a handful of cylinders for a given recipe, the average is more of a rough guide than a precise figure, because a single unusual cylinder can move the average a lot. The recipes with the most cylinders behind them are the ones to trust most.
SCOPE OF TESTING (COMPRESSION ONLY)
All of our testing measured crush resistance, meaning how much downward load the material can bear before it crushes. We did not test how it holds up under bending, pulling, repeated freezing and thawing, or long-term wear. None of those properties can be assumed from the compression numbers alone, and they would all matter for a real building.
DISCUSSION
All in all, this round of Aircrete testing was successful in building upon the results of past volunteer teams. The previous team ended with generally inconsistent results, but their successes and notable mistakes left a solid foundation for new trials. This most recent testing highlighted the reliable success of Aircrete Harry’s mixing method when compared with Domegaia’s, mainly a result of the foaming agents used and target foam densities of both procedures (a lower foam density, of around 68 g/qt, paired with Drexel was ideal). However, Domegaia’s mixing method should not be completely disregarded due to our smaller batch sizes and sterile curing environment, both of which did not match Domegaia’s recommended mixing conditions. More testing limitations are discussed above (see Limitations of This Testing Process).
Similar to past results, it was again observed that lighter Aircrete mixes (batches that had a higher percentage of foam) were weaker than those with more cement. Also, extended cure times in the dry lab environment were seen to lead to weaker crush resistance due to rapid moisture loss. Still, lighter batches had greater insulative properties (higher R-values). For more information on possible uses for Aircrete, based on these findings, see Our Thoughts as a Building Material.
In the end, these results should serve as a solid starting point for future research or for replicators looking to mix Aircrete themselves. Mixing Aircrete is a delicate process, and small environmental or technical changes could lead to drastically different outcomes, so minor adjustments should be expected when attempting to recreate these results.
OUR THOUGHTS ON THIS AS A BUILDING METHOD
Pulling the results together, here is how we see aircrete as a building material. The points below cover crush resistance, weight, stucco reinforcement, foaming agents, and cure time.
- Crush Resistance: Aircrete’s crush resistance is much lower than traditional concrete, especially as more foam is added. Even with stucco reinforcement, the material is still weaker compared to regular concrete. The data shows that adding foam (e.g., 5%, 10%, 15%) greatly reduces the material’s ability to withstand compression. For example, Aircrete Harry’s standard mix had a weight-bearing capacity of around 175.4, but this dropped greatly with foam variations.
- Weight and Density: Aircrete is much lighter than traditional concrete, which could be beneficial for applications where weight reduction is a priority, such as insulation or non-load-bearing walls. However, this reduced weight comes at the cost of strength.
- Stucco Reinforcement: Stucco appears to improve the crush resistance of aircrete, as seen in the tests with and without reinforcement. This could be a key factor in making aircrete more practical for specific uses.
- Foaming Agents: The different foaming agents (Aircrete Harry, Domegaia, and Domegaia with Drexel) produced varying results. Aircrete Harry consistently outperformed the others in terms of crush resistance, while Domegaia with Drexel had the lowest weight-bearing capacity. This suggests that the choice of foaming agent is crucial in determining the material’s strength.
- Curing Time: Curing time also affects crush resistance, but not in the way we first expected. In our testing, longer curing periods generally produced weaker aircrete rather than stronger, likely because the material dried out before the cement could fully harden in our dry lab conditions. Either way, aircrete stayed far below traditional concrete at every cure time.
While aircrete is appealing for its lightweight properties and potential cost savings, the much lower crush resistance compared to traditional concrete limits its use in supporting heavy weight. Aircrete may be more suited for projects like insulation, partition walls, or other non-load-bearing components where strength is not a primary concern. The addition of stucco reinforcement helps, but it does not fully bridge the gap in performance between aircrete and conventional concrete.
ANALYSIS OF PRIMARY AIRCRETE FOAMING AGENTS
During this set of trials, two foaming agents were primarily used: 7th Generation Dish Soap and Drexel. An analysis of the sustainability and cost of these products was conducted, and it was revealed that both have their own distinct, contrasting strengths and weaknesses. During testing, 7th Generation Dish Soap performed much worse when it came to Aircrete stability, but it is the more sustainable, affordable, and easily accessible option when compared to Drexel. For lighter mixes (mixes with more foam), Drexel was shown to be the only viable option.
Regardless of the foaming agent we use in the future, One Community plans to buy these products in bulk containers to improve their sustainability.
SUSTAINABILITY ANALYSIS
The safety and sustainability of Aircrete’s two main foaming agent options (7th Generation Dish Soap and Drexel) were analyzed, and the findings have been compiled in the table below:

Regarding the plastic packaging each company uses (current details can be found under “Product Information”). To improve sustainability, Instead of buying many small containers from other retailers, One Community hopes to organize purchasing our foaming agents in large batches from the seller. This will reduce packaging waste and should reduce the transportation carbon footprint.
COST ANALYSIS
The costs of Aircrete’s two main foaming agent options (7th Generation Dish Soap and Drexel) were analyzed, and the findings have been compiled in the table below:
 - Click for source")
We think organizing purchasing our foaming agents in large batches from the seller should also increase the profit margin for the producer and reduce per-ounce costs for us as the consumer.
AIRCRETE MIXING TUTORIALS
During final compression testing, four primary Aircrete mixing methods were followed: one from Aircrete Harry, two from Domegaia with differing foaming agents, and one control group that was regular cement. Concise tutorials for each method are included below in written and video form.
MATERIALS
The first step to making Aircrete is to set up Aircrete Harry’s foam generator. A simple list of materials needed for this procedure is listed below:
SAFETY AND CLEANUP EQUIPMENT
 It is extremely important to wear proper safety equipment when working with concrete. The dust is dangerous to your eyes and lungs. For this reason, it is important to properly clean up remaining dust too. Rainwater polluted with concrete washwater can percolate down through the soil and alter the soil chemistry, inhibit plant growth, and contaminate the groundwater. Its high pH can also increase the toxicity of other substances in the surface waters and soils.
- Shop Towels – These shop towels are useful and durable enough for cleaning of the tools, containers, and labroom.
- Gloves – The gloves are useful for keeping the work environment and self clean, and also protects hands from cement, water and detergent.
- Safety Goggles – Protect your eyes from aircrete splatter, detergents and dust. (Aircrete production can be very messy).
- N95 Masks – Cement dust can get into your lungs, and a properly-used N95 will prevent this.
- Washout – Used for collecting waste from aircrete. Any slurry waste in the washout should be dried before being disposed of. Dried aircrete/concrete is safe to dispose of through normal trash cans, but beware of its weight, so the equipment used to remove it does not get overloaded.
AIRCRETE HARRY MIX*
NOTE: Our mixes were small for the purposes of testing. Aircrete Harry recommends mixing 94 pounds of cement, 6 gallons of water, and 42 gallons of foam for large-scale construction. This is under the assumption that you will be using a 50 gallon container. It should be expected that the time for mixing will increase with the size of the batch. With that comes increased importance in making sure the mixture is fully mixed. When mixed to completion, a larger batch should see less disparity in density, especially depending on its intended use. For our testing, we had to divide our already small batch into 3 cylinders; however, for normal construction, it can be assumed that most of the batch would be used. For a bigger batch (using a 94 pound bag of cement), a small difference in density is not as significant as it is for our small tests.
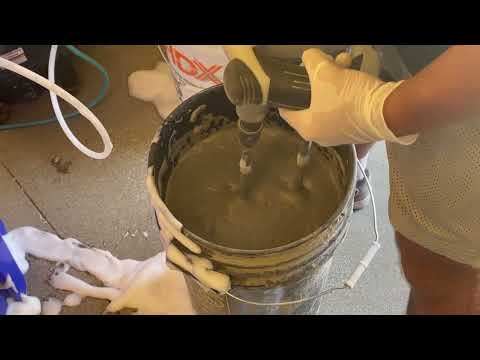

- Step 1: Add water to a 7 gallon bucket, then add the respective quantity of cement after the water, mixing the slurry as the powder is being poured.
- Step 2: Keep mixing this slurry of water and cement powder until it has an even consistency (3 – 5 minutes, on average).
- Step 3: To create foam, first add a specified amount of Drexel (about 4 oz) to a 5 gallon bucket of water. Place the intake tube of the Aircrete Harry generator into the solution and step on the foot pedal, producing just a bit of foam, to prime the machine.
- Step 4: Then, turn the air valve of the foam generator on, to about 40-45 psi. Fill a one-quart container with the foam and weigh it to ensure a foam density of around 68 g/qt (making sure to tare the scale, so the weight of the container is not factored in).
- Step 5: Then, add foam to the bucket until the foam reaches the top, keeping the handheld drill mixer running in the bucket, moving it up and down.
- Step 6: While mixing, move the drill up and down to ensure that the foam and slurry are incorporated. Do not mix with a high drill speed. This process will take about 5 minutes, and by the end, the mixture should have a gray color and the volume should stop decreasing.
- Step 7: After the mixture has an even consistency, pour into the desired mold(s). To reduce weight disparity when using multiple molds, fill each mold halfway first, then fill to the top.
DOMEGAIA MIX*
NOTE: Our mixes were small for the purposes of testing. Domegaia recommends mixing 94 pounds of cement in a 55-gallon drum for large-scale construction.
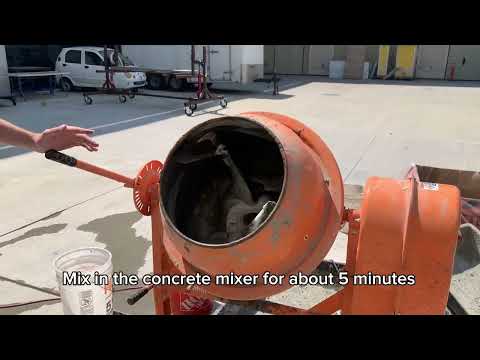
- Step 1: Add water to a 5 gallon bucket, then slowly add the respective quantity of cement after the water, mixing the slurry as the powder is being poured.
- Step 2: Keep mixing this slurry of water and cement powder until it has an even consistency
- Step 3: To create foam, add a specified amount of 7th Generation Dish Soap (or other foaming agent) to a 5 gallon bucket filled with water. The ratio of agent to water should be 1 to 40.
- Step 4: Place the lid of the Little Dragon on the bucket and start the foam machine. Keep it running for a moment to prime the device, then begin to adjust the air pressure until foam is produced in the desired consistency. Pour this foam into a one-quart container and weigh the full quart to ensure a foam density of 90-100 g/qt (making sure to tare the scale, so the weight of the container is not factored in).
- Step 5: Add foam to the bucket until the foam reaches the top, keeping the handheld drill mixer running in the bucket.
- Step 6: After the foam has been added, immediately pour the mix into the concrete mixer. The foam will rapidly lose volume and precious air bubbles after being poured into the bucket, so it is important to be quick. Ensure that all of the bucket’s contents are poured into the mixer.
- Step 7: Run the concrete mixer for about 5 minutes. The final mixture should have a mousse-like texture.
- Step 8: Finally, pour into the desired mold(s). To reduce weight disparity when using multiple molds, fill each mold halfway first, then fill to the top.
To replicate trials following Domegaia’s procedure while using Drexel (these were observed to be more successful), simply swap the foaming agent from 7th Generation Dish Soap to Drexel.
* Only the Aircrete Harry and Domegaia mixes were included because Domegaia with Drexel is not significantly different and there are plenty of resources showing how to make regular cement.
MIXING AIRCRETE WITH ALTERED RATIOS
When changing the foam to slurry ratio in a batch of Aircrete, as was done in the documented trials, base any deviations on weight. When adding a higher percentage of foam (5% for example), decrease the weight of the slurry by the desired percentage (in this case, 5% less cement and water would be used).
Changes are made to the slurry’s weight when making a lighter batch because the volume of foam changes rapidly after it’s added, and this can quickly throw off measurements. On the other hand, when making a heavier batch that has an increased percentage of cement, simply add more cement and water (vs. decreasing the amount of foam as it is harder to work with).
Example: If you want to add 10% more foam to your batch, decrease your water and cement by 10%. Changes in foam are based on the volume of the cement slurry. If you want a lighter batch, you decrease the slurry amount. If you want a heavier batch, you increase the slurry amount.
EQUIPMENT TUTORIALS
Here are the best tutorials we’ve found from the leading aircrete organizations.
LITTLE DRAGON AIRCRETE MIXER DEMO
Here are the equipment tutorials that are provided by both Domegaia and Aircrete Harry for their respective foam generators.
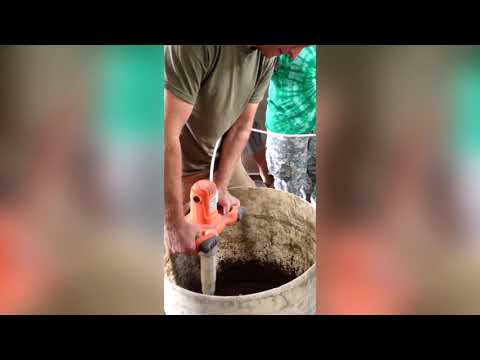
AIRCRETE HARRY AIRCRETE MIXER DEMO
Here is the demo video from Aircrete Harry showing how to use his aircrete foam generator::

WASTE MANAGEMENT
While Aircrete contains a significant amount of foam, which can be disposed of easily, heightened precaution still needs to be taken when cleaning any excess material. Aircrete begins as a malleable slurry, but hardens quickly and should not be poured down drains because of the concrete included. It is best to dispose of Aircrete in its hardened state, then the solid debris can be disposed of in a standard trash bin.
Here are the considerations for each key area in the process:
COMPRESSION MACHINE CLEANUP
- Grab a dust pan and/or broom
- Clear any debris inside the cage and the floor around the machine
- Dispose the debris in the designated trash bins
MIXING ROOM CLEANUP
- DO NOT DUMP ANY CONCRETE SUBSTANCE IN DRAINS OR SINKS
- Clean up any debris on the tables and dispose of it in the trash bin
- Pour any liquid cement onto a tray
- Set the tray outside for the liquid to evaporate
- Clean out any powder after evaporation of all liquid from the tray
- Use a washout to clean any tools
- You may dispose of FOAM in the drain (May clog, takes a day to decompress)
GENERAL LAB AREA CLEANUP
- Wipe down tables
- Sweep the room
- Deposit any debris or dust into the trash bins
HARDENED CONCRETE DISPOSAL
- Facility will be able to dispose the concrete from the trash bin
PAST COMPRESSION TESTING RESULTS
Compression testing was done on a control mix (standard concrete mix) and 5 Aircrete mixes at each curing stage of the cylinder, namely after 48 hours, 1 week, 2 weeks, 3 weeks, and 4 weeks from when the cylinders were made. Each mix type and curing time were done in replicas of 5. After the cylinder had time to cure for that corresponding time, the molds were removed from the cylinder and its compressive strength (pounds per square inch) was tested using a compression testing machine.

Raw data is available here for concrete and Aircrete. The Quikrete mix (standard concrete) is rated at 4000 psi when it has cured for a period of 28 days. Looking at the results, the average psi strength from all 5 cylinders increased from 1800 psi at 48 hours to 4000 psi at 28 days. The data for this are summarized here. From the current state of knowledge that we have, we know that the cement/concrete strength increases over a period of 28 days. The results from these cylinders show exactly that. As a result, the concrete cylinders were a success as it reached the targeted rating.
The results for Aircrete are less clear because substantial collapse occurred with the light and standard Aircrete cylinders. Of the 25 light Aircrete cylinders, 18 experienced collapse, which represents 72% of the total cylinder. Fewer standard Aircrete cylinders experienced collapse, but nonetheless, more than expected. Out of 25 standard cylinders, 12 experienced collapse, which represents 48% of the total cylinder.
This is not considered acceptable. Since this was an issue, there were Aircrete cylinders that were not usable because they were too small to fit into the compression machine. It needs to be a full cylinder in order to have an accurate data reading.
Additionally, the Aircrete cylinders had greater variability in their weight than concrete cylinders, as shown in the plot below:

In terms of cylinder weight across the different mix ratios, the percent deviation (the difference between the approximate value and the exact value of a data) was about 1% for concrete and 25% for the light Aircrete, followed by a gradual decrease with Aircrete containing more cement.
A higher percent deviation in cylinder weight means that the weights of all cylinders in one mix (40% foam, for example) were greatly varied, possibly pointing to inadequate mixing or a fault in high-foam batches. A low percent deviation shows that in one mix, the cylinder weights were consistent in relation to each other.

To assess the compressive strength, the cylinders that collapsed or shrank were taken out of the final assessment. Aircrete was much weaker than concrete, but generally exhibited an increase in compressive strength over longer cure times and with increased amounts of cement:


The heaviest Aircrete was the strongest, but still much lower than standard concrete (600 psi versus 4100 psi, respectively). Another noteworthy observation was that the light and standard mixes were not fully drying in the cylinders when it was time for the compression test, even after 28 days. When it was time to remove them from the cylinders, water would rush out and because of that, the cylinders were still moist. When it got put into the compression test, the machine continued to apply pressure because it could not read that the cylinder had already reached its peak and because of this, the data was inaccurate. The cylinder just got squashed together and became compacted as it went through the testing.
DISCUSSION
At the start of the project, it was thought that the instructions available online for making Aircrete were robust. With this not being the case, a slough of pre-experiments were completed and in the end were not able to recreate online successes, because they were not able to make Aircrete that consistently retained its volume. This effort, which lasted just under a year, ended up having a lot of unknowns that were discovered during the journey and the search for Aircrete that maintains its volume continued in the testing above.
The standard and light Aircrete mixes proved to be delicate mixes that were not easily reproducible. The Aircrete mixes with 60% or less foam (i.e., more cement) did not experience collapse, but did experience variable weights indicating the difficulty in achieving adequate mixing. Also the presence of moisture in the Aircrete cylinders indicates that allowing a longer cure time or curing outside of the molds may result in increased compressive strengths specifically for the cylinders with high foam content.
Ultimately, the source for all of the above problems, as discussed in the Past Testing Summary section above, turned out to be inconsistencies in equipment and material use during Aircrete production.
Mixing Device Differences: Three different mixer styles were tested, with the auger drill attachment being the most consistent. The egg beater drill attachment mixed faster but often led to overmixing, while the cement mixer caused material loss and incomplete integration.
Water Hardness: Varying water hardness was thought to affect foam stability, but a trial using deionized water showed no noticeable improvement, leaving the impact of water quality unclear.
Mixing Container Differences: Smaller containers tended to destabilize the foam due to overmixing and vibration. Larger containers and denser Aircrete mixes were suggested for better foam stability.
Foaming Agent Differences: Among several foaming agents tested, Drexel outperformed others like 7th Generation Dish Soap in retaining foam volume and efficiency. Drexel’s superior performance was highlighted, though sustainability and cost analyses suggested practical trade-offs.
Foam Generator Differences: Two foam generators were compared, with Aircrete Harry’s model offering better control and ease of use, despite some pressure adjustment challenges. The Little Dragon, once a common choice, is no longer sold, leaving equipment selection a critical factor in success.
Each issue stemmed from the equipment, materials, or methods used in different trials, pointing to the need for standardization and refinement in the Aircrete process.
FUTURE PLANS FOR AIRCRETE AND OTHER SUSTAINABLE BUILDING MATERIALS
Based on the lessons learned and the sustainability potential of aircrete, additional experiments are recommended. Continued exploration is warranted and recommended next steps for Aircrete include:
- New mixer and Soft water
- Curing time duration
- Stucco Application
- Perfecting Lightest Mixture
- Stabilized Earth
- New compression with new test parameters
- R value
- Aircrete Harry’s hardening agent
- See if the current methods work with shorter cure times. Traditional concrete becomes hard enough to walk on after 48 hours, yet we stuck with a 2 week minimum test time towards the end.
- Larger mixing batches
A new mixer and using soft water instead of hard water. The new mixer could consist of a double bit to provide a more thorough mix and would save time. This would have resulted in the cement more evenly distributed thus resulting in a homogenous mixture. Another aspect is using soft water because the water used was hard water. Hard water makes the micro-bubbles collapse, thus quickly causing the Aircrete to collapse and loss of stability.
Also test-worthy are longer curing time for all the mixes and possibly removing the mold once the cylinders can self-hold itself and finishing the curing of the cylinder out of the mold. A good test with this could include outdoor curing which could cure the cylinder faster.
For added compressive strength, stucco application is recommended. The two methods for stucco application worth testing are Domegaia and Aircrete Harry’s(1, 2) method for application. Once the fundamental issue with the standard Aircrete shrinkage is resolved, attention is needed to establish the lightest possible Aircrete mix. This is particularly beneficial for using Aircrete as an insulative material.
Another environmentally friendly building material is Stabilized Earth. Stabilized Earth was dropped from the original project like other components of the test because of time constraints. More detailed research of Stabilized Earth and determination of its compressive strength is needed, as there is a knowledge gap and insufficient data for this building material.
A repeat of the final testing discussed in this report is warranted once the above mentioned concerns are ironed out. This includes the original Aircrete, Stabilized Earth, stucco, and concrete which would have been close to 300 test cylinders plus trial and error cylinders.
Given the findings from this 1-year long experimental phase, Aircrete still has potential and some variables should be investigated further, as outlined above, before solidifying the recommendations on how applicable Aircrete is structurally or for use as insulation.
RESOURCES
Here are the resources we’ve found useful and used for everything on this page. Use this page (click here) if you have a resource you’d like to suggest be added here.
AIRCRETE VIDEO RESOURCES
Aircrete Harry: Aircrete Collapsing Time Lapse: “Aircrete Collapsing Time Lapse.” YouTube, Aircrete Harry, 2 Sept. 2018.
Aircrete Harry: Aircrete Column Foam Agent Test Part 1 of 2: “AirCrete Column Foam Agent Test Part 1 of 2.” YouTube, Aircrete Harry, 27 Aug. 2017.
Aircrete Harry: Aircrete Final Test Results AFter 4 weeks of Curing
“Aircrete Final Test Results After 4 Weeks of Curing.” YouTube, Aircrete Harry , 4 Sept. 2018.
Aircrete Harry: Aircrete Foam Generator
“Aircrete Foam Generator.” YouTube, Aircrete Harry, 14 Sept. 2018.
Aircrete Harry: New Dome Building System
“Aircrete Harry NEW Dome Building System.” YouTube, Aircrete Harry, 2 Dec. 2020.
Aircrete Harry: Aircrete Tools
“Aircrete Tools.” YouTube, Aircrete Harry, 31 Aug. 2018.
Aircrete Harry: Best Aircrete Foaming Agents for your Money
“Best Aircrete Foaming Agents for Your Money.” YouTube, Aircrete Harry, 29 July 2018.
Domegaia: Domegaia’s Little Dragon Foam Generator Kit
“Domegaia’s Little Dragon Foam Generator Kit.” YouTube, Domegaia, 21 Sept. 2018.
Domegaia: Domegaia’s Low Cost Aircrete Housing
“Domegaia’s Low Cost Aircrete Housing.” YouTube, La Maison Du 21e Siècle André Fauteux , 4 Jan. 2022.
Domegaia: Domegaia Aircrete Mixing Part 3: Foam Generation
F, David, director. Domegaia Aircrete Mixing Part 3: Foam Generation 4K. YouTube, Domegaia, 12 Sept. 2020.
Aircrete Harry: How to Make Aircrete in a Mortar Mixer
“How To Make Aircrete In a Mortar Mixer.” YouTube, Aircrete Harry, 23 July 2021.
Aircrete Harry: How to Make Aircrete Part 1
“How To Make Aircrete Part 1.” YouTube, Aircrete Harry, 1 Sept. 2018.
Aircrete Harry: How to Make Aircrete Part 2
“How To Make Aircrete Part 2.0.” YouTube, Aircrete Harry, 2 Sept. 2018.
Aircrete Harry: How to Make Aircrete Part 3
“How To Make Aircrete Part 3.” YouTube, Aircrete Harry, 2 Sept. 2018.
Aircrete Harry: How to Make Aircrete Part 4
“How To Make Aircrete Part 4.” YouTube, Aircrete Harry, 2 Sept. 2018.
My Tiny Wagon: How to Make Aircrete Using the Dragon XL
“How to Make Aircrete Using the Dragon XL.” YouTube, My Tiny Wagon, 4 Aug. 2019.
Domegaia: How to Make Aircrete with Domegaia’s Little Dragon and Foam Injection Mixer
“How to Make Aircrete with Domegaia’s Little Dragon and Foam Injection Mixer.” YouTube, Domegaia, 22 Sept. 2018.
Aircrete Harry: How to Operate the Aircrete Harry Foam Generator
“How To Operate The Aircrete Harry Foam Generator.” YouTube, Aircrete Harry, 30 Aug. 2019.
Domegaia: How to Use Domegaia’s Aircrete Foam Injector Mixer
“How to Use Domegaia’s Aircrete Foam Injector Mixer.” YouTube, Domegaia, 22 Sept. 2018.
Open Source Aircrete Production Equipment – Estimated cost is $4000
We haven’t tested this, but it is open source and looks promising
AIRCRETE ARTICLE RESOURCES
Domegaia Home
“Domegaia Home.” Domegaia
Domegaia
Domegaia
Need Assistance with Air-Crete Making
HandyDan. “Need Assistance with Air-Crete Making.” Domegaia, 30 Mar. 2018.
How to Make Aircrete
“HOW TO MAKE AIRCRETE.” DIY Aircrete.
Aircrete Is Collapsing
Leroy. “Aircrete Is Collapsing.” Edited by Hajjargibran, Domegaia, 24 Aug. 2018.
Making Foam Concrete
“Making Foam Concrete.” FoamConcreteWorld.com, Foamconcreteworld, 5 Feb. 2022.
Aircrete Guide: Everything You Need to Know
Roberts, Tobias. “Aircrete Guide: Everything You Need to Know.” Rise, 18 Jan. 2020.
LIST OF DIY VIDEOS
Concrete Tutorial
Foam Tutorial
Aircrete Tutorial
Cylinder Mold Removal
Compression Testing Tutorial
SUMMARY
Aircrete has the potential to be an economical, lightweight, and easily accessible building material. Open sourcing this Aircrete research is important so that these processes can be replicated and so other engineers or builders can improve upon our work, creating a stronger base of Aircrete knowledge for everyone. Summarized in this page are the steps taken to answer unanswered questions, such as is Aircrete truly DIY, how strong is it, and how quickly can it be used for building to ensure that structures using Aircrete are safe. We will continue to build upon our findings.
FREQUENTLY ANSWERED QUESTIONS
Q: What is Aircrete?
Aircrete is a mixture of foam from a foaming agent such as Seventh Generation Dish Liquid or Drexel that is mixed with cement slurry until homogeneous.
Q: How did you know the consistency during testing?
The consistency was based on time and color consistency of the mix. This was a limiting point because a test or parameter to accurately test even consistency of the mix was not used to tell if one part of the mix is heavier than another.
Q: How was the ratio of Aircrete determined?
Aircrete ratio was determined in a few ways. One was to use the Domegaia ratio and scale it down. The other way was Aircrete Harry’s proportion which was already scaled down; however, to convert it to a cylinder amount, the ratio was scaled down more. The last way which was used during the experiment was by volume.
Q: What problems were recurring throughout the project that needed to be improved or thoroughly checked?
Some of the constant difficulties we ran into was one of the little dragon pressures not being constant for a longer period of time. An example is one time the density was 95 gram per liter and 10 minutes later the density fell by 10 and then a minute later it was less. This may have been a machine malfunction that we did not find until the later part of the project.
Another difficulty was the shrinkage during mixing and curing phase because of the inaccurate consistency of mixes. These happened only during light and standard because mixes with high foam ratios are more delicate/less stable, thus more susceptible to collapse, resulting in a lower final volume of Aircrete than targeted.
Q: Why use Aircrete?
Aircrete is another building resource that is more affordable, lighter (makes it easy to transport and use), and less toxic than concrete because there is less cement in the mix.
Q: Why not use other types of building material?
There are other options such as stabilized earth, recycled materials, and shipping containers. These are all options that One Community has envisioned in their question for a better world. Beside Stabilized Earth which One Community has researched, Aircrete was the other concrete-like building resource that needed to be tested.,
Q: What is compressive strength, and why is it important?
A: Compressive strength measures how much pressure a material can withstand before breaking. It is a critical factor in determining the structural integrity and suitability of materials like aircrete, concrete, and stabilized earth for construction applications.
Q: What were the primary challenges encountered during the initial Aircrete trials?
A: The first three trials revealed significant inconsistency with the Aircrete collapsing during the curing process. Despite using the same materials, mixing methods, and timing, the Aircrete failed each time, suggesting issues with materials, mixing method, conditions, or tools.
Q: Did the water quality affect the aircrete performance?
A: Yes, Trial 8 focused on water quality, using distilled water for the cement slurry to address the potential impact of hard water on the foam. Hard water, which contains high levels of calcium and magnesium, produces fewer suds and can affect foam integrity. Despite using distilled water, the Aircrete still collapsed, likely because the foam solution was still made with hard tap water.

Q: What was discovered about the tap water used in the earlier trials?
A: A hardness test of the tap water revealed that the water in the lab was very hard, measuring 13 grains of calcium carbonate per gallon (223 mg/L). Hard water can significantly impact foam formation and stability, which likely contributed to the consistent Aircrete collapse in all trials.

Q: Why did trial 9 work?
A: Trial 9 was successful because the Aircrete was mixed directly in the compression testing cylinder, allowing the mixer bit to be fully submerged in the cement slurry. In previous trials, larger 5-gallon buckets were used, which prevented full immersion of the mixer bit, leading to improper mixing and Aircrete collapse.

Q: How did adjusting the foam and slurry ratio affect Aircrete in later trials?
A: Two different Aircrete recipes were tested in Trials 14 and 15:
Trial 14 used a lighter mix with 90% foam and 10% slurry, but it resulted in failure as the Aircrete collapsed.
Trial 15 used a heavier mix with 60% slurry and 40% foam, and this trial was successful, with no collapse. This suggests that a higher cement slurry content contributes to greater structural stability.
Q: Why was the reason for Trial 13’s failure while it replicated a successful Trial 9?
A: Trial 13 aimed to replicate the success of Trial 9 by making a larger batch of Aircrete (enough for three cylinders) in a 5-gallon bucket, ensuring the mixer was fully submerged. However, the aircrete collapsed during curing, indicating that the larger quantity or additional variables made the process less consistent.
Q: What was the outcome of testing different foaming agents?
A: Trial 16 tested several off-the-shelf foaming agents, and Suave outperformed others in terms of foam longevity. In a comparison of Drexel and Seventh Generation Dish Soap, Drexel produced superior foam, maintaining its volume longer. Drexel foam started to lose volume after 100 minutes, whereas Seventh Generation foam began collapsing at 40 minutes.


Q: Did increasing the concentration of the foaming agent improve Aircrete performance?
A: Yes, in Trial 21, increasing the Drexel concentration from 4 oz to 6 oz in the foam solution led to the production of a longer-lasting, better-quality foam. As a result, the Aircrete did not collapse, indicating that a more concentrated foam solution can enhance Aircrete stability.
Q: How did the foam generators perform?
A: Domegaia Little Dragon and Aircrete Harry foam generators, both machines performed similarly, but the Aircrete Harry generator maintained foam volume slightly better, showing 1 cm less collapse after the 75-minute mark. This indicated that the Aircrete Harry generator produced more stable foam over time.
Q: What was determined to be the maximum foam limit?
A:Trial 26 identified the upper foam limit for Aircrete by testing various foam-to-slurry ratios. The highest successful foam content was 85% foam to 15% cement slurry by volume. Higher foam percentages, such as 95% foam, resulted in shrinkage during curing. This 85% foam limit was 7% higher than the standard mix used in earlier trials.
Q: What were the six cementitious recipes tested, and how did they differ?
A: The experiment included one control mix (a standard concrete mix) and five Aircrete mixes. Each mix varied by the proportion of cement and foam. The Aircrete mixes typically included different foam-to-cement ratios, while the control used a traditional concrete mixture. These recipes were designed to test how varying the foam content affected the compressive strength of the materials.
Q: How did curing time impact the compressive strength of aircrete and concrete?
A: The curing times tested were 48 hours, 1 week, 2 weeks, 3 weeks, and 4 weeks. The compressive strength of both Aircrete and concrete was measured after these intervals. As expected, compressive strength generally increased over time, with the strongest results typically seen after 4 weeks of curing. However, Aircrete tended to have lower compressive strength than the standard concrete mix at all stages of curing.

Q: What materials were used for producing aircrete in this experiment?
A: The key materials for Aircrete production included an Aircrete Harry Foam Generator, air compressor, cordless or corded drill for mixing, Portland Cement, and water. A steel spiral mixer was used for thorough mixing in a 5-gallon bucket, while foam was generated by combining detergent and air using the foam generator. Cylinder molds were used to shape and cure the Aircrete for testing.
Q: What role did foam quality and generation play in the strength of aircrete?
A: Foam quality was critical in determining Aircrete’s structural integrity. The foam was generated using the Aircrete Harry Foam Generator in combination with an air compressor and detergent. If the foam was not properly generated or started collapsing too quickly, it negatively impacted the aircrete’s compressive strength. Stability and longevity of the foam were essential for maintaining the desired Aircrete structure.
Q: What safety precautions were taken during the aircrete and concrete production process?
A: Safety measures included wearing gloves, safety goggles, and N95 masks to protect against cement dust, detergent splashes, and foam debris. Shop towels were used for cleaning tools and surfaces, and the use of proper mixing and measuring equipment helped ensure accuracy while preventing potential hazards during material handling.
Q: What type of concrete mix was used for the compression testing?
A: The experiment used Quikrete 4000 PSI concrete mix (No. 1011). This type of concrete is commonly used for foundations, footings, sheds, and workshops due to its strength and durability. It was chosen for this test due to its widespread availability, cost efficiency, and suitability for similar projects like dome structures.
Q: How much water is required to mix Quikrete 4000 PSI concrete?
A: For every 90-pound bag of Quikrete Mix, approximately 7 to 10 pints of water (about 7.3-10.43 pounds) is required. To produce 1.5 gallons of concrete (enough to fill a standard compression cylinder mold), you would need around 10 pounds of mix and 0.8-1.1 pounds of water.
Q: What is the purpose of the slump test in concrete mixing?
A: The slump test ensures that the concrete has the right consistency (not too wet or too dry) for optimal strength and durability. The recommended slump for Quikrete 4000 PSI concrete is 2-3 inches. A proper slump ensures that the concrete is workable, strong, and less likely to shrink or crack during curing.
Q: How do I adjust the concrete mix if the slump is outside the recommended range?
A: If the slump is too low (zero slump): Add small amounts of water and remix until the slump reaches the recommended range.
If the slump is too high (collapsed slump): Add more dry concrete mix in small portions and remix to thicken the mixture until the desired consistency is achieved.

A: The key equipment for making Aircrete includes:
- Aircrete Harry Foam Generator
- Air compressor (90 PSI)
- Corded or cordless power drill
- Mixing auger (steel spiral mixer)
- Portland Cement
- Seventh Generation Dish Soap (for foam)
- Water
- Cylinder molds were used to shape and cure the Aircrete for compression testing.
Q: What are the steps for mixing Quikrete 4000 PSI concrete?
A: The steps involve:
- Weigh materials: Determine the required amount of concrete mix and water.
- Prepare the mixer: Ensure the mixer or mixing tray is clean.
- Add water first: Start by pouring half of the required water into the mixer.
- Add the dry mix gradually: Mix the dry concrete in stages, alternating with water.
- Check the consistency: Perform a slump test to ensure proper hydration.
- Adjust if needed: Modify the mix by adding water or dry mix to reach the correct slump.
- Apply concrete: Once the mix is ready, use it immediately or keep it rotating to prevent hardening.
- Fill compression cylinders: Add the concrete in layers to the mold, tamping it down with a rod.
Q: What conclusions can be drawn from the results of these trials regarding Aircrete mixing?
A: The initial trials demonstrated that Aircrete is highly sensitive to changes in mixing methods, water quality, and other factors. The inability to replicate consistent results highlights the challenges of working with Aircrete and suggests that further adjustments to materials and methods are necessary to achieve successful outcomes. The subsequent trials demonstrated that Aircrete’s stability is highly sensitive to the mix ratio of foam and cement slurry. Heavier Aircrete recipes (higher cement content) were more successful in avoiding collapse, while lighter mixes (higher foam content) were prone to failure. Additionally, the ability to fully submerge the mixer in the slurry appears to be crucial for proper mixing and stability.